
Table of contents: The engine has been removed from the… ↓ Engine on a car ↓
Cylinder head, camshaft and valves
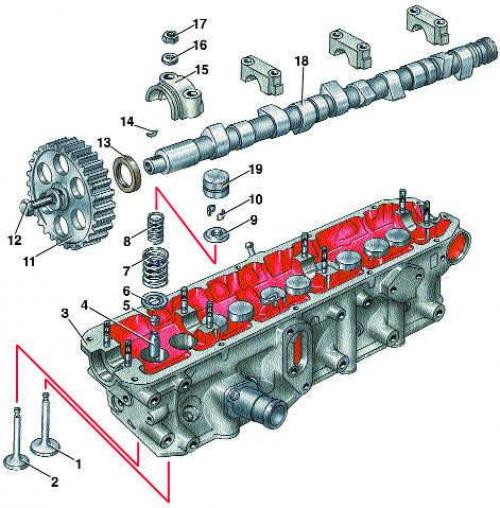
- 1 - inlet valve;
- 2 - exhaust valve;
- 3 - cylinder head;
- 4 - guide bushing;
- 5 - oil seal;
- 6 - valve spring support washer;
- 7 - outer valve spring;
- 8 - internal valve spring;
- 9 - valve spring plate;
- 10 - cracker;
- 11 - camshaft gear wheel;
- 12 - gear wheel mounting bolt;
- 13 - oil seal;
- 14 - key;
- 15 - bearing cap;
- 16 - washer;
- 17 - bearing cap fastening nut;
- 18 - camshaft;
- 19 - hydraulic valve lifter
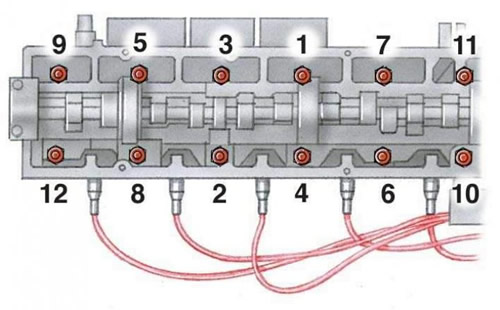
Cylinder head bolt tightening sequence
The engine has been removed from the car
1. Loosen the nuts and remove the upper cover 2 of the camshaft drive (see Fig. Five-cylinder engine).
2. Unscrew the twelve fastening nuts and remove the cylinder head cover 11, but do not remove the gasket.
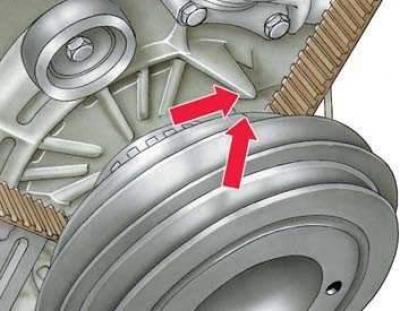
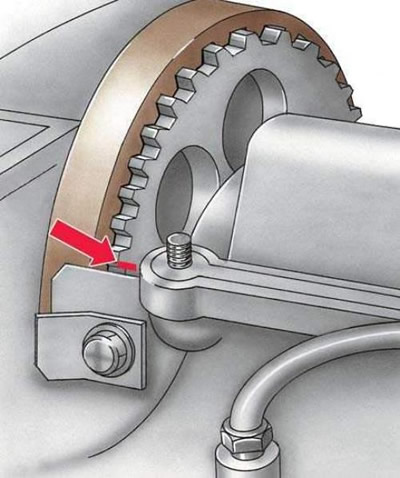
3. Set the piston of the 1st cylinder to TDC of the compression stroke (both valves are closed). The mark on the crankshaft pulley must coincide with the protrusion on the oil pump housing, as shown in the figure (or with the mark on cover 3 - see Fig. Five-cylinder engine).
4. The mark on the camshaft gear must be aligned with the upper plane of the cylinder head cover gasket. The distributor rotor must be directed towards the contact of the 1st cylinder.
5. Loosen the water pump mounting bolts 22 (see Fig. Five-cylinder engine), turn the pump towards the cylinder block to loosen the tension of belt 1.
6. Remove belt 1 from gear wheel 5 of the camshaft
7. Loosen the bolt securing the gear wheel 5 and remove the wheel from the camshaft. Remove the key 7.
8. Unscrew and remove the rack securing cover 2 to block head 6.
9. Unscrew the bolt securing the rear cover 4 to the cylinder head.
10. Loosen the cylinder head mounting bolts, first loosening them evenly in the reverse order to that shown in the figure Cylinder head bolt tightening sequence.
11. Press cover 4 to remove the camshaft from underneath it. Remove the cylinder head.
12. Remove cylinder head gasket 18 (see Fig. Five-cylinder engine)
13. Install the cylinder head in the reverse order. At the same time, replace the cylinder head gasket 18. Place the new gasket on the cylinder block with the inscription "TOP" facing up, without using sealant. Tighten the cylinder head mounting bolts in the sequence shown in the figure Cylinder head bolt tightening sequence, in three stages: 1st stage – 40 N·m (4.0 kgf·m); Stage 2 – 60 N·m (6.0 kgf·m); Step 3 – tighten further by half a turn (180°). Tighten the bolt securing gear 5 to the camshaft to a torque of 80 N·m (8.0 kgf·m). Adjust the tension of the camshaft drive belt (see subsection 3.2.2.2).
If necessary, for example to replace and grind valves, clean combustion chambers from carbon deposits, etc., the cylinder head can be removed without removing the engine from the vehicle.
Engine on a car
1. Disconnect the wire from the negative terminal of the battery.
2. Drain the fluid from the engine cooling system (see pp. 1–3 of subsection 4.1).
3. Remove the radiator grille and the upper radiator cover of the cooling system (see item 7 of subsection 4.6, pp. 1–2 of subsection 11.2).
4. Remove the air filter (see paragraphs 1–6 of subsection 6.1.2).
5. Remove the alternator belt (see paragraphs 2–5 of subsection 12.1.3.1).
6. On vehicles equipped with air conditioning, without disconnecting the hoses, remove the compressor and secure it to the side of the body with wire.
7. On vehicles with power steering, without disconnecting the hoses, remove the power steering pump and secure it to the side of the body with wire.
8. Disconnect the upper radiator hose.
9. Label all fuel and vacuum hoses and disconnect them from the cylinder head.
10. Remove the distributor cap with high tension wires and wire holder.
11. On models with fuel injection, loosen the clamp and disconnect the air duct 12 (see Fig. Main elements of the fuel injection system) from the throttle body. Disconnect the wires from the throttle position sensor.
12. Disconnect the accelerator cable and, if applicable, the cruise control mechanism.
13. Disconnect the ground wire from the cylinder head.
14. Disconnect the exhaust pipe.
15. Further, the procedure for removing the cylinder head is the same as on the engine removed from the car (see pp. 1–12 of subsection 3.2.2).
16. Install the cylinder head in reverse order (cm. item 13 of subsection 3.2.2).