



Car body repair Audi 100 C3, petrol

Body repair without removing chassis components and assemblies
Paint code The paint code is located on the inside surface of the trunk lid on the right side. Brand and color of paint Code Single-color enamels ALN 769...
Paint code The paint code is located on the inside surface of the trunk lid on the right side. Brand and color of paint Code Single-color enamels ALN 769...
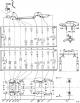
Checking the geometric characteristics of the body on the repair and verification stand
The geometric dimensions of the car body, as well as the points between which measurements should be taken, are indicated on the design drawings. Special sets...
The geometric dimensions of the car body, as well as the points between which measurements should be taken, are indicated on the design drawings. Special sets...
Repair and replacement of welded elements of the body frame
Warning: Before proceeding with the removal of structural body parts that cannot be straightened, it is necessary to straighten the deformed section of the...
Warning: Before proceeding with the removal of structural body parts that cannot be straightened, it is necessary to straighten the deformed section of the...

Reference dimensions for checking the body frame
Reference dimensions for checking the front of the body power frame. Tolerance 2 mm Reference dimensions for checking the sides and internal dimensions of the...
Reference dimensions for checking the front of the body power frame. Tolerance 2 mm Reference dimensions for checking the sides and internal dimensions of the...

Front body parts
Front body parts: 1 - front wheel mudguard with stand assembly right 448 809 102 (left 444 809 105); 2, 20 - upper mudguard reinforcement right 443 805 304...
Front body parts: 1 - front wheel mudguard with stand assembly right 448 809 102 (left 444 809 105); 2, 20 - upper mudguard reinforcement right 443 805 304...

Replacing the front pillar of the body side
Replacing the front pillar of the body side panel in assembly with the door hinge (electric welding in a protective environment) Shine the wing and the door on...
Replacing the front pillar of the body side panel in assembly with the door hinge (electric welding in a protective environment) Shine the wing and the door on...

Replacement of the middle pillar of the body side
Remove the doors on the corresponding side. Drill out the contact welding spots where the pillar panel joins the body floor. Make a cut at the top of the...
Remove the doors on the corresponding side. Drill out the contact welding spots where the pillar panel joins the body floor. Make a cut at the top of the...

Body side parts
Sidewall details: 1 - front left pillar 443 809 241 A (right 443 809 242 A); 2 - upper reinforcement of the left wheel mudguard 443 809 097 (right wheel 443...
Sidewall details: 1 - front left pillar 443 809 241 A (right 443 809 242 A); 2 - upper reinforcement of the left wheel mudguard 443 809 097 (right wheel 443...

Replacing the roof panel of the car body
Chisel off the roof panel as close to the gutter as possible. Strip the top ends of the middle pillars, saw off the ends of the front and rear pillars. Drill...
Chisel off the roof panel as close to the gutter as possible. Strip the top ends of the middle pillars, saw off the ends of the front and rear pillars. Drill...

Body floor parts
Body floor details: 1 - front cross member; 2 - right half of the floor 443 804 074 (left half of the floor 443 804 0737); 3 - footrest 444 803 212 B; 4 -...
Body floor details: 1 - front cross member; 2 - right half of the floor 443 804 074 (left half of the floor 443 804 0737); 3 - footrest 444 803 212 B; 4 -...

Partial replacement of door thresholds
Saw out the deformed part and cut off the areas inaccessible to the saw with a chisel. Straighten around the perimeter and prime the bare metal with a...
Saw out the deformed part and cut off the areas inaccessible to the saw with a chisel. Straighten around the perimeter and prime the bare metal with a...

Replacing the rear fender panel
Drill out the contact welding races. Clean the mating surfaces with a grinder. Apply zinc-containing primer to the surfaces to be contact welded. Adjust the...
Drill out the contact welding races. Clean the mating surfaces with a grinder. Apply zinc-containing primer to the surfaces to be contact welded. Adjust the...

Car roof parts
Roof details: 1 - roof panel 445 817 111; 2, 9 - front roof crossbar 443 817 995; 3 - rear roof cross member 445 817 891; 4 - rear left side member 445 817 385...
Roof details: 1 - roof panel 445 817 111; 2, 9 - front roof crossbar 443 817 995; 3 - rear roof cross member 445 817 891; 4 - rear left side member 445 817 385...

Replacing the rear inner wheel housing
Note: The spare parts include a two-piece rear wheel over-wheel housing. The inner half-housing is welded directly to the body floor power frame, and the outer...
Note: The spare parts include a two-piece rear wheel over-wheel housing. The inner half-housing is welded directly to the body floor power frame, and the outer...

Replacing the rear wheel housing
Note: The rear wheel panel trim and wheel housing components are supplied as separate parts. Remove the rear wing panel. Chisel off the part of the half-casing...
Note: The rear wheel panel trim and wheel housing components are supplied as separate parts. Remove the rear wing panel. Chisel off the part of the half-casing...

Replacement of the rear panel of the luggage compartment
Note: The rear luggage compartment panel is supplied as spare parts in three pieces. Drill the contact welding spots where it connects to the rear floor cross...
Note: The rear luggage compartment panel is supplied as spare parts in three pieces. Drill the contact welding spots where it connects to the rear floor cross...

Replacement of the luggage compartment floor
Note: The luggage compartment floor is supplied as spare parts in three elements (the spare wheel box is made of plastic and its installation requires the use...
Note: The luggage compartment floor is supplied as spare parts in three elements (the spare wheel box is made of plastic and its installation requires the use...

Replacing a part of the rear floor member
Note. Before replacing the rear body rear side member section, it is necessary to check the rear axle geometric characteristics and the rear diagonal length at...
Note. Before replacing the rear body rear side member section, it is necessary to check the rear axle geometric characteristics and the rear diagonal length at...

Luggage compartment floor details
Luggage compartment floor details: 1 - intermediate cross member 443 804 084; 2, 7 - cross member 445 803 069 A; 3 - spare wheel box 443 803 265; 4 - right...
Luggage compartment floor details: 1 - intermediate cross member 443 804 084; 2, 7 - cross member 445 803 069 A; 3 - spare wheel box 443 803 265; 4 - right...

Interior luggage compartment panel details
Interior luggage compartment panel details: 1, 2, 3, 4 - rear skirt parts 443 813 304; 5 - partition 443 813 111 on station wagons; 6, 7, 8 - rear skirt parts...
Interior luggage compartment panel details: 1, 2, 3, 4 - rear skirt parts 443 813 304; 5 - partition 443 813 111 on station wagons; 6, 7, 8 - rear skirt parts...

Front wing details
Front wing details: 1 - Air filter air intake 443 821 127; 2 - mud deflector left 443 821 171 (right 443 821 172); 3 - mounting strip 443 809 523; 4 - front...
Front wing details: 1 - Air filter air intake 443 821 127; 2 - mud deflector left 443 821 171 (right 443 821 172); 3 - mounting strip 443 809 523; 4 - front...

Paint and varnish care
Warning: When drying paintwork in a drying chamber or by local thermal heating, it is necessary to protect it from high temperatures or remove plastic parts...
Warning: When drying paintwork in a drying chamber or by local thermal heating, it is necessary to protect it from high temperatures or remove plastic parts...

Reference dimensions for checking body control points
Reference dimensions for checking the body control points of the AUDI 100 1983-1987 model years Reference dimensions for checking the body control points of...
Reference dimensions for checking the body control points of the AUDI 100 1983-1987 model years Reference dimensions for checking the body control points of...
This section is available on russian, bulgarian, belarusian, ukrainian, serbian, croatian, romanian, polish, slovak, hungarian
Similar sections of other Audi car models:
General information: Repair characteristics Audi 80 B3 (1986-1991)
Power unit: Engine overhaul Audi A4 B5 (1994-2001)
Engine repair: Removal and reassembly Audi A6 C4 (1994-1997)
General information: Repair characteristics Audi 80 B3 (1986-1991)
Power unit: Engine overhaul Audi A4 B5 (1994-2001)
Engine repair: Removal and reassembly Audi A6 C4 (1994-1997)
Share information:
- General information
- User manual
- Power unit
- Engine repair
- Ignition system
- Fuel system (gasoline)
- Fuel system (diesel)
- Lubrication system
- Cooling system
- Exhaust system
- Transmission
- Clutch
- Car gearbox
- Drive shafts
- Chassis
- Car suspension
- Steering
- Wheels and tires
- Brake system
- Body
- Ventilation and heating
- Body repair
- Electrical equipment
- Power devices
- Lighting and appliances
- Electrical circuits
- General information
- Operation and maintenance
- Power unit
- Engine repair
- Exhaust system
- Cooling system
- Supply system
- Air filter
- Mono-Motronic injection system
- Digifant injection system
- KE-III-Jetronic and KE-Motronic
- MPI and MPFI injection system
- Transmission
- Clutch
- Car gearbox
- Chassis
- Suspension and steering
- Brake system
- Wheels and tires
- Body
- Exterior
- Interior
- Electrical equipment
- Fuses and relays
- Power devices
- Ignition system
- Lighting and signaling
- Equipment and devices
- Electrical circuits
- General information
- User manual
- Maintenance
- Specifications
- Power unit
- Engines 4-cylinder
- Engines 5-cylinder
- Diesel engine
- Cooling system
- Power system (carburetor)
- Power system (injector)
- Fuel system (diesel)
- Transistor ignition system
- Electronic ignition system
- Transmission
- Clutch
- 4 speed gearbox 014
- 5 speed gearbox 013 and 093
- 5 speed gearbox 016 and 012
- Shift mechanism KP 016
- Automatic transmission
- Front wheel drive
- Chassis
- Front suspension
- Rear suspension
- Steering
- Brake system
- Body
- Body elements
- Electrical equipment
- Lighting and appliances
- Power devices
- Electrical circuits
- General information
- Maintenance and operation
- 4 cylinder engine
- Engine repair
- Cooling and lubrication system
- Supply system
- Ignition system
- 5 cylinder engine
- Engine repair
- Cooling and lubrication system
- Supply system
- Ignition system
- Transmission
- Clutch and drive shafts
- 4 speed gearbox 014
- 5 speed gearbox 013 and 093
- 5 speed gearbox 016 and 012
- Automatic gearbox
- Chassis
- Steering
- Front suspension
- Rear suspension
- Brake system
- Body
- Body elements
- Doors, locks and windows
- Body repair
- Electrical equipment
- Equipment and devices
- Power devices
- Electrical circuits
- General information
- User manual
- Maintenance
- Troubleshooting
- Power unit
- Engine in a car
- Engine removed
- Cooling system
- Fuel system
- Exhaust system
- Starting and charging
- Preheating
- Transmission
- Clutch
- Mechanical gearbox
- Automatic gearbox
- Drive shafts
- Chassis
- Brake system
- Suspension
- Steering
- Body
- Exterior
- Interior
- Electrical equipment
- Equipment and devices
- Electrical circuits