



Table of contents: Equipment from Facom-Celette ↓ Blackhawk "P 188 MK 2" and "P 201"… ↓ Caroliner Fenwick slipway "MK 3" ↓ "Dataliner" Nike Hydraulic ↓ Repcar "FP 80" Measuring Kit ↓
The geometric dimensions of the car body, as well as the points between which measurements should be taken, are indicated on the design drawings. Special sets of devices and documentation have been developed for various verification and verification-repair stands and rigs, simplifying the execution of work.
As a rule, replacement of welded structural elements is not carried out until the absence of deformation of the body floor is established.
Usually the most difficult to detect are minor deformations of the body, which occur as a result of medium-force impacts to the front or rear parts of the car. In this case, it is necessary to check the dimensions of the body floor on the frame. Below is a brief description of the repair and verification equipment of some Western companies.
Equipment from Facom-Celette
The installation (catalog No.313.508) of the French company Facom Ce-lette allows you to perform the necessary checks without removing the chassis units and assemblies and includes the following sets of devices:
- 41.42.V38 for checking the rear mounting points of the front subframe (centering devices);
- 43.44.V39 for checking the position of the rear suspension arms;
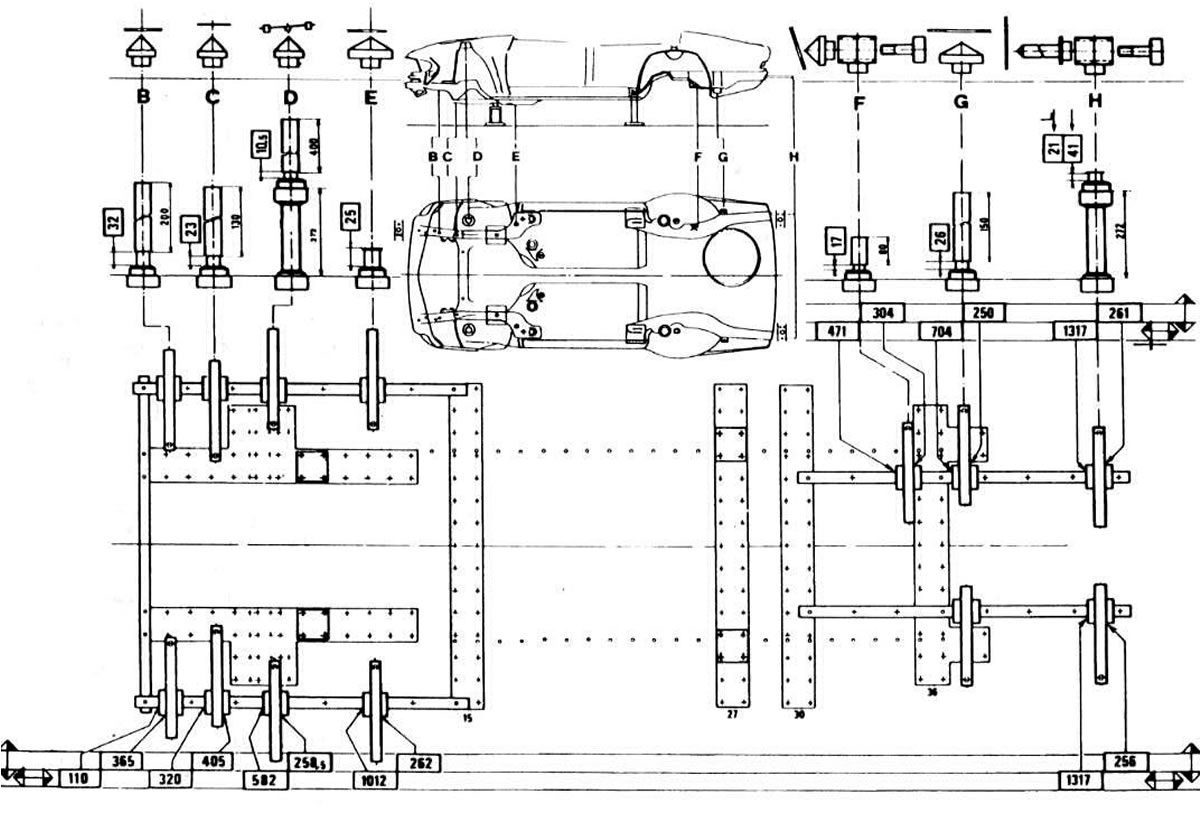
- "Celette integral", consisting of four attachment points (each car model has its own set), a set of rulers, sliders, feeler gauges and tips;
- "Celette WX 2000", consisting of a set of adjustable in three coordinates, which allows you to perform all measurements without making templates.
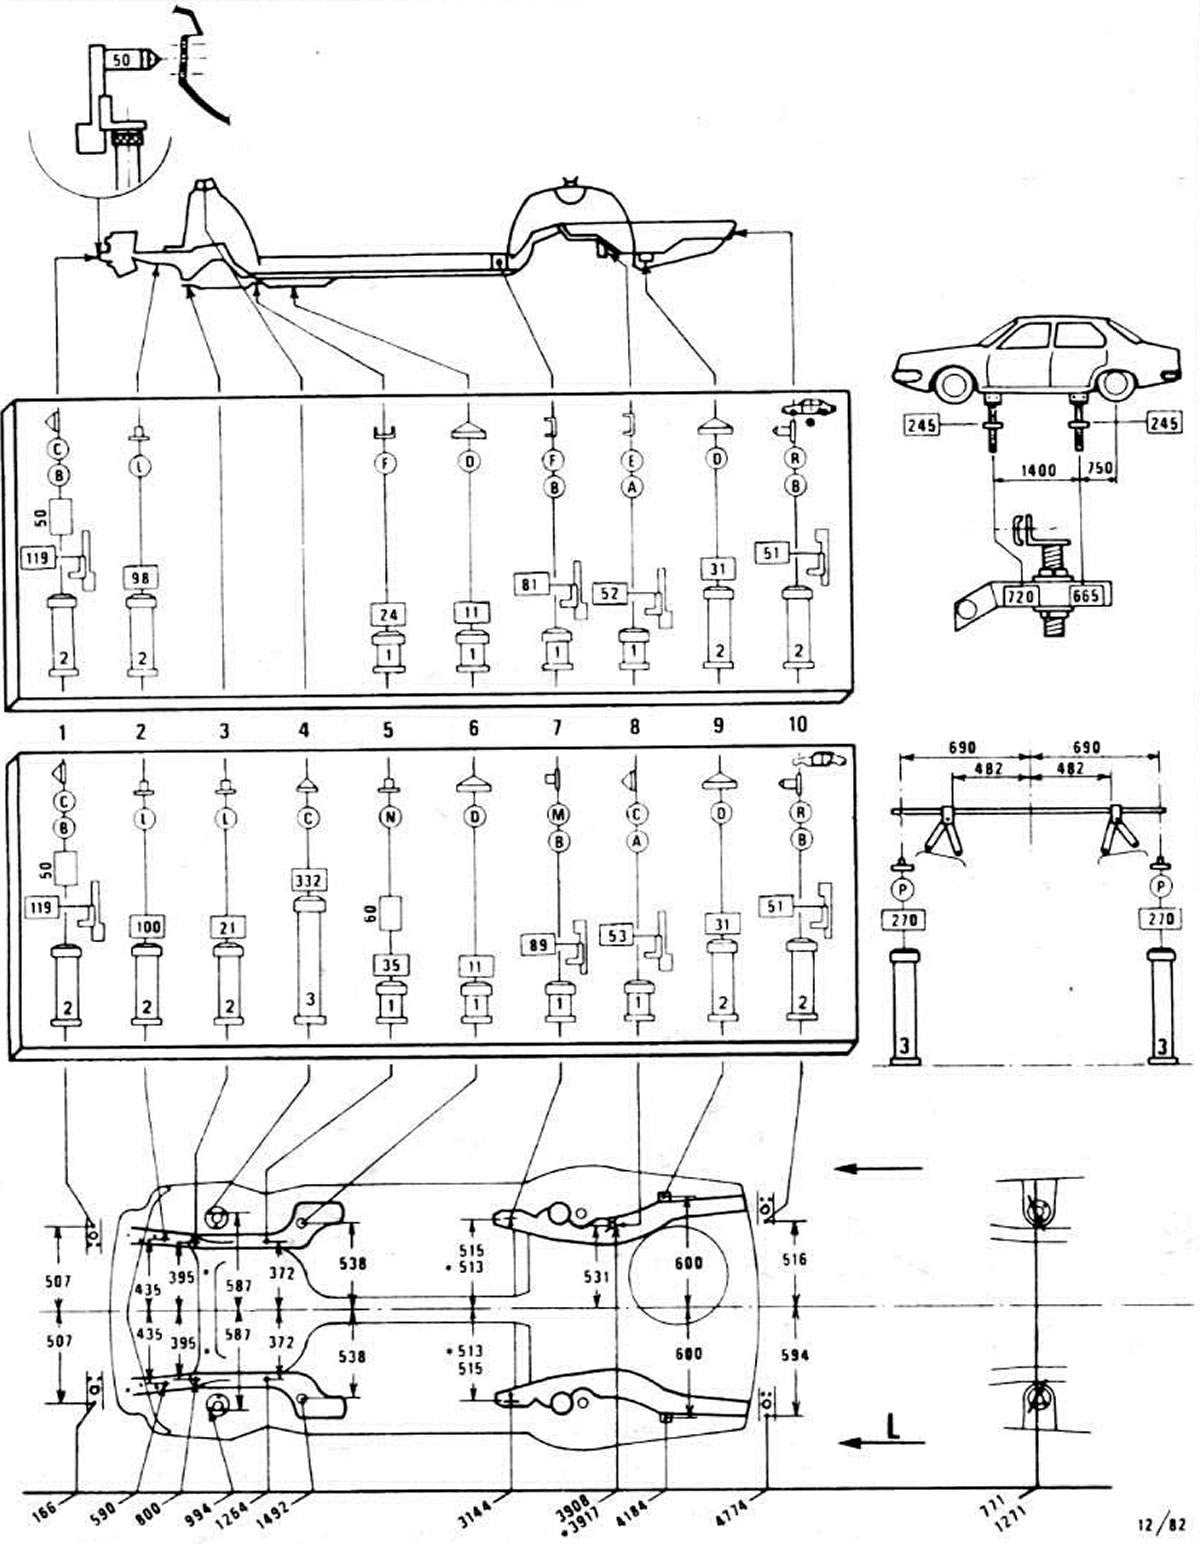
The Facom-Celette stand can be used with two types of measuring devices, allowing control measurements to be performed without removing or with removing chassis units and assemblies:
Open large image in new window »
Scheme of checking dimensions on the Facom-Celette stand "Metro WX 2000" (with and without removal of chassis units and assemblies) indicating measurement points, devices and control dimensions for the bodies of Audi "100" and "200" cars produced since 1983.
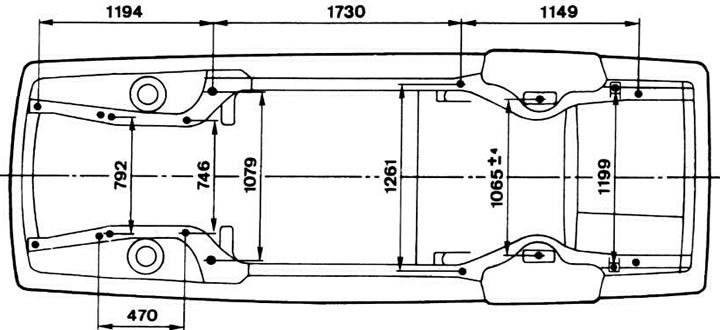
Reference dimensions for checking the body floor of Audi "100" and "200" cars
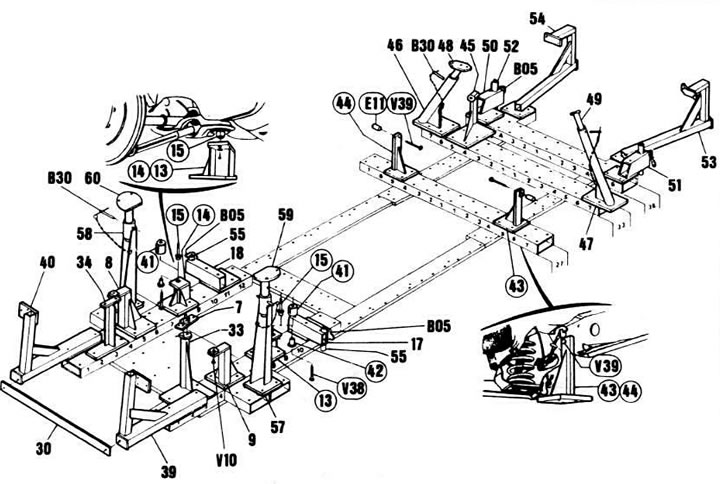
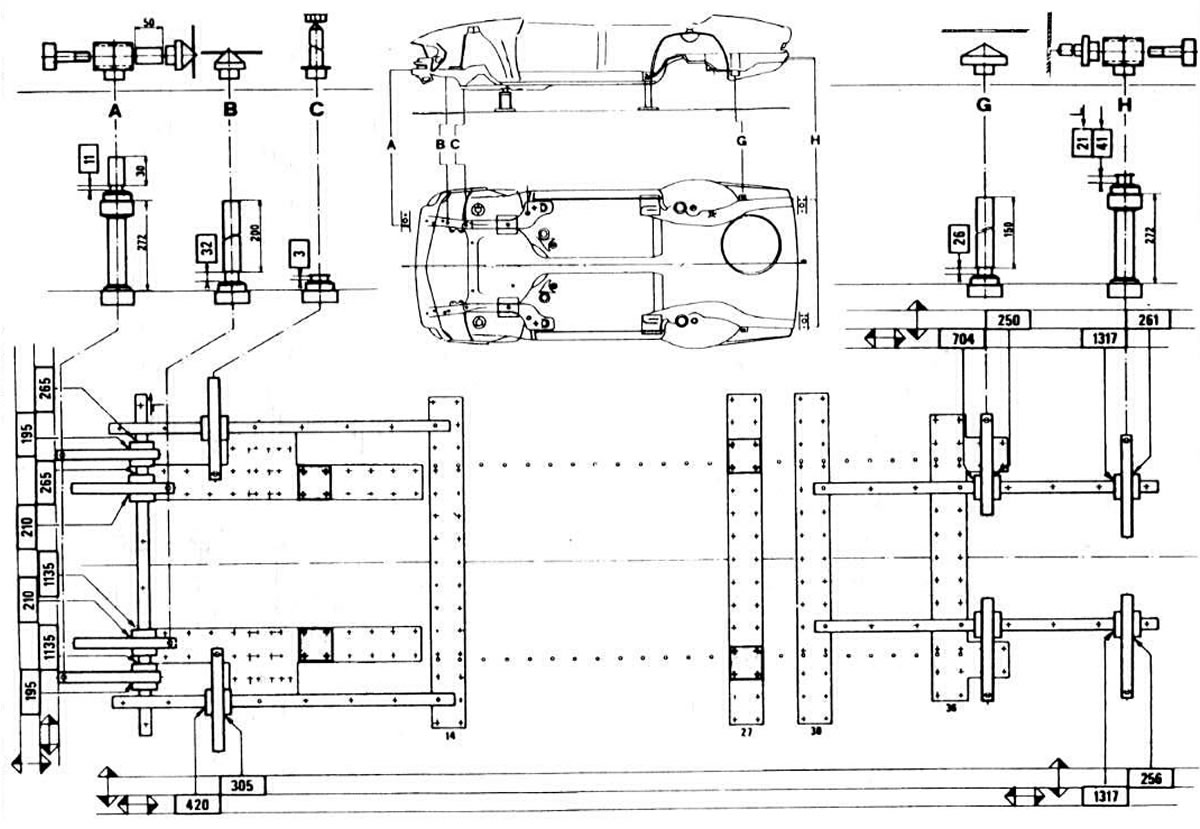
Facom-Celette frame for checking the dimensions of Audi "100" and "200" car bodies
Open large image in new window »
Technological chart of the Facom-Cefette "Integral" set of devices for checking the dimensions of Audi "100" and "200" car bodies
Open large image in new window »
Facom-Celette stand with measuring kit "Celette integral" to check the dimensions of the Audi "100" and "200" car bodies. Measurements are performed without removing chassis units and assemblies
Each measuring device is supplied with a set of process charts containing all the necessary information about the tool used and the control dimensions.
The Facom-Celette stand consists of a rigid, strictly horizontal base, installed fixedly or freely. Crossbars are attached to this base by means of bolts, on which a set of special probes is installed, selected depending on the car model. If it is necessary to perform correct work requiring high compression or tension forces, the car must be secured to the stand by means of special fastening units and additionally adjusted relative to the horizontal axis.
Sets of fastening units intended for work with the bodies of Audi 100 cars manufactured in 1983 and later years have catalog number WM 377.320.
List of units and devices for testing Audi "100/200" cars
| Catalogue No | Purpose |
| 39, 40, 30 | Checking the size by the front bumper |
| 33, 7 | Checking the left engine mount |
| 34 | Checking the right engine mount |
| 8, 9, V10 | Checking the front subframe mount |
| 57, 58, 59, 60, B30 | Checking the front suspension shock absorbers |
| 13, 14, 15, 41, 42, V38 | Checking the rear subframe mount |
| 17, 18, 55, B05 | Front inspection holes |
| 43, 44, V39, E11 | Checking the rear suspension arms |
| 45 | Panhard rod test |
| 46, 47, 48, 49, B30 | Checking the rear suspension shock absorbers |
| 50, 51, 52, B05 | Inspection holes of rear side members |
| 53, 54 | Checking the size by the rear bumper |
When checking the dimensions of the body floor with the removal of the front units and assemblies of the chassis, do the following:
- remove the front wheels;
- unscrew the rear subframe mounting bolts to replace them with tool 15 (the operation must be performed sequentially on each side);
- lower the vehicle onto the surface plate: fixtures 15 should fit into holes 13 and 14;
- secure fixture 15 with L12 washer and HM 12x15 bolt.
When checking the dimensions of the body floor with the removal of the rear units and assemblies of the chassis, do the following:
- remove the rear wheels;
- unscrew the rear suspension arm mounting bolts;
- on the right side of the car, unscrew the bolts securing the electric fuel pump and move it back;
- secure fixtures 43 and 44 under the vehicle using V39 bolts;
- lower the vehicle onto the surface plate.
When checking the dimensions of the body floor with the removal of all chassis units and assemblies, perform the operations indicated below.
At the front of the car:
- install tool kit 13, 41, 42, V38 and 14, 41, 42, V38 under the vehicle;
- lower the vehicle onto the surface plate.
Note: Tools 13 or 14 can be removed without raising the vehicle after removing bolt V38 complete with washer and centering tool 42.
At the rear of the vehicle: perform the same operations as when checking without removing the components and chassis, but be sure to install the E11 spacer to compensate for the difference in thickness.
Blackhawk "P 188 MK 2" and "P 201" rigs
The Blackhawk "P 188 MK 2" inspection and repair stand is a set of measuring probes installed on a verification bridge. Movements are carried out using pneumatic jacks.
The Blackhawk "P 2C1" inspection and repair stand is equipped with a set of fasteners and devices, catalog No. VW 91205 MMS, designed specifically for repairing the bodies of Audi "100/200" cars manufactured since 1983.
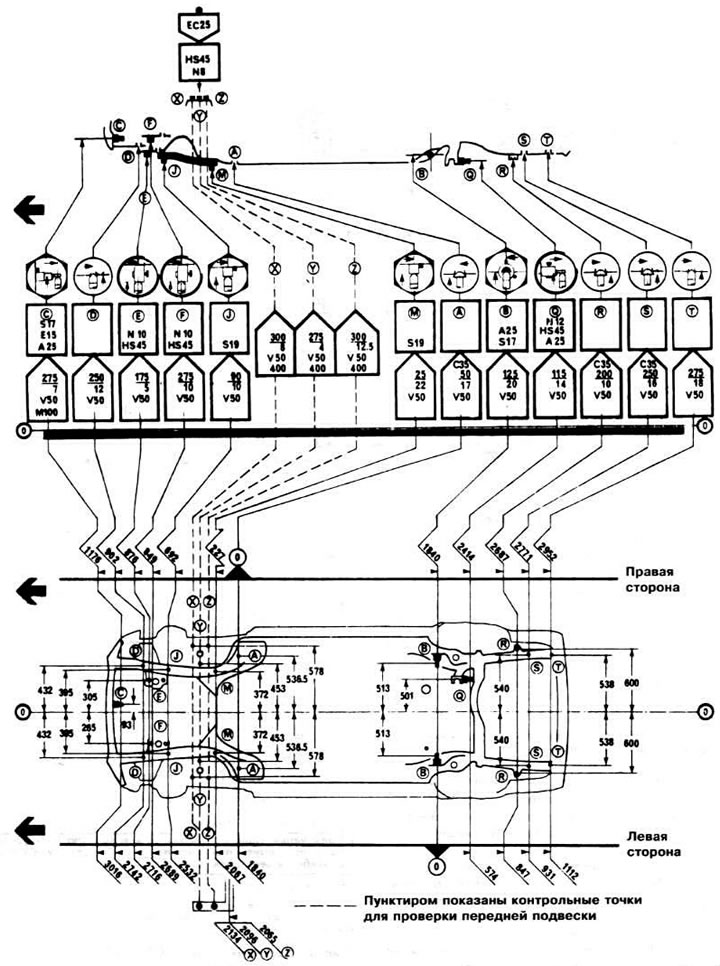
Blackhawk Slipform Dimension Checking Diagram (without removing mechanical units) indicating measurement points, devices and control dimensions for the bodies of Audi "100" and "200" cars
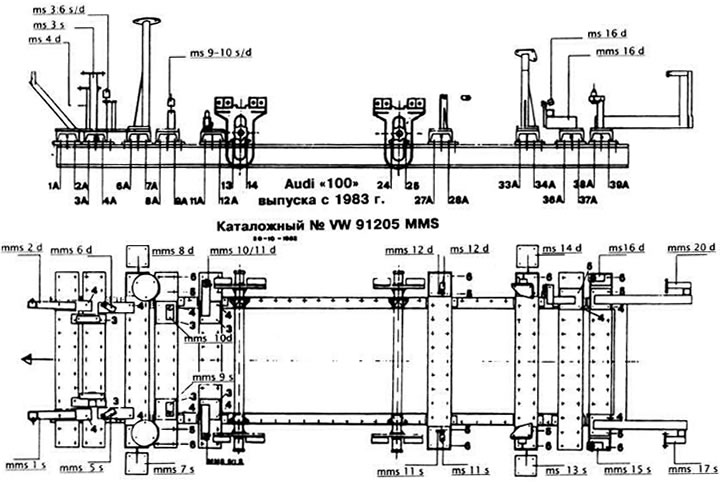
Blackhawk "P 201" frame control templates for Audi "100" and "200" car bodies
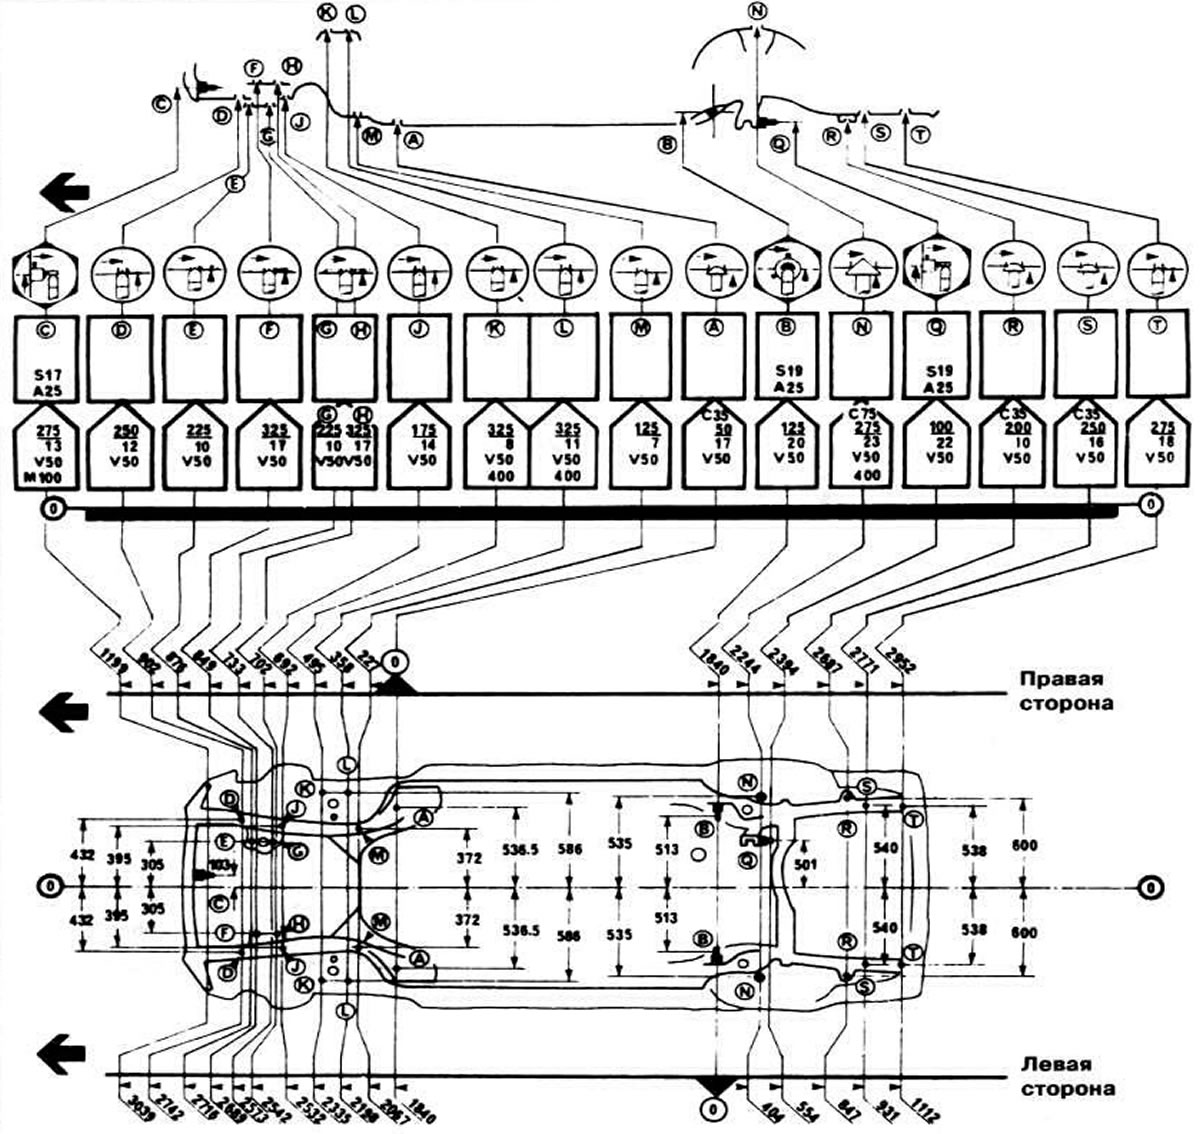
Open large image in new window »
Technological map of the Blackhawk "P 188 MK 2" frame for Audi "100" and "200" car bodies with indication of measurement points, devices and dimensions
Caroliner Fenwick slipway "MK 3"
The Caroliner Fenwick "MK 3" verification and repair stand from the Swedish company Sameta consists of a stand on which the car is installed and a measuring bridge equipped with sliders carrying feeler gauges.
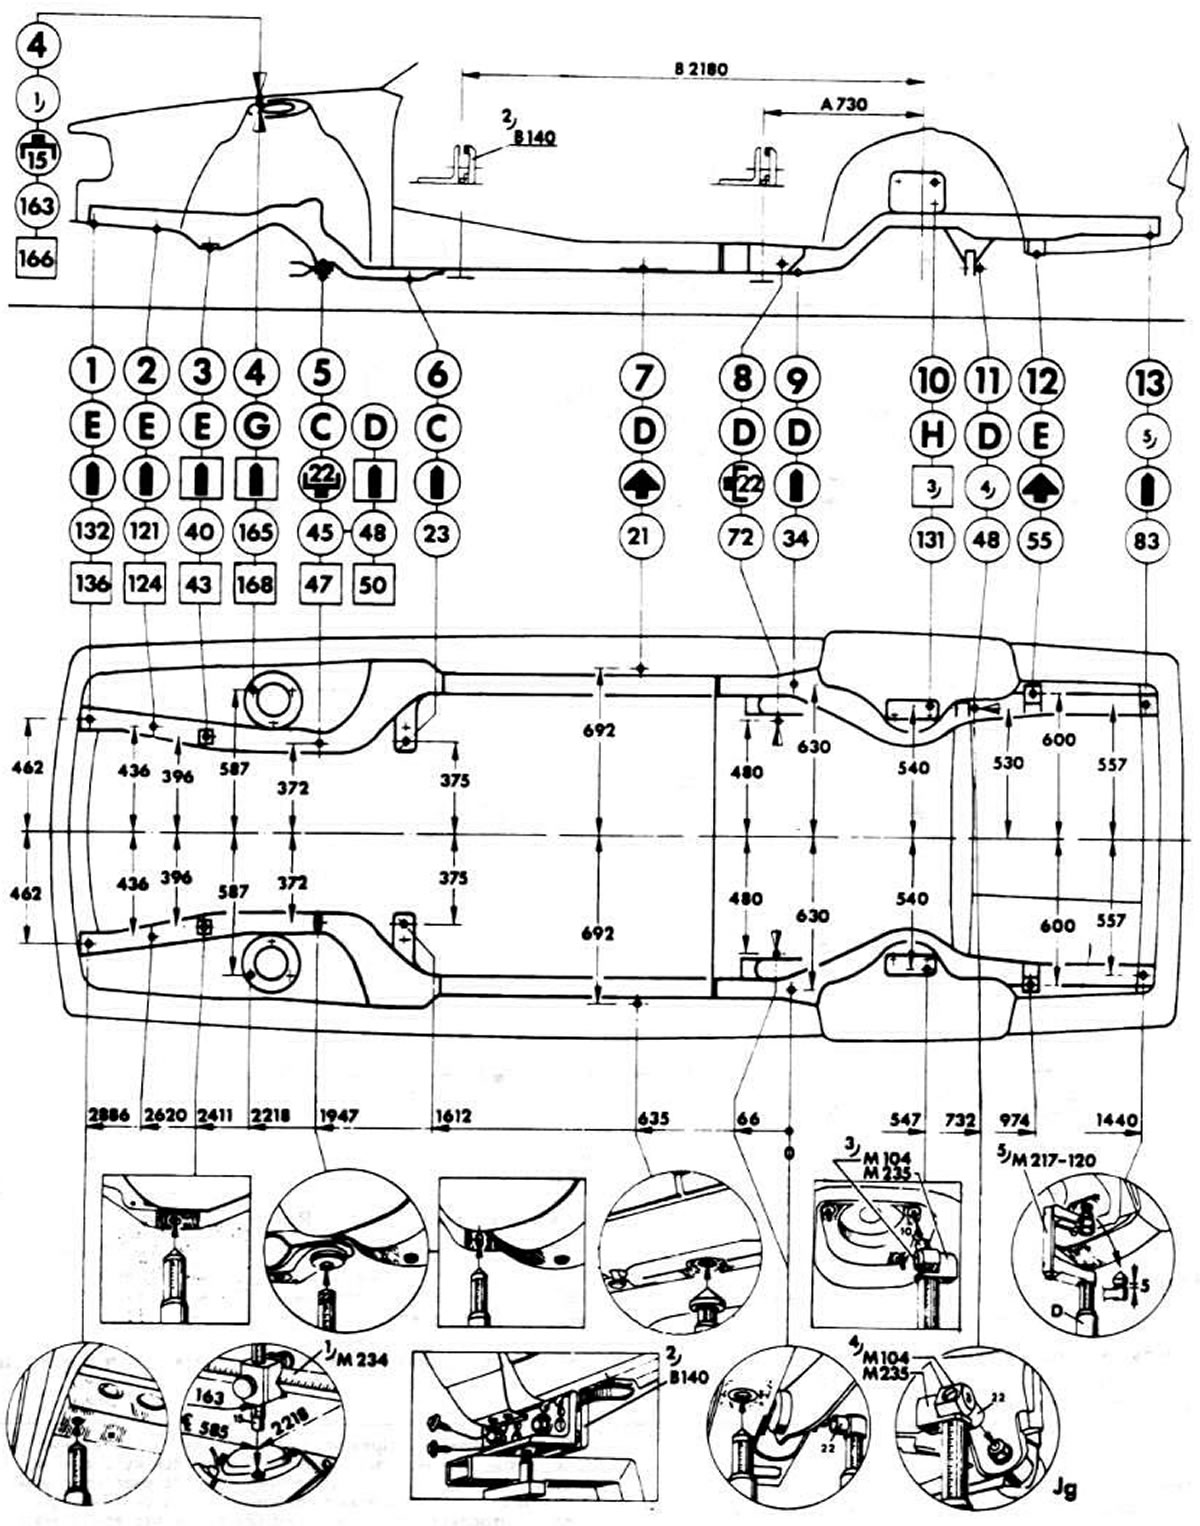
Open large image in new window »
Diagram of body size testing for Audi "100" and "200" cars on the Caroliner Fenwick "MK 3" stand (without removing chassis components and assemblies) indicating measurement points, devices and dimensions
"Dataliner" Nike Hydraulic
The "Dataliner" inspection and repair stand from the Swedish company Nike Hydraulic is a verification stand equipped with optical measuring instruments, a laser and transparent rulers suspended from the vehicle.
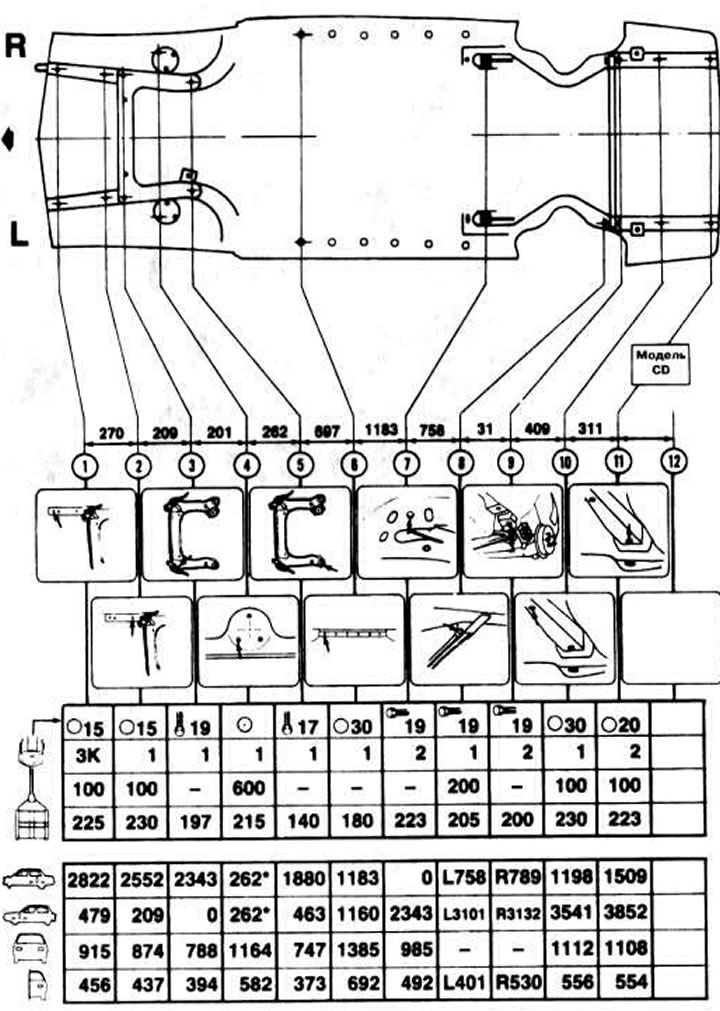
Diagram of checking the dimensions of Audi "100 CC, CS, CD" car bodies on the Dataliner stand (without removing chassis assemblies) indicating measurement points, devices and dimensions
Repcar "FP 80" Measuring Kit
The measuring kit "FP 80" from the French company Repcar uses a plumb line with hanging probes fixed to a measuring tape, and a millimeter grid applied to the surface of a cross-beam made of light alloy metal.
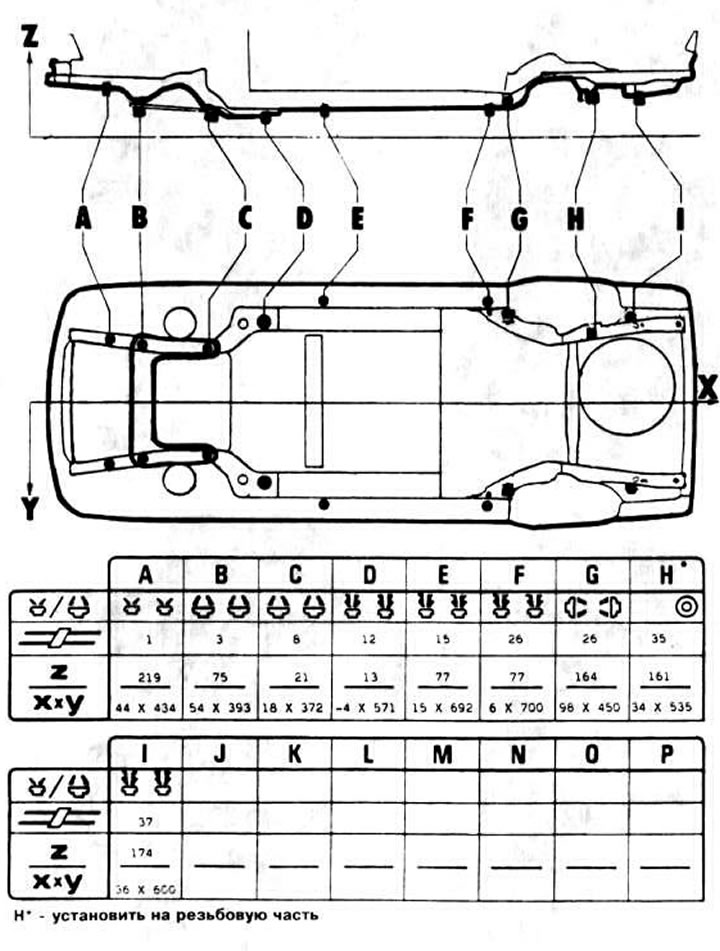
Diagram of the Audi "100" and "200" car body size check of the Repcar measuring tool kit with indication of measurement points, tools and sizes
[The original source of the article can be found on the website AUDIMANUAL]