
Table of contents: Execution order ↓ Removal traces of minor scratches ↓ Dent repair ↓ Repair of rusted holes and punctures ↓ Puttying and painting ↓
Execution order
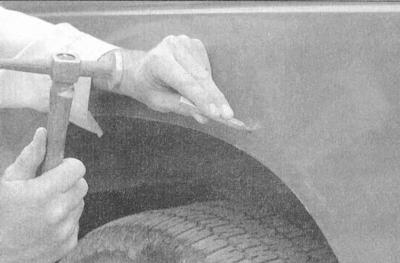
1. If you cannot access the back of the body panel to tap out the dent, you should pull it out using a sliding hammer. In the deepest part of the dent, or along its border, drill or tap small holes at least 2.5 cm apart…
2....then screw the hammer rod into the hole and operate it. Tap with a regular hammer at the edge of the dent to help the metal take its original shape. After completing this procedure, the surface of the dent should approach its original contour and protrude about 0.3 cm above the surface of the surrounding metal.
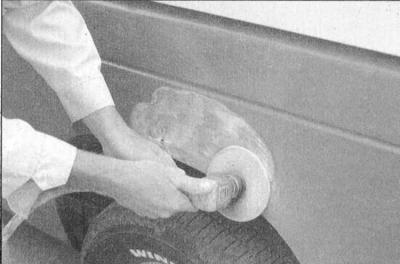
3. Using coarse sandpaper, remove the paint down to bare metal. You can do this by hand, but the tool shown in the photo will help you speed up the process. Using finer sandpaper, about #320, remove the paint in a radius of at least 2.5 cm around the dented area.
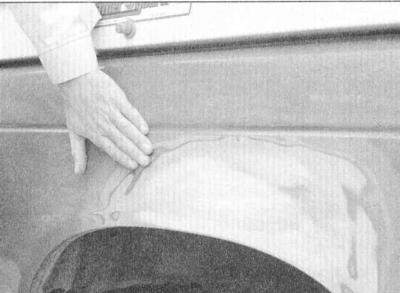
4. After removing the paint, it is better to check by touch rather than by sight whether the metal surface is smooth enough. Hammer the bulges and/or pull out the depressions where necessary. Clean the surface to be restored with wax or silicone stain remover.
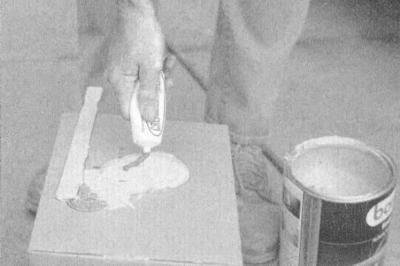
5. Mix a pack of plastic filler with hardener according to the instructions on the package. The mixing ratio is critical, and if you mess it up, the filler will set too slowly or too quickly (and you won't have time to apply it and give it the desired shape).
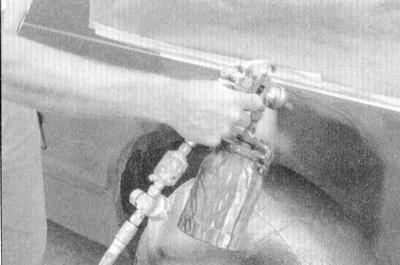
6. Working quickly to prevent the filler from setting, apply it to the metal surface with pressure using a plastic applicator, making sure it bonds completely to the metal. Work the filler until it resembles the original shape of the area and is slightly raised above the surrounding surface.
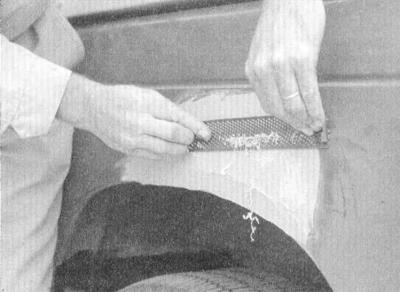
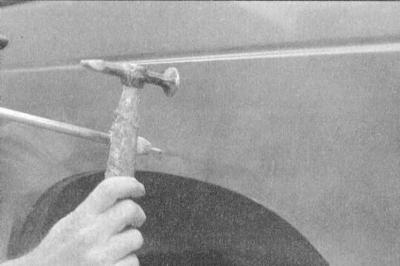
7. Let the filler harden until it can only be pressed through with a fingernail. Using a file or the tool shown in the photo, roughly file the filler.
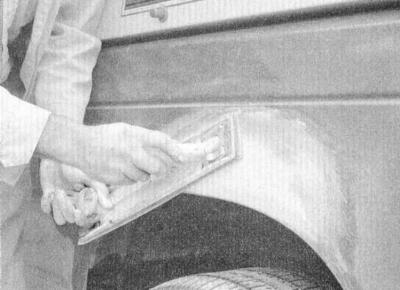
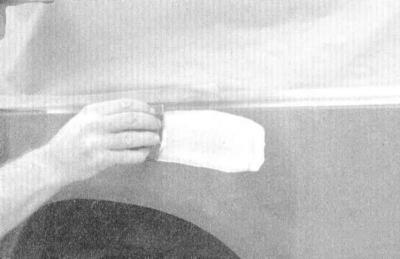
8. Using coarse sandpaper on a board or block, sand the filler until it is smooth and even. Gradually move to finer and finer grades of paper, always using a board or block, and finish with 360 or 400 grit.
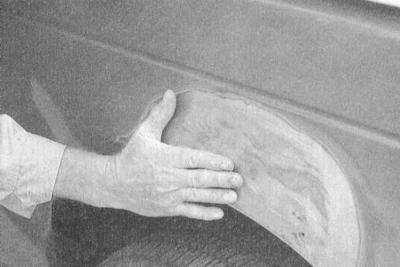
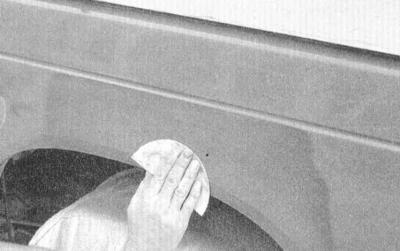
9. As a result of the treatment, the hand should not feel the boundaries of the transition from the putty to the bare metal and from the bare metal to the old paint. If this goal is achieved, remove the dust and cover the adjacent panels and trim parts.
10. Apply several coats of primer to the surface to be treated. Do not spray too much primer so that it does not run off, and let the previous coat dry after applying each coat. A professional spray gun is usually used here, but auto parts stores sell primer in inexpensive aerosol cans.
11. The primer will help to reveal any imperfections or scratches. Fill them with polishing compound. Following the instructions on the package, sand it with fine (#360 or 400) sandpaper until smooth. Repeat the polishing process, applying polishing compound and sanding it until the primed surface is completely smooth.
12. Finish sanding with very fine paper (400 or 600 grit) to remove excess primer. Wash the area with water and allow to dry. Use a tack cloth to remove all dust, then apply a coat of exterior paint. Do not attempt to wipe or wax the area until the paint is completely dry (at least two weeks).
Removal traces of minor scratches
1. If the scratch is superficial and does not affect the metal of the panel, it is extremely easy to repair. To remove particles of peeling paint and wax coating, lightly rub the scratched area with a fine grinding paste. Rinse the treated surface with clean water.
2. Using a small brush, paint over the scratch with the paint used to cover the surrounding body panels. Continue applying coats of paint until the surface inside the scratch is flush with the surrounding panel surface. Allow the new paint to cure for at least two weeks, then sand the transition surface flush with the rest of the panel using very fine sanding compound. Finally, wax the treated surface.
3. If it has penetrated through the paint, reaching the metal panel and causing corrosion, a different repair technique must be used. Use a pocket knife to scrape out the powdery rust from the scratch, then treat the surface with an inhibitor paint to prevent future corrosion. Use a rubber or nylon applicator to coat the treated damaged area with a gloss filler. If necessary - which is especially useful when filling narrow scratches - the filler can be thinned with solvent to form a very fine paste. Before the gloss filler hardens inside the scratch, wrap the tip of your finger in a smooth cotton cloth. Then, moisten your finger in solvent, quickly run it along the filled surface of the scratch. This will make the surface slightly concave. Now, after the filler has hardened, the treated scratch can be painted.
Dent repair
1. When repairing dents, the primary task is to pull out the deformed surface to bring it to the original level. There is no point in trying to achieve a 100% match to the original - this is still impossible due to the damage to the internal structure of the panel metal upon impact. The optimal level for bringing the dented surface to a level approximately 3 mm below the surface of the surrounding undamaged area of the body panel. If the dent is very shallow, pulling it out does not make any sense at all.
2. If the concave area can be reached from the back of the panel, you should try to straighten the dent from the inside by hitting it with a soft-faced hammer. When tapping out the dent, press a wooden hammer firmly against its front side to dampen the impact impulse and avoid excessive bending of the deformed metal of the panel.
3. If the dent is on a two-layer section of the panel or if access to it from the back is impossible for some other reason, you should use a different pulling method. Drill several small holes on the concave section of the panel, trying to make sure that they are in the deepest areas of the dent. Then screw long screws into the holes, leaving their heads sticking out enough so that you can grab them with pliers. Now start pulling the dent out with pliers by the screws.
4. The next stage of treatment involves removing the dent from the damaged surface and an area of approximately 3 cm around it. This work is best done with a wire attachment or sanding disc installed in the chuck of an electric drill, but manual processing with sandpaper is no less effective. The final stage of preparation for puttying is scratching the exposed metal of the dent with a screwdriver or a broken file, or drilling small holes in it to ensure maximum adhesion of the putty to the metal surface. Then you can proceed to the puttying and painting procedures (please refer to the materials provided below).
Repair of rusted holes and punctures
1. Using a sanding or wire bit clamped into the chuck of an electric drill, remove all traces of paint from the damaged area and an area about 3 cm wide around it. If you cannot use an electric drill, the job can be done just as effectively by hand with sandpaper.
2. After removing the paint, you can assess the extent of metal damage from corrosion and decide whether it makes sense to start repairs or whether it would be wiser to replace the entire panel (if this is possible in principle). New panels can be purchased for not nearly as much as many car enthusiasts think. It is often much faster and even more economical to install a new panel than to repair extensive damage to the body.
3. Remove all body trim from the damaged panel, except for those that can serve as a guide for recreating the original shape of the deformed areas (such as the headlight trim, etc.). Using metal shears or a hacksaw blade, remove all loose, loose, and hopelessly corroded pieces of metal, then bend the edges of the hole inward with a hammer to create a recess for placing the filler material into it.
4. Use a wire brush to remove powdery rust from the damaged metal. If the back of the damaged area is accessible, treat it with a corrosion inhibitor.
5. Before you start filling, the hole must be plugged. This can be done by riveting or screwing a piece of tin to the damaged area from the back, or by covering the hole with wire mesh.
6. After blocking the hole, the damaged area can be filled and painted.
Puttying and painting
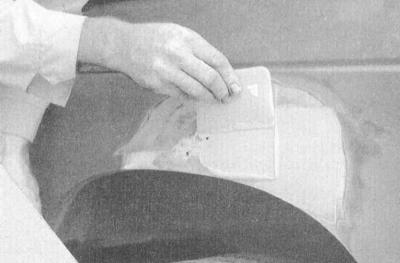
1. There are many types of body fillers, but it should be noted that for this type of work, the best choice is the filler paste with hardener in a tube that comes with body panel repair kits. In order to achieve a smooth and correct contour of the filled surface, the paste should be applied with a flexible plastic or nylon applicator. Strictly following the manufacturer's instructions (violation of these may lead to improper hardening of the putty mass), mix a small amount of putty on a clean wooden or cardboard surface (use hardener with care).
2. Apply the putty to the appropriately prepared surface using an applicator (please refer to the materials presented above) surface of the damaged area of the body panel. To achieve the desired surface contour and filler level, each stroke of the applicator must pass through the entire surface being repaired. As soon as the contour of the filled surface is close to the original, immediately stop applying the filler, since it will begin to stick to the applicator when hardening, forming lumps and leaving burrs on the surface being treated. Continue applying layers of paste at intervals of about 20 minutes until the level of the filled surface begins to protrude slightly above the surrounding metal of the panel.
3. After the putty has hardened, its excess can be removed with a file. Then begins the stage of sanding and grinding the putty surface. Waterproof sandpaper of imported manufacture is best suited for this purpose (because it maintains uniform grain size of the abrasive and good adhesion to the base). You should start with coarse-grained paper No.180 and, gradually decreasing the graininess, you can finish with No.600. In order to achieve adequate flatness of the surface being processed, the paper should first be wrapped around a block of dense rubber (wood or foam) or stick it on it. During the processing, the paper should be regularly and frequently moistened with water. This technology allows achieving absolute smoothness and evenness of the processed surface at the final stage.
4. At this point, the treated damaged surface should be surrounded by a ring of clean, exposed metal, ending with a gradually tapering edge of good paint. Rinse the treated surface with clean water, washing away all the abrasive that formed during grinding.
5. Spray the treated surface with a thin layer of light primer from an aerosol can. This will reveal all the defects made during sanding, which can be eliminated by covering them with a layer of fresh putty. Repeat the sanding and sanding stage. Repeat alternating puttying, surface treatment and priming until a satisfactory result is achieved. Upon completion, rinse the treated surface with water and dry it.
6. The surface is now ready for painting. The car should be spray painted in still, dry, warm and dust-free air. The conditions of a large, closed and heated room best meet these requirements. If circumstances force the body to be painted outdoors, the choice of suitable weather conditions should be taken very seriously. When working indoors, knock down dust by spraying the floor with water. If only a separate panel of the car body is being painted, cover the surrounding undamaged panels. This precaution will minimize the effect of a slight difference in the tones of old and fresh paint. Trim elements such as chrome decorative strips, door handles, etc. should also be covered (or better yet, removed). To protect surfaces that are not to be painted, use adhesive tape and old newspapers, which should be applied in several layers.
7. Before using the aerosol, shake the can thoroughly, then spray the paint on a test surface, practicing the painting technique. Cover the surface prepared for painting with a thick layer of primer. The thickness is achieved by repeatedly applying the primer in thin layers. Do not spare water, use moisture-resistant sandpaper No.600 to process the primed surface, achieving its absolute smoothness. Before starting the final painting, let the primer dry completely.
8. Apply a layer of decorative paint, again achieving thickness by applying it repeatedly. Start painting from the center of the repaired area, making circular movements with your hand with the spray can, expanding their radius in a spiral until the entire damaged area is covered, plus another ring of surrounding good about five centimeters wide. After 10-15 minutes (better not later, so as not to damage the edge of the fresh paint that is starting to harden) after applying the final coat of paint, peel off the newspapers and tape covering the surrounding body panels. The paint will fully polymerize in about two weeks, after which, to smooth out the transition of fresh paint, treat the restored surface with a very fine sanding paste. Finally, apply a layer of wax to the panel.