



Exterior (external elements) of the car Audi A3 8L
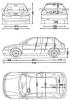
Body specifications
Body - self-supporting, with a rigid life-saving frame, front and rear zones of directed energy-absorbing deformation. In-door and side reinforcements are used...
Body - self-supporting, with a rigid life-saving frame, front and rear zones of directed energy-absorbing deformation. In-door and side reinforcements are used...

General information and safety precautions
The cars of these models have a "universal body" design, where a floor panel with front and rear side beams is used (spars) frames that act as carriers for the...
The cars of these models have a "universal body" design, where a floor panel with front and rear side beams is used (spars) frames that act as carriers for the...
Car body care
The condition of a car's body is an extremely important factor in determining its resale value. Carrying out repair procedures to restore damaged or neglected...
The condition of a car's body is an extremely important factor in determining its resale value. Carrying out repair procedures to restore damaged or neglected...

Repair of minor damage to body panels
Execution order 1. If you cannot access the back of the body panel to tap out the dent, you should pull it out using a sliding hammer. In the deepest part of...
Execution order 1. If you cannot access the back of the body panel to tap out the dent, you should pull it out using a sliding hammer. In the deepest part of...
Repair of significant body damage
Execution order 1. Repairs to serious body damage must be carried out in a specialized auto repair shop that has the necessary equipment. 2. In case of...
Execution order 1. Repairs to serious body damage must be carried out in a specialized auto repair shop that has the necessary equipment. 2. In case of...

Removal and installation the hood lock panel
Hood Lock Panel 1 - Torx screw, 25 Nm 2 - lock holder 3 - turn signal 4 - hex bolt, 35 Nm 5 - Torx screw, 6 Nm 6 - lock holder 7 - bumper trim 8 - self-tapping...
Hood Lock Panel 1 - Torx screw, 25 Nm 2 - lock holder 3 - turn signal 4 - hex bolt, 35 Nm 5 - Torx screw, 6 Nm 6 - lock holder 7 - bumper trim 8 - self-tapping...

Removal and installation bumpers
To remove the front bumper 1 - bumper trim 2 - bolt, 25 Nm 3 - hex bolt, 6 Nm 4 - bumper 5 - guide element 6 - self-tapping screw, 1.5 Nm 7 - buffer 8 - clamp...
To remove the front bumper 1 - bumper trim 2 - bolt, 25 Nm 3 - hex bolt, 6 Nm 4 - bumper 5 - guide element 6 - self-tapping screw, 1.5 Nm 7 - buffer 8 - clamp...

Removal and installation the wing
Front wing fastening elements 1 wing 2 bolt, 10 Nm 3 self-tapping screws, 1.5 Nm 4 self-tapping screws, 1.5 Nm 5 bolt, 15 Nm 6 bolt, 15 Nm Removal 1. Remove...
Front wing fastening elements 1 wing 2 bolt, 10 Nm 3 self-tapping screws, 1.5 Nm 4 self-tapping screws, 1.5 Nm 5 bolt, 15 Nm 6 bolt, 15 Nm Removal 1. Remove...

Removal and installation the inner wing lining
Removal 1. Remove the wheel arch liner, refer to the subsection Removal and installation front and rear wheel arch liners . 2. Unscrew screws –3– and remove...
Removal 1. Remove the wheel arch liner, refer to the subsection Removal and installation front and rear wheel arch liners . 2. Unscrew screws –3– and remove...

Removal and installation front and rear wheel arch liners
Rear wheel arch liner fastening 1 - wheel arch liner 2 - Torx screw, 2 Nm 3 - notched nut 4 - channel cover 5 - guide element Front wheel arch locker Removal...
Rear wheel arch liner fastening 1 - wheel arch liner 2 - Torx screw, 2 Nm 3 - notched nut 4 - channel cover 5 - guide element Front wheel arch locker Removal...

Removal and installation the outside mirror and mirror glass
Outside mirror 1 mirror housing 2 mirror adjustment unit (manual). Electric adjustment unit, refer to subsection Removal and installation the tailgate . 3 beam...
Outside mirror 1 mirror housing 2 mirror adjustment unit (manual). Electric adjustment unit, refer to subsection Removal and installation the tailgate . 3 beam...

Removal and installation the B-pillar trim
Body B pillar trim Removal 1. Remove the door seal –3– in the area of the trim –2–. 2. Drill the heads of the rivets –1–. 3. Remove the visor with brackets...
Body B pillar trim Removal 1. Remove the door seal –3– in the area of the trim –2–. 2. Drill the heads of the rivets –1–. 3. Remove the visor with brackets...

Removal and installation side molding
Removal 1. Using a hair dryer, heat section by section to separate the molding. 2. Clean the surfaces to be glued with gasoline, treat with silicone remover...
Removal 1. Using a hair dryer, heat section by section to separate the molding. 2. Clean the surfaces to be glued with gasoline, treat with silicone remover...

Removal and installation door and wing trim
Door and wing trims Door trim Removal 1. Open the door. 2. Remove the Phillips head screw -3- from the bottom inside the door. 3. Pull the trim back out of the...
Door and wing trims Door trim Removal 1. Open the door. 2. Remove the Phillips head screw -3- from the bottom inside the door. 3. Pull the trim back out of the...

Replacing the rubber bands of windshield wipers
Windscreen wiper blades should be replaced if the glass cleaning quality is poor. Complete windscreen wipers are available for sale (rubber with holder), as...
Windscreen wiper blades should be replaced if the glass cleaning quality is poor. Complete windscreen wipers are available for sale (rubber with holder), as...

Adjusting the windshield washer nozzles
Adjusting the windshield washer nozzles 1. The direction of the windshield wiper nozzle jets can be adjusted using a 0.8 mm needle. To do this, insert it into...
Adjusting the windshield washer nozzles 1. The direction of the windshield wiper nozzle jets can be adjusted using a 0.8 mm needle. To do this, insert it into...

Removal and installation windshield washer nozzles
Removal 1. Remove lever –1–, refer to subsection Removal and installation, checking and adjustment of the final position of the windshield wiper arms and to...
Removal 1. Remove lever –1–, refer to subsection Removal and installation, checking and adjustment of the final position of the windshield wiper arms and to...

Removal and installation, checking and adjustment of the final position of the windshield wiper arms
Removal 1. Wet the windshield with water. 2. Let the wiper run for about 2 minutes and stop it with the switch. The wiper will stop at the end position. 3....
Removal 1. Wet the windshield with water. 2. Let the wiper run for about 2 minutes and stop it with the switch. The wiper will stop at the end position. 3....
This section is available on russian, bulgarian, belarusian, ukrainian, serbian, croatian, romanian, polish, slovak, hungarian
Similar sections of other Audi car models:
Body: Exterior Audi 80 B3 (1986-1991, petrol)
Body: Exterior Audi 100 C3 (1982-1990, diesel)
Body: Exterior Audi A4 B5 (1994-2001)
Body: Exterior Audi A6 C5 (1997-2004)
Body: Exterior (external elements) Audi A8 D2 (1994-2002)
Body: Exterior Audi Q5 Type 8R (2008-2017)
Body: Exterior Audi A2 (1999-2005)
Body: Exterior Audi 80 B3 (1986-1991, petrol)
Body: Exterior Audi 100 C3 (1982-1990, diesel)
Body: Exterior Audi A4 B5 (1994-2001)
Body: Exterior Audi A6 C5 (1997-2004)
Body: Exterior (external elements) Audi A8 D2 (1994-2002)
Body: Exterior Audi Q5 Type 8R (2008-2017)
Body: Exterior Audi A2 (1999-2005)
Share information:
- General information
- User manual
- Maintenance
- Power unit
- Engine repair
- Lubrication system
- Cooling system
- Supply system
- Fuel injection system
- Exhaust system
- Ignition system
- Transmission
- Manual transmission
- Automatic transmission
- Clutch and drive shafts
- Chassis
- Brake system
- Front suspension
- Rear suspension
- Steering
- Body
- Ventilation and heating
- Exterior (external elements)
- Interior (internal elements)
- Doors, covers and windows
- Electrical equipment
- Power devices
- Lighting and appliances
- Electrical circuits