
Table of contents: Removal ↓ Installation ↓ Removal ↓ Installation ↓ Removal ↓ Installation ↓ Removal ↓ Installation ↓
Outside mirror
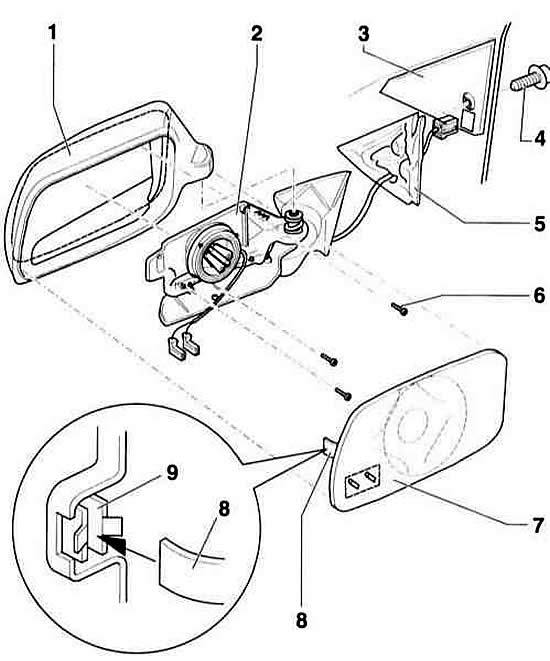
- 1 mirror housing
- 2 mirror adjustment unit (manual). Electric adjustment unit, refer to subsection Removal and installation the tailgate.
- 3 beam of adjustment elements
- 4 Allen screw, 12 Nm
- 5 seal. When installing, check for proper fit.
- 6 Phillips head screw, 1 Nm
- 7 glass mirror
- 8 finger
- 9 clamp
Manual mirror adjustment unit
Removal
1. Remove the outside mirror from the door.
2. Remove the mirror glass.
3. Disconnect the electrical wires for the mirror heater.
4. Remove the Phillips head screws –6– and remove the adjustment block from the housing.
Installation
It is performed in the reverse order of removal.
Mirror glass
Removal
1. Cover the mirror body with adhesive tape at the top and bottom.
2. Carefully press the glass with a spatula, first from the bottom and then from the top.
Installation
Warning: When installing the mirror glass, be sure to use gloves or place a clean cloth underneath.
1. Insert the glass into the guide pins and the pins –8– into the clamps –9–.
2. Press the mirror glass down by pressing on it in the center.
Mirror housing
Removal
Warning: The mirror housing can be removed without removing the entire mirror.
1. Remove the glass –7–.
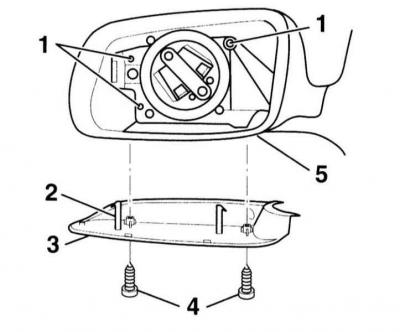
2. Remove screws –4–.
3. Press on the tabs –2– and remove the cover –3– downwards.
4. Remove screws –1– from the mirror adjustment unit.
5. Remove the housing –5– upwards.
Installation
1. Place the housing –5– on top.
2. Insert screws –1– into the adjustment unit and tighten them lightly to 1 Nm.
3. Place the cover –3– on the bottom and secure it.
4. Install the mirror glass.
Electric mirror adjustment unit
Removal
1. Disconnect the negative (–) battery cable with the ignition off.
Warning: This will erase information from electronic memory units, such as the radio code. Without the code, the radio can be switched on at an AUDI service station. Therefore, read the instructions in the subsection Entering the radio code.
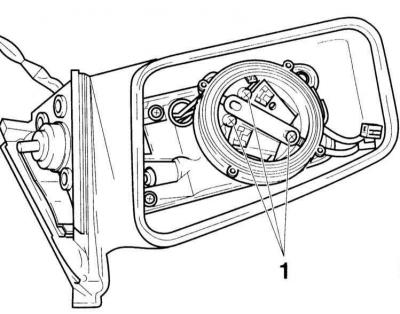
2. Remove the mirror glass.
3. Remove screws –1–.
4. Disconnect the plug connections of the mirror adjustment unit.
Warning: If there are soldered connections, they must be disconnected individually at the housing. Note the location of the connections before disconnecting them.
5. Remove the control unit from the housing.
Installation
1. Insert the adjustment unit into the housing.
2. Connect the electrical wires according to their location.
3. Lightly tighten screws –1– to 1 Nm.
4. Install the glass.
5. Connect the battery ground (–) cable.
Warning: Activate the high-altitude automatic electric window lifter, and also set the clock and enter the radio code, refer to the subsection Entering the radio code.