Repair Chevrolet Repair Toyota Repair Honda Repair AvtoVAZ Repair Mercedes-Benz Repair BMW Repair Opel
Home  |  Contacts  |  Sitemap  |    
English Русский
Български
Беларускі
Український
Српски
Hrvatski
Română
Polski
Slovenský
Magyar
AudiManual.ru


  • AUDI 80
  • AUDI 100
  • AUDI A3
  • AUDI A4
  • AUDI A6
  • AUDI A8
  • AUDI Q
  • OTHER
  • ARTICLES
Type 8L (1996-2003)

Removal and installation front and rear wheel arch liners (Audi A3 8L)

  • Home
  • Audi A3
  • Type 8L (1996-2003)
  • Body
  • Exterior (external elements)
  • Removal and installation front and rear wheel arch liners
            0
Table of contents: Removal ↓ Removal ↓ Installation ↓

Rear wheel arch liner fastening


Rear wheel arch liner fastening

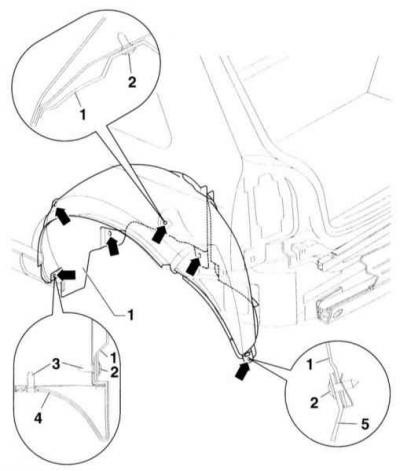
  • 1 - wheel arch liner
  • 2 - Torx screw, 2 Nm
  • 3 - notched nut
  • 4 - channel cover
  • 5 - guide element

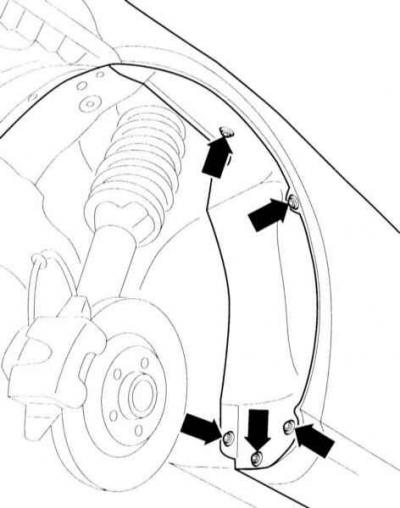
Front wheel arch locker


Removal


1. Remove the front wheel.

Warning: Lifting and installing the vehicle on stands is dangerous! Therefore, before carrying out the operation, read the subsection Jacking up a car.


2. Mark the position of the front wheel relative to the hub with paint. This will allow you to install the balanced wheel in its original position during assembly. Loosen the wheel mounting bolts with the car on the ground. Raise the front of the car, place it on stands and remove the front wheel.

3. Remove the Torx screws.

3. Remove the Torx screws.


3. Remove the Torx screws.


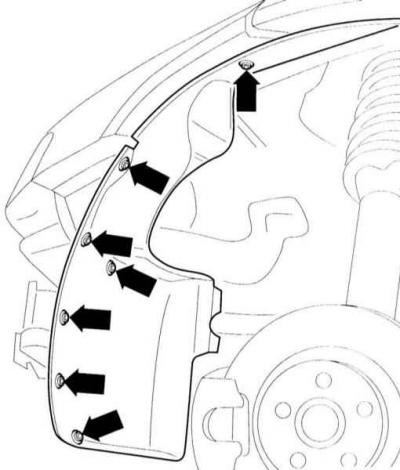
4. Squeeze the liner slightly and remove it from the wheel arch.


5. Secure the locker with Torx screws (arrows).

6. Install the front wheel so that the markings applied during removal match. Pre-lubricate the centering belt of the wheel disk on the hub with a thin layer of bearing grease. Do not lubricate the wheel mounting bolts. Replace rusty bolts. Tighten the bolts. Lower the car onto the wheels and tighten the bolts crosswise to 120 Nm.

Rear wheel arch liner


Removal


1. Remove the rear wheel.

Warning: Lifting and installing the vehicle on stands is dangerous! Therefore, before carrying out the operation, read the subsection Jacking up a car.


2. Mark the position of the rear wheel relative to the hub with paint. This will allow you to install the balanced wheel in its original position during assembly. Loosen the wheel mounting bolts with the car on the ground. Raise the rear of the car, place it on stands and remove the rear wheel.

3. Remove the Torx screws –2– (arrows).

4. Squeeze the liner –1– slightly and remove it from the wheel arch.

Installation


1. Squeeze the liner –1– slightly and insert it into the wheel arch.

2. Secure the locker with Torx screws –2– (arrows).

3. put the rear wheel back in place so that the markings applied during removal match. First, lubricate the centering belt of the wheel disk on the hub with a thin layer of bearing grease. Do not lubricate the wheel mounting bolts. Replace rusty bolts. Tighten the bolts. Lower the car onto the wheels and tighten the bolts crosswise to a torque of 120 Nm.
The article was checked by auto expert Nikita Rudakov
This article is available at russian, bulgarian, belarusian, ukrainian, serbian, croatian, romanian, polish, slovak, hungarian

Share information:
Previous articles
Audi A3 Type 8L: Exterior (external elements)
Next articles

Removal and installation the inner wing lining
Removal and installation the wing
Removal and installation bumpers
Removal and installation the hood lock panel
Removal and installation the outside mirror and mirror glass
Removal and installation the B-pillar trim
Removal and installation side molding
Removal and installation door and wing trim


Similar articles on other Audi car models:
Rear wheel cylinder — removal, overhaul and installation Audi 80 B3 (1986-1991, petrol)
Rear wheel cylinder — removal, overhaul and installation Audi 100 C3 (1982-1990, diesel)
Removal and installation the front wheel cover Audi A4 B6 (2000-2006, petrol)
Removal and installation rear wheel bearings/hubs Audi A6 C5 (1997-2004)
Removal and installation the engine Audi A8 D2 (1994-2002)
Removal the rear wheel arch liner Audi Q5 Type 8R (2008-2017)
Removal and installation the thermostat housing and coolant pipe… Audi A2 (1999-2005)
Link to this page in different formats


Visitor comments

No comments yet


How much will 15 + 29 =


A3(8L, 1996-2003) 
  • General information
  • User manual
  • Maintenance
  • Power unit
  • Engine repair
  • Lubrication system
  • Cooling system
  • Supply system
  • Fuel injection system
  • Exhaust system
  • Ignition system
  • Transmission
  • Manual transmission
  • Automatic transmission
  • Clutch and drive shafts
  • Chassis
  • Brake system
  • Front suspension
  • Rear suspension
  • Steering
  • Body
  • Ventilation and heating
  • Exterior (external elements)
  • Interior (internal elements)
  • Doors, covers and windows
  • Electrical equipment
  • Power devices
  • Lighting and appliances
  • Electrical circuits
 
AudiManual.ru © 2017-2026 · Mobile version · Feedback · Sitemap: EN BG BY UA RS HR RO PL SK HU · Site search · News and articles
80 B2 · 80 B3 petrol · 80 B3 · 80 B4 · 100 C3 diesel · 100 C3 petrol · 100 C3 · 100 C4 petrol · 100 C4 · A3 Type 8L · A4 B5 petrol · A4 B5 · A4 B6 petrol · A4 B6 · A4 B7 · A4 B8 · A6 C4 · A6 C5 · A6 C5 Allroad · A8 D2 · Q5 Type 8R · Q7 Typ 4L · Audi A2 ·
This site uses cookies 🍪. Click the button to accept this fact.