
Table of contents: Removal ↓ Installation ↓
Front wing fastening elements
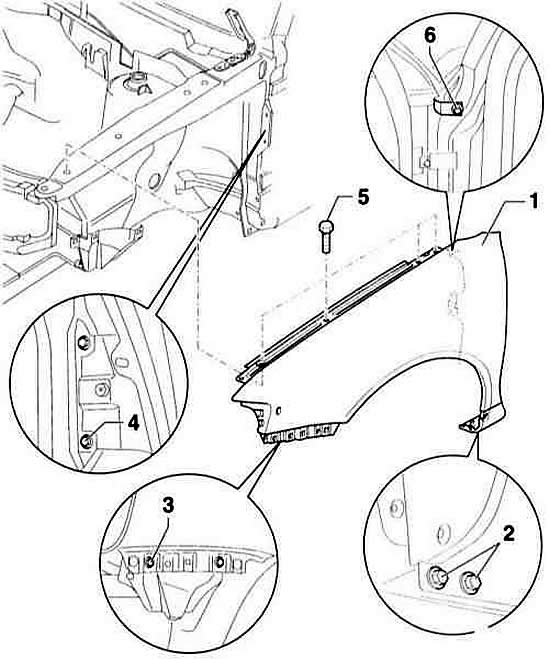
- 1 wing
- 2 bolt, 10 Nm
- 3 self-tapping screws, 1.5 Nm
- 4 self-tapping screws, 1.5 Nm
- 5 bolt, 15 Nm
- 6 bolt, 15 Nm
Removal
1. Remove the bumper trim, refer to the subsection Removal and installation bumpers.
2. Remove the wheel arch liner, refer to the subsection Removal and installation front and rear wheel arch liners.
3. Unscrew the mounting bolts –5– and the wing and longitudinal beam strips –2–.
4. Remove bolt –6– with the door open.
5. Remove the screws –3– from the guide element.
6. Remove the screws –4– under the closing sheet.
7. Remove the wing –1–.
Installation
1. If necessary, restore the paintwork of the wing.
2. Install the wing –1– in place.
Warning: Ensure that the specified clearances are maintained, refer to Specifications.
3. Screw in self-tapping screws –3– and –4– at the guide element and under the closing sheet.
4. Screw in bolt –6– with the door open.
5. Screw in bolts –5– at the wing strip and at the longitudinal beam –2–.
6. Install the wheel arch liner, refer to the subsection Removal and installation front and rear wheel arch liners.
7. Install the bumper trim, refer to the subsection Removal and installation bumpers.
(This article was previously published on the resource AUDIMANUAL.ru)