Repair Chevrolet Repair Toyota Repair Honda Repair AvtoVAZ Repair Mercedes-Benz Repair BMW Repair Opel
Home  |  Contacts  |  Sitemap  |    
English Русский
Български
Беларускі
Український
Српски
Hrvatski
Română
Polski
Slovenský
Magyar
AudiManual.ru


  • AUDI 80
  • AUDI 100
  • AUDI A3
  • AUDI A4
  • AUDI A6
  • AUDI A8
  • AUDI Q
  • OTHER
  • ARTICLES
Type 8L (1996-2003)

Replacing the rubber bands of windshield wipers (Audi A3 8L)

  • Home
  • Audi A3
  • Type 8L (1996-2003)
  • Body
  • Exterior (external elements)
  • Replacing the rubber bands of windshield wipers
            0
Table of contents: Removal ↓ Installation ↓
Windscreen wiper blades should be replaced if the glass cleaning quality is poor. Complete windscreen wipers are available for sale (rubber with holder), as well as individual brushes. If only the rubber is replaced, be careful not to bend the holder.

Warning: If the brushes move jerkily, it is usually not enough to replace the brushes or rubber. Just in case, it is necessary to check and, if necessary, adjust the angle of the levers, while referring to the subsection Removal and installation, checking and adjustment of the final position of the windshield wiper arms.


Removal


Removal


1. Fold the lever up and place the brush at a right angle to the lever.

2. Press the spring clip (A) (direction of the arrow) and slide the brush down (B) from the hook on the lever. Remove the brush from the hook on the lever.

2. Press the spring clip (A) (direction of the arrow) and slide the brush down (B) from the hook on…


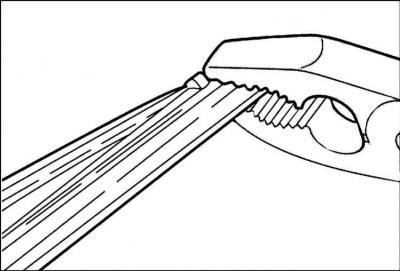
3. Squeeze both steel tires with pliers on the closed side of the rubber and remove them from the upper bracket. Then remove the rubber together with the tires from the remaining brackets of the brush.


Installation


1. Insert new rubber without tires loosely into the lower brackets of the brush.

2. Insert both tires into the first groove of the rubber so that the grooves of the tires point towards the rubber and fix them in the rubber tabs of the grooves.

2. Insert both tires into the first groove of the rubber so that the grooves of the tires point…


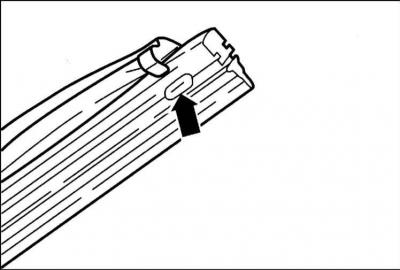
3. Press both steel bars and rubber together with pliers and insert into the upper bracket so that the bracket tabs on both sides are fixed in the clamping grooves (arrow on the illustration) rubber.

4. Insert the rubber through the lever and secure the spring clips into the hooks of the lever. The fairing on the brush, if any, should be facing downwards.

5. Lower the lever back. Make sure that the rubber is in contact with the glass everywhere, otherwise carefully bend the holder.

[Read the original source on the website: AudiManual.ru]
The article was checked by auto expert Nikita Rudakov
This article is available at russian, bulgarian, belarusian, ukrainian, serbian, croatian, romanian, polish, slovak, hungarian

Share information:
Previous articles
Audi A3 Type 8L: Exterior (external elements)
Next articles

Removal and installation door and wing trim
Removal and installation side molding
Removal and installation the B-pillar trim
Removal and installation the outside mirror and mirror glass
Adjusting the windshield washer nozzles
Removal and installation windshield washer nozzles
Removal and installation, checking and adjustment of the final…


Similar articles on other Audi car models:
Replacing the wiper blade rubber Audi 80 B3 (1986-1991)
Checking windshield wipers and washers Audi 100 C4 (1990-1994, petrol)
Replacing the rubber bands of the windshield wiper blades Audi A4 B6 (2000-2006)
Replacing the battery in the remote control key Audi A6 C5 (1997-2004)
Replacing spark plugs Audi A8 D2 (1994-2002)
Servicing windshield wipers and washer fluid nozzles Audi Q7 Typ 4L (2005-2015, diesel)
Air filter — cleaning the housing and replacing the filter… Audi A2 (1999-2005)
Link to this page in different formats


Visitor comments

No comments yet


How much will 17 + 46 =


A3(8L, 1996-2003) 
  • General information
  • User manual
  • Maintenance
  • Power unit
  • Engine repair
  • Lubrication system
  • Cooling system
  • Supply system
  • Fuel injection system
  • Exhaust system
  • Ignition system
  • Transmission
  • Manual transmission
  • Automatic transmission
  • Clutch and drive shafts
  • Chassis
  • Brake system
  • Front suspension
  • Rear suspension
  • Steering
  • Body
  • Ventilation and heating
  • Exterior (external elements)
  • Interior (internal elements)
  • Doors, covers and windows
  • Electrical equipment
  • Power devices
  • Lighting and appliances
  • Electrical circuits
 
AudiManual.ru © 2017-2026 · Mobile version · Feedback · Sitemap: EN BG BY UA RS HR RO PL SK HU · Site search · News and articles
80 B2 · 80 B3 petrol · 80 B3 · 80 B4 · 100 C3 diesel · 100 C3 petrol · 100 C3 · 100 C4 petrol · 100 C4 · A3 Type 8L · A4 B5 petrol · A4 B5 · A4 B6 petrol · A4 B6 · A4 B7 · A4 B8 · A6 C4 · A6 C5 · A6 C5 Allroad · A8 D2 · Q5 Type 8R · Q7 Typ 4L · Audi A2 ·
This site uses cookies 🍪. Click the button to accept this fact.