
Table of contents: V6 petrol engines ↓ V8–2V petrol engines ↓ V8–5V petrol engines ↓ Left cylinder head ↓ Right cylinder head ↓ Checking spark plugs ↓
Spark plugs are replaced during routine maintenance.
If unscheduled spark plug replacement is necessary, use only spark plugs recommended for the engine.
This will prevent engine failures, loss of power, deterioration of throttle response, increased levels of harmful substances in exhaust gases and interference with radio reception. Particularly important characteristics of spark plugs are the number of electrodes, the glow number and, in some cases, the ability not to interfere with radio reception.
Normal operation of spark plugs is one of the most important conditions for efficient engine operation. Only spark plugs recommended by the manufacturer should be installed on the engine. If the engine is in good condition, spark plug cleaning is rarely performed.
V6 petrol engines
Loosen the clamps and remove the air tube connecting the air filter and the throttle body.
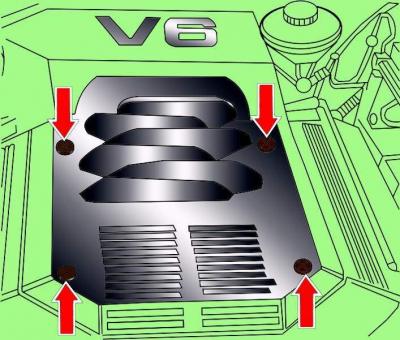
Fig. 3.1–41. Location of engine casing mounting screws
Remove the four screws and remove the engine cover (Fig. 3.1–41).
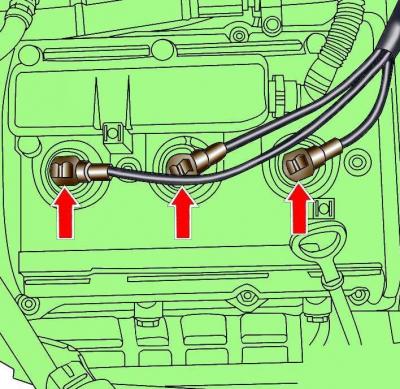
Fig. 2–10. Location of high-voltage wires on spark plugs of V6 gasoline engine
Remove the high-voltage wire tips from the spark plugs (Fig. 2–10).
Clean the spark plugs with a brush, vacuum cleaner or compressed air jet to prevent dirt from getting into the engine cylinders after unscrewing the spark plugs. Unscrew the spark plugs with spark plug wrench 3122 B.
Screw in the new spark plugs and tighten them to a torque of 30 Nm.
Connect the high-voltage wires to the spark plugs.
Install the engine cover and the air tube connecting the air filter and the throttle body.
V8–2V petrol engines
Loosen the clamps and remove the air tube connecting the air filter and the throttle body.
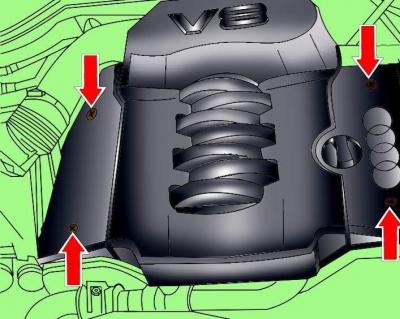
Fig. 3.2–3. Location of engine casing mounting screws
Loosen the screws and remove the engine casing (see Fig. 3.2–3).
Release the clips and disconnect the electrical connectors from the ignition coils.

Fig. 2–11. Location of ignition coils on spark plugs of V8–2V gasoline engine
Unscrew the ignition coil mounting bolts and remove them (Fig. 2–11).
Clean the spark plugs with a brush, vacuum cleaner or compressed air jet to prevent dirt from getting into the engine cylinders after unscrewing the spark plugs. Unscrew the spark plugs with spark plug wrench 3122 B.
Screw in the new spark plugs and tighten them to a torque of 30 Nm.
Check and replace the sealing rings if necessary, install the ignition coils and secure them with the bolts, tightening them to a torque of 10 Nm.
Connect the electrical connectors to the ignition coils.
V8–5V petrol engines
Unscrew the screws and remove the engine casing (see Fig. 3.2–3).
Left cylinder head
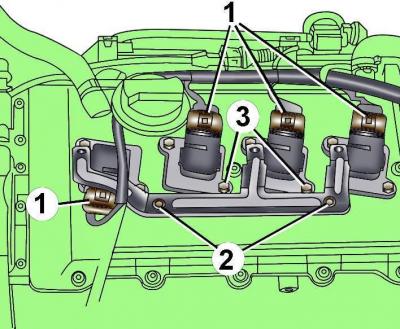
Fig. 2–12. Location of electrical connectors (1) and bolts (3) for mounting the ignition coils, as well as bolts (2) for mounting the bracket on the left cylinder head of the V8–5V gasoline engine
Disconnect electrical connectors 1 (Fig. 2–12) from the ignition coils.
Unscrew bolts 2 and remove the bracket.
Unscrew the 3 bolts securing the ignition coils and remove the coils.
Clean the spark plugs with a brush, vacuum cleaner or compressed air jet to prevent dirt from getting into the engine cylinders after unscrewing the spark plugs. Unscrew the spark plugs with spark plug wrench 3122 B.
Screw in the new spark plugs and tighten them to a torque of 30 Nm.
Check and replace the sealing rings if necessary, install the ignition coils and secure them with the bolts, tightening them to a torque of 10 Nm.
Install the bracket and connect the electrical connectors to the ignition coils.
Right cylinder head
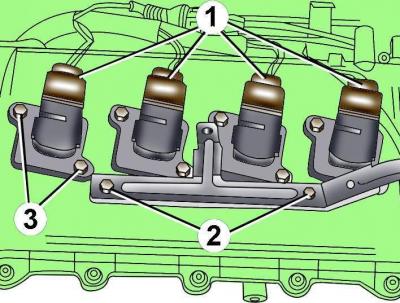
Fig. 2–13. Location of electrical connectors (1) and bolts (3) for mounting the ignition coils, as well as bolts (2) for mounting the bracket on the right cylinder head of the V8–5V gasoline engine
Disconnect electrical connectors 1 from the ignition coils (Fig. 2–13).
Unscrew bolts 2 and remove the bracket.
Unscrew the 3 bolts securing the ignition coils and remove the coils.
Clean the spark plugs with a brush, vacuum cleaner or compressed air jet to prevent dirt from getting into the engine cylinders after unscrewing the spark plugs. Unscrew the spark plugs with spark plug wrench 3122 B.
Screw in the new spark plugs and tighten them to a torque of 30 Nm.
Check and replace the sealing rings if necessary, install the ignition coils and secure them with the bolts, tightening them to a torque of 10 Nm.
Install the bracket and connect the electrical connectors to the ignition coils.
Checking spark plugs
The appearance of the spark plugs can be used to diagnose the condition of the engine. A clean, white, non-fouled spark plug insulator indicates that the fuel-air mixture is too lean. It also indicates that the plug is too hot (heat is slowly removed from the central electrode). It is necessary to adjust the composition of the fuel-air mixture or replace the spark plug.
Dry soot deposits indicate that the mixture is too rich. If the deposit is black and oily, the engine is worn out and needs to be checked and repaired. If the insulator is covered with a light brown deposit, the mixture composition is optimal and the engine is in good condition.
An interelectrode gap that is too large or too small, which changes the spark size, reduces the efficiency of the engine. The gap must always meet technical requirements and is checked with a wire template or feeler gauge. The gap can be adjusted by bending the side electrode with a special tool. The central electrode must never be bent, as this can lead to breakage of the insulator and failure of the spark plug.
Before installing the spark plug into the engine, check that the threads are clean and undamaged.
There are two types of seals installed in the cylinder head: with a flat seat and an elastic (steel or copper-asbestos) gasket or with a conical seat without a gasket. When installing a new spark plug, first of all, it is necessary to check what kind of seal is provided in the cylinder head, the diameter and length of the threaded part. If you install a spark plug with a long threaded part in a head with a short thread, then the protruding part of the spark plug will be covered with carbon deposits and resins, lead deposits. The spark plug will overheat, and the threads may melt. When unscrewing such a spark plug, the threads in the cylinder head can be damaged. With a short threaded part of the spark plug and a long one in the head, carbon deposits and various deposits clog the threads, and they melt. After long work, you have to go through the threaded part in the cylinder head with a tap, but so that dirt does not remain in the cylinder.
The most important parameter characterizing a spark plug is the temperature regime of its elements, primarily the central electrode and the surface of the insulator skirt. The main problem in creating a spark plug for a high-speed engine is the fulfillment of conflicting requirements. On the one hand, it is necessary to ensure a sufficiently high temperature of the insulator skirt to prevent the formation of carbon deposits on it during long-term operation at low loads and idling, which leads to shunting, especially at low temperatures. When switching to high loads at high temperatures, the spark plug insulator self-cleans due to the burning out of deposits on it. On the other hand, at high rotation speed and heavy load, the temperature of the central electrode and the lower part of the insulator should not exceed the upper limit at which glow ignition occurs (ignition of the mixture before a spark from the ignition system occurs). From cycle to cycle, ignition occurs earlier and earlier, the temperature of the parts increases until something burns: in the best case, the spark plug, in the worst case, the piston. So, a small spark plug can cause big trouble.
How can you prevent the possibility of pre-ignition? First of all, you need to ensure that the ignition is properly (according to the instructions) setting the ignition timing angles, preventing too early ignition.