
Viscosity and specifications
At the factory, the engine is filled with special high-quality multigrade oil, which is suitable for operation at any time of the year, with the exception of extremely cold climatic zones.
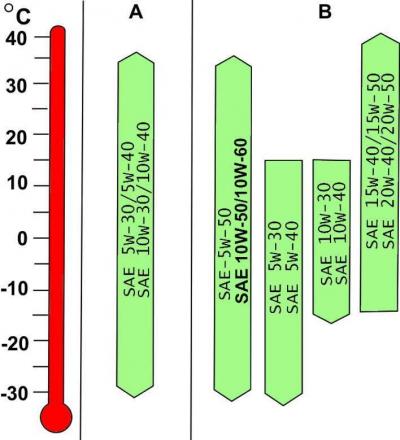
Pic. 2–1. Viscosity of motor oils
The engine can be topped up with oil of a different specification. The degree of oil viscosity should be selected in accordance with the data in fig. 2–1. If the air temperature is only briefly outside the temperature range shown in the figure, the oil should not be changed.
Gasoline engines
A - all-weather oils with increased anti-friction properties, specification VW 500 00.
B - all-weather oils, specification VW 501 01.
– all-weather oils, specification API–SF or SG.
Diesel engines
A - all-weather oils with enhanced anti-friction properties, specification VW 500 00 (for turbocharged diesel engines only mixed with VW specification 505 00 oil).
B - all-weather oils, specification VW 505 00 (for all diesel engines),
– all-weather oils, API–CD specification (for turbocharged diesel engines only in case of emergency for topping up).
– all-weather oils, specification VW 501 01 (for turbocharged diesel engines only mixed with VW specification 505 00 oil).
The quality of motor oils
All-weather oils of specifications VW 501 01 and VW 505 00 are relatively inexpensive and have the following qualities:
- the possibility of year-round use in temperate climate zones;
- excellent cleaning properties;
- good lubricity at any temperature and engine load;
- stability of initial properties for a long time.
All-weather oils with improved anti-friction properties according to the VW 500 00 specification, in addition, have additional advantages:
- the ability to use at almost any outdoor temperature;
- low engine power losses due to friction;
- make it easier to start a cold engine even at very low temperatures.
Warnings: Seasonal oils, due to their specific viscosity-temperature properties, cannot normally be used all year round and should therefore only be used in appropriate climatic zones.
When using multigrade oils SAE 5W-30, it is necessary to avoid prolonged operation of the engine at high speed and constant heavy load on the engine. These restrictions do not apply to multigrade oils with improved antifriction properties.
Additives for motor oils
Additives that reduce friction losses should not be added to engine oil.
Blending oils
This and similar questions are of interest to many motorists. Unfortunately, oils cannot be mixed, even if they are oils from leading manufacturers (Shell, Mobil, British Petroleum). Each company produces commercial oils, adding to the oil base a whole range of additives, the chemical composition of which is kept secret. Therefore, when mixing high-quality oils of the same purpose, made in accordance with the requirements of existing engine oil classification systems, but using technologies from different companies, low-quality mixtures can be obtained due to the incompatibility of additives. Oils from different companies are interchangeable, the possibility of using such oils is often indicated by engine builders. But that doesn't mean they can be mixed. API and ACEA classification systems require mandatory identical test methods (laboratory, bench - motor, etc.) oils from different companies. If desired (or need) automakers may introduce additional tests (or more stringent conditions) oils.
The same applies to mixing mineral or synthetic oils (sometimes even the same company). Synthetic oils, such as hydrocarbon oils, from the same company can be mixed. In this case, the oil manufacturer gives appropriate recommendations and bears responsibility. However, it is not uncommon for oils to deteriorate in quality when mixed. As a result, the engine may rattle as the mixture of incompatible oils turns into «jelly».
In no case should imported and domestic oils be mixed, especially with the addition of domestic additives. Neither the seller nor the consumer knows the composition of the additives that are added to the oils. Some oils «domestic origin» produced «firms», who do not even have basic knowledge of petroleum products. Sometimes such «specialists» using used oils (even without proper regeneration) for production «commodity». Use only oils recommended in the owner's manual.
None «cleaners» («Tocron» and etc.) unable to increase the octane number of gasoline. For this, special additives are used - antiknock agents, which are added during the manufacture of gasoline at refineries, or additives. Cause of detonation (a metallic noise is heard while the engine is running) and glow ignition (the engine continues to run when the ignition is off) there may be carbon deposits in the combustion chamber.
Increasing the compression in the system «with some additives» occurs not due to viscosity additives, since they do not have them in their composition, but for other reasons.
It is not advisable to reduce oil waste in an old engine and increase cylinder compression by using high-viscosity oils, since this will indeed lead to an increase in cylinder compression, but not for long. In the future, engine repairs will cost more.
Cause «acoustic» noise in an old engine is its wear, so it will be cheaper to repair with the subsequent use of high-quality oil. You can reduce the gaps with additives, but the expediency of this should be sorted out so as not to harm the engine.
It is necessary to make it a rule: use a high-quality engine oil of the same brand that matches the engine and do not mix it with synthetic (or semi-synthetic) oil. The engine will thank for this trouble-free operation. Don't buy oil «from the hands», because the packaging is easy to fake.
Changing the oil and oil filter
Periodic oil and oil filter changes are the most important preventive maintenance procedure. During operation, engine oil ages - it becomes liquid and contaminated, which leads to premature engine wear.
An oil change should be carried out immediately after a trip on a still warm engine, so that the oil drains better along with contaminants.
Raise the car on a lift or place it in a horizontal position on a viewing ditch.
Remove the lower engine mudguard.
V6 petrol engines
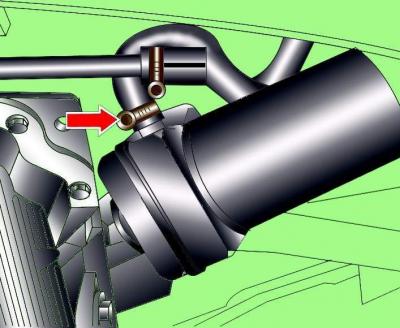
Pic. 2–2. Location of the oil filter on V6 gasoline engines
Unscrew the oil filter (pic. 2–2). If the filter is difficult to unscrew, use the special key Hazet 2171-1.
Place an oil collecting container under the oil drain hole and unscrew the plug. If necessary, press the plug when unscrewing to prevent the oil from draining prematurely and drain the engine oil.
When the oil is completely drained, wipe the oil around the drain hole and screw in the oil drain plug with a new O-ring.
Wipe the oil filter installation site and screw in a new oil filter.
Fill the engine with the correct brand of oil.
V8 petrol engines
The oil filter is located on the right rear of the engine.
V8-5V engines do not have an oil drain plug on the oil filter cap.
Place an oil collecting container under the drain hole and unscrew the plug. If necessary, press the plug when unscrewing to prevent the oil from draining prematurely and drain the engine oil.
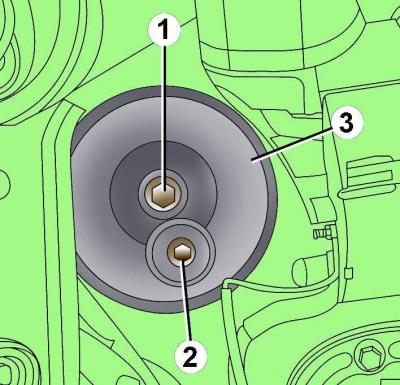
Pic. 2–3. Bolt location (1) oil filter mounts (3) and traffic jams (2) drain hole
Unscrew the drain plug 2 on the oil filter (pic. 2–3).
Unscrew the fastening bolt 1 and remove the cover and the oil filter element.

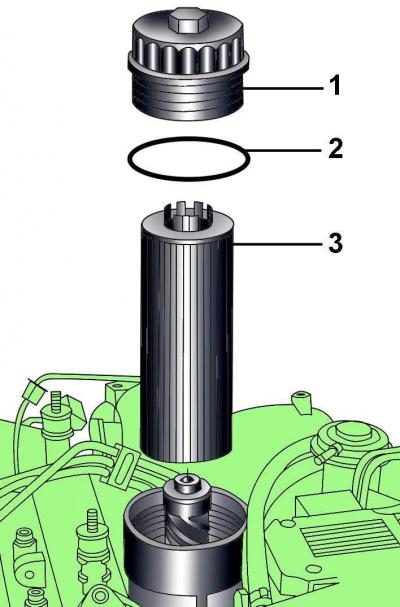
Pic. 2–4. Elements of the oil filter of an eight-cylinder gasoline engine: 1 - a bolt; 2 - seal; 3 - cover; 4 - sealing ring; 5 - filter element; 6 - sealing ring; 7 - drain plug
Wipe the oil filter housing and cover and install a new filter element 5 (pic. 2–4) oil filter.
Lubricate O-ring 4 with fresh engine oil, install cover 3 with O-ring in place and secure with bolt 1 with a new seal 2, tightening it to 25 Nm.
Screw plug 7 with a new sealing ring 6 into the filter cover and tighten it to 50 Nm.
Wipe off the oil around the drain hole and screw the drain plug into the oil pan, tightening it to 35 Nm.
Fill the engine with the correct brand of oil.
On V8–5V engines, tighten the oil filter cover bolt to 25 Nm and the oil pan plug to 50 Nm.
Diesel engines V6 TDI
Pic. 2–5. The oil filter of the V6 TDI diesel engine: 1 – a cover; 2 - sealing ring; 3 - filter element
Using a box wrench SW 32, unscrew cover 1 of the oil filter (pic. 2–5).
Remove sealing ring 2 and oil filter element 3.
Clean the oil filter housing and install a new filter element 3.
Install a new sealing ring 2 on the cover 1 and screw the cover onto the housing, tightening it with a torque of 25 Nm.
Place an oil drain container under the drain hole and unscrew the plug, pressing if necessary when unscrewing to prevent the oil from leaking out prematurely, and drain the engine oil.
When the oil is completely drained, wipe off the oil around the drain hole and screw in the plug with a new O-ring, tightening it to 25 Nm.
Fill the engine with the correct brand of oil.
Diesel engines 3.3l V8 TDI
The oil filter is located on the right side of the engine, near the lower frame.
Place an oil drain container under the oil drain hole and unscrew the plug. If necessary, press the plug when unscrewing to prevent the oil from draining prematurely and drain the engine oil.

Pic. 2–6. Plug location (1) drain hole on the lid (2) oil filter
Unscrew plug 1 (pic. 2–6) drain hole from cover 2 of the oil filter.
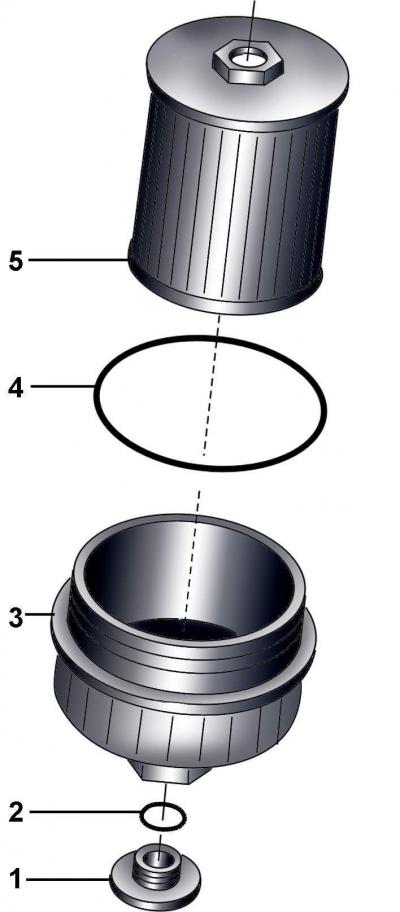
Pic. 2–7. Diesel engine oil filter 3.3l V8 TDI: 1 - plug; 2 - sealing ring; 3 - cover; 4 - sealing ring; 5 - filter element
Unscrew cover 3 of the oil filter (pic. 2–7).
Remove sealing ring 4 and filter element 5.
Clean the oil filter housing and install a new filter element 5.
Install a new sealing ring 4, lubricated with a thin layer of oil, on cover 3 and screw the cover onto the housing, tightening it to a torque of 25 Nm.
Screw in the plug 1 with a new sealing ring 2 and tighten it to 10 Nm.
Screw in the drain plug with a new sealing ring, tightening it with a torque of 50 Nm.
Fill the engine with the correct brand of oil.
Engines with a turbocharger
After changing the oil and oil filter, the engine should be idling at the first start until the oil pressure warning light goes out. If you increase the speed when the lamp is on, turbocharger may fail.
Checking the engine oil level

Pic. 2–8. Oil level and location of marks on the pointer (dipstick) oil level: a - minimum; b - normal; c - maximum
Check engine oil level. If the oil level is low, add oil in small portions until the oil level reaches the MAX mark (pic. 2–8) on the index (dipstick) oil level.
If the oil level is at the MIN·mark, adding about another liter will raise the oil level to the maximum level. Close the filler cap.
Start the engine and let it run for a few minutes. Check for oil leaks around the filter and drain plug on the pan. Be aware that the oil pressure warning light may be on for a few seconds (until the oil fills the entire lubrication system).
Stop the engine and wait a few minutes for the oil to drain into the sump. Check the oil level and top up if necessary. Check the tightness of the plug.
Visitor comments