
Vehicle lighting and lamps Audi A8 D2
Removal and installation headlights
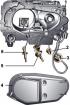
Fig. 18–33. Headlight with halogen lamp: 1 – headlight housing; 2 – fog light bulb H3 (12 V, 55 W); 3 - 5-pin electrical connector; 4 – rear headlight cover; 5...
Fig. 18–33. Headlight with halogen lamp: 1 – headlight housing; 2 – fog light bulb H3 (12 V, 55 W); 3 - 5-pin electrical connector; 4 – rear headlight cover; 5...

Replacing external lighting lamps
Before replacing the exterior light bulb, remove the ground cable from the battery. Remember: if the bulb has just been on, it may be too hot. Before replacing...
Before replacing the exterior light bulb, remove the ground cable from the battery. Remember: if the bulb has just been on, it may be too hot. Before replacing...

Low beam lamp and/or fog lamp
You can replace the lamps without removing them headlights . Open the hood. Pull back the plastic cover headlights and take it off. Fig. 18–36. Location of...
You can replace the lamps without removing them headlights . Open the hood. Pull back the plastic cover headlights and take it off. Fig. 18–36. Location of...

High beam headlight bulb
Open the hood. Pull back the plastic cover headlights and take it off. Fig. 18–36. Location of electrical connectors on headlight bulbs: 1 – low beam bulb...
Open the hood. Pull back the plastic cover headlights and take it off. Fig. 18–36. Location of electrical connectors on headlight bulbs: 1 – low beam bulb...

Headlight adjustment
Precise adjustment is only possible with the help of a special device. When adjusting the headlights, the fog lights are also adjusted headlights . Fig. 18–37....
Precise adjustment is only possible with the help of a special device. When adjusting the headlights, the fog lights are also adjusted headlights . Fig. 18–37....

Front direction indicator
The front turn signal can be removed without removing the headlights . Fig. 18–38. Using a screwdriver blade to release the front turn signal retainer Using a...
The front turn signal can be removed without removing the headlights . Fig. 18–38. Using a screwdriver blade to release the front turn signal retainer Using a...

Side turn signal repeater
Removal Fig. 18–41. Removing the side turn signal repeater Carefully slide the turn signal repeater rearward and remove it from the wing (Fig. 18–41)....
Removal Fig. 18–41. Removing the side turn signal repeater Carefully slide the turn signal repeater rearward and remove it from the wing (Fig. 18–41)....

Rear fender light bulbs
Open the trunk lid. Remove the trim where the tail light is located. Fig. 18–42. Rear light mounting elements in the wing: 1 – cover; 2 – latch; 3 – nuts; 4 –...
Open the trunk lid. Remove the trim where the tail light is located. Fig. 18–42. Rear light mounting elements in the wing: 1 – cover; 2 – latch; 3 – nuts; 4 –...

Rear light in the wing
Removal Open the trunk lid. Remove the trim where the tail light is located. Fig. 18–42. Rear light mounting elements in the wing: 1 – cover; 2 – latch; 3 –...
Removal Open the trunk lid. Remove the trim where the tail light is located. Fig. 18–42. Rear light mounting elements in the wing: 1 – cover; 2 – latch; 3 –...

Rear light bulbs in the trunk lid
Open the trunk lid. Remove the trunk lid trim. Fig. 18–44. Location of the mounting nuts and rear light bulbs in the trunk lid: 1 – direction indicator lamp...
Open the trunk lid. Remove the trunk lid trim. Fig. 18–44. Location of the mounting nuts and rear light bulbs in the trunk lid: 1 – direction indicator lamp...

Rear light in the trunk lid
Removal Open the trunk lid. Remove the trunk lid trim. Remove the holders with bulbs from the rear light by turning the holder clockwise (counterclockwise)....
Removal Open the trunk lid. Remove the trunk lid trim. Remove the holders with bulbs from the rear light by turning the holder clockwise (counterclockwise)....

High-mounted brake light
The high-mounted brake light is mounted on the rear shelf. Fig. 18–45. Upper brake light: 1 – housing; 2 – screw; 3 – lamp holder; 4 – lamp; 5 – diffuser...
The high-mounted brake light is mounted on the rear shelf. Fig. 18–45. Upper brake light: 1 – housing; 2 – screw; 3 – lamp holder; 4 – lamp; 5 – diffuser...

Front interior light
Removal Using a screwdriver blade as a lever, remove the diffuser from the interior light bulb (12 V, 10 W). Fig. 18–46. Removing the screw in the interior...
Removal Using a screwdriver blade as a lever, remove the diffuser from the interior light bulb (12 V, 10 W). Fig. 18–46. Removing the screw in the interior...
This section is available on russian, bulgarian, belarusian, ukrainian, serbian, croatian, romanian, polish, slovak, hungarian
Similar sections of other Audi car models:
Electrical equipment: Lighting and signaling Audi 100 C4 (1990-1994, petrol)
Electrical equipment: Lighting and lamps Audi A4 B5 (1994-2001, petrol)
Electrical equipment: Lighting and alarm Audi Q5 Type 8R (2008-2017)
Electrical equipment: Lighting and lamps Audi A2 (1999-2005)
Electrical equipment: Lighting and signaling Audi 100 C4 (1990-1994, petrol)
Electrical equipment: Lighting and lamps Audi A4 B5 (1994-2001, petrol)
Electrical equipment: Lighting and alarm Audi Q5 Type 8R (2008-2017)
Electrical equipment: Lighting and lamps Audi A2 (1999-2005)
Share information:
- General information
- User manual
- Maintenance
- Power unit
- Petrol engine 2.8L
- Petrol engine 3.7L and 4.2L
- Diesel engine 2.5L
- Diesel engine 3.3L
- Ignition and injection (gasoline)
- Fuel system (diesel)
- Lubrication system
- Cooling system
- Transmission
- Clutch
- Car gearbox
- Drive shafts
- Cardan gear
- Car suspension
- Chassis
- Wheels and tires
- Steering
- Brake system
- Body
- Exterior (external elements)
- Interior (internal elements)
- Heating and air conditioning
- Electrical equipment
- Fuses and relays
- Lighting and lamps
- Instruments and switches