Repair Chevrolet Repair Toyota Repair Honda Repair AvtoVAZ Repair Mercedes-Benz Repair BMW Repair Opel
Home  |  Contacts  |  Sitemap  |    
English Русский
Български
Беларускі
Український
Српски
Hrvatski
Română
Polski
Slovenský
Magyar
AudiManual.ru


  • AUDI 80
  • AUDI 100
  • AUDI A3
  • AUDI A4
  • AUDI A6
  • AUDI A8
  • AUDI Q
  • OTHER
  • ARTICLES
B8 (2007-2015) B7 (2004-2008) B6 (2000-2006) B6 (2000-2006, petrol) B5 (1994-2001) B5 (1994-2001, petrol)

Replacing spark plugs (Audi A4 B5)

  • Home
  • Audi A4
  • B5 (1994-2001, petrol)
  • Power unit
  • Ignition system
  • Replacing spark plugs
            0
Table of contents: Removal spark plugs ↓ "Spark Plug Face" ↓ Distance between electrodes ↓
Replacing spark plugs


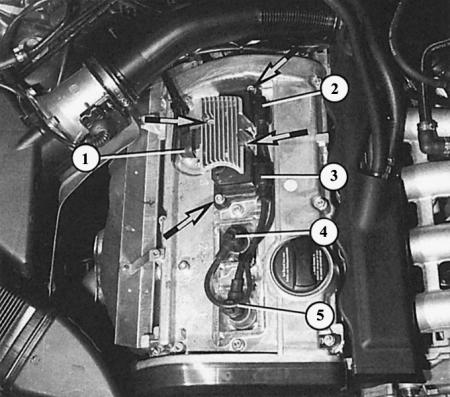
To replace the spark plugs in a 92 kW engine, disconnect the connector (1) on the final power stage and unscrew the final stage together with the ignition coils. The screws are shown with arrows. When installing, take into account the order of wiring: the wire from the rear coil (2) goes to the 2nd cylinder (4); wire from the front coil (3) – to the 1st cylinder (5).

The maintenance plan provides for replacement of spark plugs every 60,000 km or every three years, whichever comes first. The time interval prevents the occurrence of a defect due to aging at low mileage.

Audi provides a very long service interval, which can only be observed if the approved spark plug types are used. Therefore, there is no reason to extend it even further. Particular attention should be paid to the working condition of the ignition system if the cars have a catalytic converter - we have already discussed this.

It is worth critically examining the removed spark plugs: below you will read what the "face of the spark plug" says.


If the spark plugs are sometimes unscrewed for inspection: it is advisable not to clean the spark plugs by hand. This damages the insulating layer of the intermediate electrode of the spark plug (steatite).

Removal spark plugs


1. 1.8L engine and six-cylinder engine: Remove the engine cover.

2. 1.8L 92kW engine: Unscrew and remove the ignition coils with the power output stage; remove the spark plug connectors.

3. 1.8L 110kW engine: Unscrew and remove the individual ignition coils.

4. When dismantling the ignition coil connectors, do not pull on the wire, but grab the connector itself.

5. Unscrew the spark plugs and place them in order of the cylinders so that you can draw conclusions about the condition of the spark plug of the corresponding cylinder.

6. If the spark plugs are seated very tightly, do not use force, otherwise you may strip the spark plug threads in the cylinder head, which is made of light metal.

7. Warm up the engine and now unscrew the spark plugs.

8. When installing, do not screw cold spark plugs tightly into the heated cylinder head, otherwise they will then sit as if riveted.

9. Spark plugs should be tightened to 30 Nm. If you don't have a torque wrench at hand:

10. Screw the spark plug in so that the sealing ring fits – it will no longer be possible to screw it in without applying force either by hand or with a spark plug wrench.

11. Now screw in the new spark plug using a special key exactly a quarter of a turn harder.

12. A used spark plug can only be tightened approximately 15°.


12. A used spark plug can only be tightened approximately 15°.


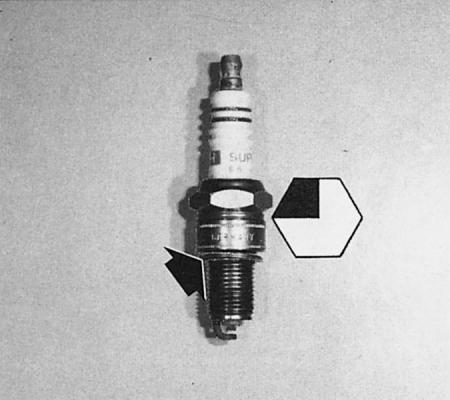
Spark plugs should be tightened to 30 Nm. If you don't have a torque wrench at hand: screw the plug in so that the sealing ring (arrow) is flush - in this case, it cannot be tightened further by hand or with a wrench without applying force. Now, if the plug is new, tighten it with a wrench exactly a quarter of a turn. If the plug has been used, then turn it with a wrench only about 15°, this is enough.

Tips: To increase the sliding of the spark plug threads, you can scrape a little graphite from a soft pencil into the threads or lubricate them with a little copper-containing grease. The oil or grease will "bake" the spark plug into the cylinder head threads.


"Spark Plug Face"


Spark plugs are, to a certain extent, witnesses to the combustion process in the engine. The appearance of the top of the plug (the "face of the plug") can determine how optimally the engine is working. Beforehand, the car should be thoroughly warmed up on a country road or on a motorway. Checking after driving a short distance can lead to an incorrect conclusion. Look at the top of the insulator with the middle electrode and the side electrodes:


  • The top of the insulator is light gray or brownish: the injection system is installed correctly, the engine runs economically.
  • Heavy deposits: The cause may be additives in the engine oil, or in the fuel, or increased oil consumption. Change the brand of oil or fuel.
  • Black deposits similar to soot: due to frequent movement over short distances, the spark plug does not reach the self-cleaning temperature, incorrect heat range.
  • The top of the insulator is whitish in color: the ignition timing is shifted too much towards the "advance" side, the electronic ignition timing adjustment or the detonation sensor is not working.
  • Melted areas on the center and side electrodes: glow ignition due to deposits in the combustion chamber, overheated valves, incorrectly set ignition point, faulty ignition point adjustment or heat stagnation due to insufficient cooling.
  • Destruction of the insulator tip, initially visible as hairline cracks: detonation combustion due to low-quality fuel, incorrect ignition timing, faulty ignition point adjustment, faulty knock sensor, insufficient engine cooling or lean fuel-air mixture due to by-product air.
  • Yellowish shiny layer on the top of the insulator: deposits formed due to additives in gasoline and motor oil, which, under a sharp full load on the engine, turned into a liquid state and became electrically conductive, and as a result - ignition interruptions. When driving short distances for a week, you should not immediately subject the engine to full load.
  • Oil layer on the electrodes and inner surface of the spark plugs: defective piston rings, valve guides or valve stem gaskets.
  • If the spark plug does not show any special features in its appearance, but the engine starts poorly or jerks, the spark plugs may still be the cause. When starting a cold engine, invisible cracks in the ceramic insulator may be filled with fuel condensate, which diverts the spark. Spark plugs can also fail under pressure, although a spark can be seen when removed. Replace them if in doubt.


Distance between electrodes


The fuel-air mixture and exhaust gases contribute to the corrosion of the metal electrodes of the spark plugs. And the high voltage during the spark jumps tears off the smallest particles of metal from them, as a result of which the distance between the spark plug electrodes increases over time. With spark plugs with three electrodes, the ignition spark can "find" the shortest path. Therefore, it is almost not necessary to bend the electrodes.
The article was checked by auto expert Georgy Rodionov
This article is available at russian, bulgarian, belarusian, ukrainian, serbian, croatian, romanian, polish, slovak, hungarian

Share information:
Previous articles
Audi A4 B5: Ignition system
Next articles

High voltage unit
Ignition distributor
Troubleshooting Ignition
Work on the ignition system
Choosing the Right Spark Plugs
Checking the ignition timing


Similar articles on other Audi car models:
Replacing spark plugs Audi 80 B3 (1986-1991)
Replacing spark plugs Audi 100 C4 (1990-1994, petrol)
Checking and replacing spark plugs Audi A3 Type 8L (1996-2003)
Replacing spark plugs (leaded petrol models) Audi A6 C4 (1994-1997)
Replacing spark plugs Audi A8 D2 (1994-2002)
Removal glow plugs Audi Q5 Type 8R (2008-2017)
Spark plugs — replacement Audi A2 (1999-2005)
Link to this page in different formats


Visitor comments

No comments yet


How much will 35 + 37 =


A4(B8, 2007-2015) 
  • General information
  • Operating instructions
  • Power unit
  • Petrol engines 1.8 l
  • Petrol engines 1.8/2.0 l
  • Petrol engines 3.0 l
  • Petrol engines 3.2 l
  • Fuel system (petrol)
  • Diesel engines 2.0 l (CA*)
  • Diesel engines 2.0 l (CJCB)
  • Diesel engines 2.7/3.0 l
  • Diesel engines 3.0 l
  • Fuel system (diesel)
  • Transmission
  • Manual gearbox 0B1
  • Manual gearbox 0B2
  • Manual gearbox 0B3
  • Manual gearbox 0B4
  • Automatic transmission 0B5
  • Automatic transmission 0B6
  • Automatic transmission 0AW
  • All-wheel drive system
  • Chassis
  • Front suspension
  • Rear suspension
  • Brake system
  • Steering system
  • Body
  • Exterior
  • Interior
  • Seats
  • Doors, locks and windows
  • Security system
  • Heating and air conditioning
  • Electrical equipment
  • Audio system
  • Power devices
  • Equipment and devices
  • Lighting and lamps
  • Electrical circuits
 
A4(B7, 2004-2008) 
  • General information
  • Introduction to manual
  • Troubleshooting
  • Operating instructions
  • Maintenance
  • Power unit
  • Petrol engines 2.0 (ALT)
  • Petrol engines 2.0 (TFSI)
  • Petrol engines 1.8 (MPI)
  • Diesel engines
  • Cooling system
  • Air conditioner
  • Fuel and exhaust system
  • Ignition system
  • Starting and charging
  • Transmission
  • Clutch
  • Manual gearbox
  • Automatic gearbox
  • Drive shafts
  • Chassis
  • Brake system
  • Front suspension
  • Rear suspension
  • Steering
  • Body
  • Exterior
  • Interior
  • Electrical equipment
  • Equipment and devices
  • Lighting and signaling
  • Windscreen wipers and washers
  • Electrical diagrams
  • Electrical diagrams (since 2007)
 
A4(B6, 2000-2006) 
  • General information
  • Vehicle Description
  • User manual
  • Maintenance
  • Power unit
  • Gasoline engine
  • Diesel engine
  • Lubrication system
  • Cooling system
  • Supply system
  • Injection system
  • Exhaust system
  • Ignition and control
  • Transmission
  • Gear box
  • Clutch and drive shafts
  • Chassis
  • Brake system
  • Car suspension
  • Steering
  • Body
  • Heating and ventilation
  • Exterior (external elements)
  • Interior (internal elements)
  • Electrical equipment
  • Power devices
  • Lighting and appliances
  • Electrical circuits
 
A4(B6, 2000-2006, petrol) 
  • General information
  • Introduction to the guide
  • Car care
  • Power unit
  • Engine repair
  • Lubrication system
  • Cooling system
  • Injection and control system
  • Ignition system
  • Power and exhaust system
  • Transmission
  • Clutch and drive shafts
  • Car gearbox
  • Chassis
  • Suspension and wheels
  • Steering
  • Brake system
  • Body
  • Interior
  • Exterior
  • Electrical equipment
  • Equipment and devices
  • Lighting and signaling
  • Power devices
  • Electrical circuits
 
A4(B5, 1994-2001) 
  • General information
  • Introduction to the guide
  • Car care
  • Maintenance (gasoline)
  • Maintenance (diesel)
  • Power unit
  • Gasoline engines
  • Diesel engines
  • Engine overhaul
  • Cooling system
  • Fuel injection (gasoline)
  • Fuel system (diesel)
  • Exhaust system
  • Ignition system
  • Transmission
  • Clutch
  • Mechanical gearbox
  • Automatic gearbox
  • Drive shafts
  • Chassis
  • Brake system
  • Car suspension
  • Steering
  • Body
  • Exterior
  • Interior
  • Doors, locks and windows
  • Heating and ventilation
  • Electrical equipment
  • Power devices
  • Equipment and devices
  • Electrical circuits
 
A4(B5, 1994-2001, petrol) 
  • General information
  • Vehicle description
  • Maintenance
  • Power unit
  • Engine repair
  • Turbocharging
  • Exhaust system
  • Cooling system
  • Ignition system
  • Fuel system
  • Motronic injection system
  • MPI and MPFI injection system
  • Transmission
  • Clutch
  • Gearbox and shafts
  • Chassis
  • Steering
  • Car suspension
  • Brake system
  • Wheels and tires
  • Body
  • Heating and ventilation
  • Body parts
  • Electrical equipment
  • Fuses and relays
  • Power devices
  • Lighting and lamps
  • Tools and devices
  • Electrical circuits
 
AudiManual.ru © 2017-2026 · Mobile version · Feedback · Sitemap: EN BG BY UA RS HR RO PL SK HU · Site search · News and articles
80 B2 · 80 B3 petrol · 80 B3 · 80 B4 · 100 C3 diesel · 100 C3 petrol · 100 C3 · 100 C4 petrol · 100 C4 · A3 Type 8L · A4 B5 petrol · A4 B5 · A4 B6 petrol · A4 B6 · A4 B7 · A4 B8 · A6 C4 · A6 C5 · A6 C5 Allroad · A8 D2 · Q5 Type 8R · Q7 Typ 4L · Audi A2 ·
This site uses cookies 🍪. Click the button to accept this fact.