
Car body parts Audi A4 B5, petrol

Front bumper
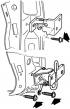
After loosening the screw (3), the grille part (2) can be pulled out of the side plug connections (arrows). A 6 mm Allen key (1) is installed on the bumper...
After loosening the screw (3), the grille part (2) can be pulled out of the side plug connections (arrows). A 6 mm Allen key (1) is installed on the bumper...

Damage resulting from accidents
The synthetic bumpers of the Audi A4 return to their original shape almost perfectly even after severe collisions. Therefore, sometimes damage to parts behind...
The synthetic bumpers of the Audi A4 return to their original shape almost perfectly even after severe collisions. Therefore, sometimes damage to parts behind...

Front of the car
The quick release closures, numbered here "1" through "10", must be removed when removing the lower engine compartment trim. The bumper bracket (2) is attached...
The quick release closures, numbered here "1" through "10", must be removed when removing the lower engine compartment trim. The bumper bracket (2) is attached...

Hood — dismantling and adjustment
The gas-filled shock absorber (1) of the Audi bonnet can be removed after removing the lock washer (2) and removing the hinge eye from the pin. An assistant...
The gas-filled shock absorber (1) of the Audi bonnet can be removed after removing the lock washer (2) and removing the hinge eye from the pin. An assistant...

Wings and mudguards
Front Fender Fastener Locations (6) 1, 3, 7, 9, 11 - hexagon head threaded bolts; 2 - threaded rivet; 4 - Phillips head self-tapping screw; 5, 10 - sheet metal...
Front Fender Fastener Locations (6) 1, 3, 7, 9, 11 - hexagon head threaded bolts; 2 - threaded rivet; 4 - Phillips head self-tapping screw; 5, 10 - sheet metal...
Side planks
Removal the shock-absorbing strips Unfortunately, the varnished side strips cannot be removed from the doors without destroying them. Those who are ambitious...
Removal the shock-absorbing strips Unfortunately, the varnished side strips cannot be removed from the doors without destroying them. Those who are ambitious...
Doors — dismantling and adjustment
The doors are screwed to the hinges as a whole with three TORX bolts (arrows). Installation control dimensions of the "door mounting unit support" (1). The...
The doors are screwed to the hinges as a whole with three TORX bolts (arrows). Installation control dimensions of the "door mounting unit support" (1). The...

Dismantling doors
With the door trim removed, the screws (arrows) are visible, which must be loosened in order to separate the two parts of the door. The "magnifying glass"...
With the door trim removed, the screws (arrows) are visible, which must be loosened in order to separate the two parts of the door. The "magnifying glass"...

External view mirror
Removal the mirror assembly 1 - mounting screw; 2 - shaped foam part for sound insulation; 3 - multi-pin connector. Removal mirror glass (4) 1 - black trim...
Removal the mirror assembly 1 - mounting screw; 2 - shaped foam part for sound insulation; 3 - multi-pin connector. Removal mirror glass (4) 1 - black trim...

Trunk lid — dismantling and adjustment
Dismantling 1. Open the lid. 2. Remove the warning triangle. 3. Unscrew the warning sign bracket. 4. Unscrew the trunk lid trim. 5. Disconnect the plug...
Dismantling 1. Open the lid. 2. Remove the warning triangle. 3. Unscrew the warning sign bracket. 4. Unscrew the trunk lid trim. 5. Disconnect the plug...

Rear bumper — dismantling
Dismantling To remove the rear bumper, you need to loosen two Phillips-head screws (1 and 2) on the right and left sides of the car. 1. Fold back the boot...
Dismantling To remove the rear bumper, you need to loosen two Phillips-head screws (1 and 2) on the right and left sides of the car. 1. Fold back the boot...
Sliding/removable roof
Precise adjustment of the sliding roof is a prerequisite for its perfect operation. However, detailed descriptions would be beyond the scope of this manual. If...
Precise adjustment of the sliding roof is a prerequisite for its perfect operation. However, detailed descriptions would be beyond the scope of this manual. If...
Checking the anti-corrosion coating of the bottom
The protective layer on the underbody of the car needs to be carefully checked and, if necessary, renewed. This can be done by yourself if you have a reliable...
The protective layer on the underbody of the car needs to be carefully checked and, if necessary, renewed. This can be done by yourself if you have a reliable...
Cleaning the water drainage holes
Execution order 1. Regularly clean the water drainage holes at the bottom of the door channels and in the underbody frame stiffeners with a pipe brush. Often...
Execution order 1. Regularly clean the water drainage holes at the bottom of the door channels and in the underbody frame stiffeners with a pipe brush. Often...

Dashboard
Removal the left receiving pocket To remove the left instrument panel trim combined with the receiving pocket, loosen bolts 1 through 4. When installing,...
Removal the left receiving pocket To remove the left instrument panel trim combined with the receiving pocket, loosen bolts 1 through 4. When installing,...

Middle console
Removal the rear part of the console Removing the rear part of the console, step 1: remove the mounting pin (arrow) at the bottom of the handbrake handle (1),...
Removal the rear part of the console Removing the rear part of the console, step 1: remove the mounting pin (arrow) at the bottom of the handbrake handle (1),...

Seats and headrests
Removal the front seats Removing the front seats (model with locking screw): Loosen the locking screw (1) at the front of the seat and disconnect the plug...
Removal the front seats Removing the front seats (model with locking screw): Loosen the locking screw (1) at the front of the seat and disconnect the plug...
This section is available on russian, bulgarian, belarusian, ukrainian, serbian, croatian, romanian, polish, slovak, hungarian
Share information:
- General information
- Operating instructions
- Power unit
- Petrol engines 1.8 l
- Petrol engines 1.8/2.0 l
- Petrol engines 3.0 l
- Petrol engines 3.2 l
- Fuel system (petrol)
- Diesel engines 2.0 l (CA*)
- Diesel engines 2.0 l (CJCB)
- Diesel engines 2.7/3.0 l
- Diesel engines 3.0 l
- Fuel system (diesel)
- Transmission
- Manual gearbox 0B1
- Manual gearbox 0B2
- Manual gearbox 0B3
- Manual gearbox 0B4
- Automatic transmission 0B5
- Automatic transmission 0B6
- Automatic transmission 0AW
- All-wheel drive system
- Chassis
- Front suspension
- Rear suspension
- Brake system
- Steering system
- Body
- Exterior
- Interior
- Seats
- Doors, locks and windows
- Security system
- Heating and air conditioning
- Electrical equipment
- Audio system
- Power devices
- Equipment and devices
- Lighting and lamps
- Electrical circuits
- General information
- Introduction to manual
- Troubleshooting
- Operating instructions
- Maintenance
- Power unit
- Petrol engines 2.0 (ALT)
- Petrol engines 2.0 (TFSI)
- Petrol engines 1.8 (MPI)
- Diesel engines
- Cooling system
- Air conditioner
- Fuel and exhaust system
- Ignition system
- Starting and charging
- Transmission
- Clutch
- Manual gearbox
- Automatic gearbox
- Drive shafts
- Chassis
- Brake system
- Front suspension
- Rear suspension
- Steering
- Body
- Exterior
- Interior
- Electrical equipment
- Equipment and devices
- Lighting and signaling
- Windscreen wipers and washers
- Electrical diagrams
- Electrical diagrams (since 2007)
- General information
- Vehicle Description
- User manual
- Maintenance
- Power unit
- Gasoline engine
- Diesel engine
- Lubrication system
- Cooling system
- Supply system
- Injection system
- Exhaust system
- Ignition and control
- Transmission
- Gear box
- Clutch and drive shafts
- Chassis
- Brake system
- Car suspension
- Steering
- Body
- Heating and ventilation
- Exterior (external elements)
- Interior (internal elements)
- Electrical equipment
- Power devices
- Lighting and appliances
- Electrical circuits
- General information
- Introduction to the guide
- Car care
- Power unit
- Engine repair
- Lubrication system
- Cooling system
- Injection and control system
- Ignition system
- Power and exhaust system
- Transmission
- Clutch and drive shafts
- Car gearbox
- Chassis
- Suspension and wheels
- Steering
- Brake system
- Body
- Interior
- Exterior
- Electrical equipment
- Equipment and devices
- Lighting and signaling
- Power devices
- Electrical circuits
- General information
- Introduction to the guide
- Car care
- Maintenance (gasoline)
- Maintenance (diesel)
- Power unit
- Gasoline engines
- Diesel engines
- Engine overhaul
- Cooling system
- Fuel injection (gasoline)
- Fuel system (diesel)
- Exhaust system
- Ignition system
- Transmission
- Clutch
- Mechanical gearbox
- Automatic gearbox
- Drive shafts
- Chassis
- Brake system
- Car suspension
- Steering
- Body
- Exterior
- Interior
- Doors, locks and windows
- Heating and ventilation
- Electrical equipment
- Power devices
- Equipment and devices
- Electrical circuits
- General information
- Vehicle description
- Maintenance
- Power unit
- Engine repair
- Turbocharging
- Exhaust system
- Cooling system
- Ignition system
- Fuel system
- Motronic injection system
- MPI and MPFI injection system
- Transmission
- Clutch
- Gearbox and shafts
- Chassis
- Steering
- Car suspension
- Brake system
- Wheels and tires
- Body
- Heating and ventilation
- Body parts
- Electrical equipment
- Fuses and relays
- Power devices
- Lighting and lamps
- Tools and devices
- Electrical circuits