
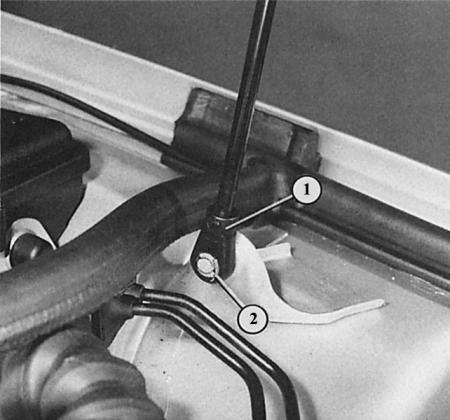
The gas-filled shock absorber (1) of the Audi bonnet can be removed after removing the lock washer (2) and removing the hinge eye from the pin.
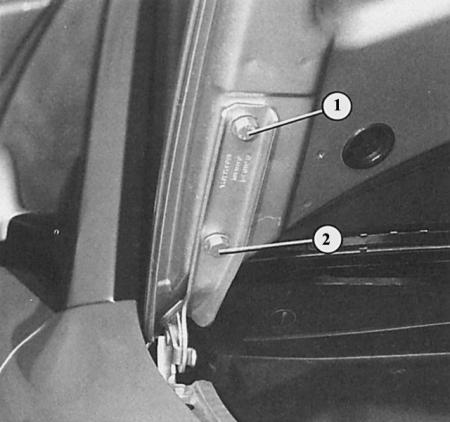
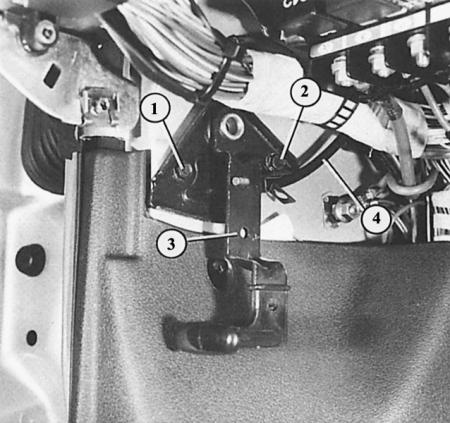
An assistant must hold the heavy hood before the hood mounting bolts (1 and 2) are loosened.
Dismantling
You can make it easier to install the removed hood if you mark the position of the hinges before dismantling. This is best done with a waterproof marker.
1. Where available, loosen the wires for the hood light, the washer system heater, and the ground connection tape.
Tip: If you are installing the same hood, attach a cord to the end of the wire when pulling it out. Pull the cord with the wire through the hood. The cord will remain in the hood and will help pull the wire in during installation.
2. Disconnect the windshield washer hose.
3. Remove the gas strut retaining clip from the upper mounting pin or from both pins.
4. Loosen the hinge bolts on the right and left.
5. The hood is too heavy to unscrew alone. Therefore, hold the hood with an assistant on the right and left sides.
6. Now push out the gas shock absorber mounting pins and remove the shock absorber.
7. Completely unscrew the already loosened bolts by hand and remove the hood.
8. If necessary, you can unscrew the hood hinges.
Tip: All gas-filled shock absorbers cannot be simply thrown away, they must be brought to an Audi workshop for "degassing".
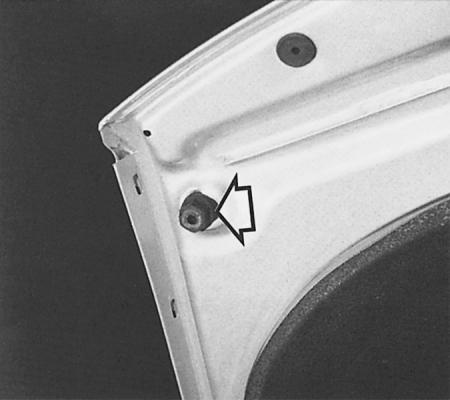
When installed correctly, the hood should fit snugly against these shock absorbers (arrow). To adjust the height, the shock absorber is screwed in or out.
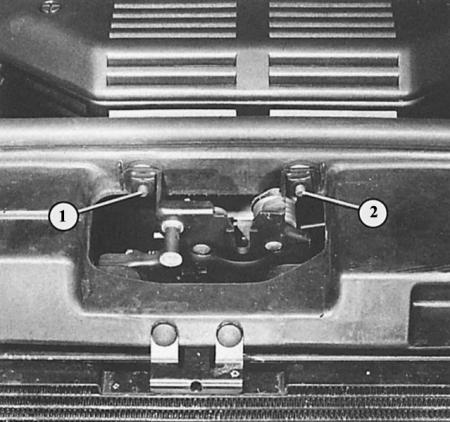
The numbers "1" and "2" indicate the reverse sides of the bolts that must be loosened to adjust the height of the hood lock.

If the hood locking bracket does not fit into the lock exactly, it can be moved after loosening the hex bolts (1–3).
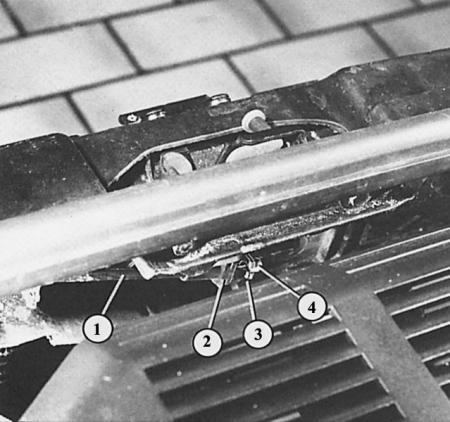
The hood release cable at the front enters the hood lock.
The numbers indicate: 1 – cable sheath; 2 – counter support of the cable sheath; 3 – hood lock lever; 4 – nipple at the end of the cable.
To replace the hood cable, loosen the Allen bolts (1 and 2). The cable (4) is only sold with the handle (3).
Adjusting the hood
When the hood is closed, the distance from it to both fenders should be the same (about 3 mm), and along the front edge it should be in the same plane as the wings. In addition, the height adjustment should also be correct.
1. To adjust in the longitudinal direction, loosen the bolts at the top between the hinge and the hood.
2. For lateral adjustment, loosen the bolts between the hinge and the body.
3. Slide the hood cover in the desired direction and tighten the bolts.
4. The hood height adjustment along the front edge is carried out as follows:
5. Screw the shock absorbers on the right and left to the edge of the metal.
6. Loosen the hood lock mounting bolts and move the lock as needed, down or up.
7. At this time, check the height adjustment with the hood closed: the upper edge of the hood should be in front at the same height as the fenders.
8. Retighten the hood lock mounting bolts.
9. Make sure that the locking bracket fits into the lock hole. If not, the locking plate can be moved laterally and longitudinally after loosening the three mounting bolts.
10. Unscrew the thrust shock absorber until the hood stops swinging in the closed position. Several attempts are required to achieve the correct adjustment.
Replacing the hood cable
1. Open the hood.
2. Hang the nipple at the end of the cable from the lock.
3. Also hang out the cable sheath.
4. Remove the cable sheath from the brackets. In the hood gasket area, it is placed in the gasket groove.
Remove the receiving pocket on the left under the instrument panel (chapter Salon).
Execution order
1. Unscrew the release handle at the driver's feet.
2. Pull the hood cable into the passenger compartment. Be careful, a "stubborn" cable can cause eye damage!
3. Pull the new cable from the inside through the rubber nozzle, making sure the nozzle is positioned correctly (tightly).
4. Screw on the release handle.
5. Insert the cable sheath into the recess of the hood gasket and into the brackets on the front of the vehicle.
6. Pass the cable through the lock counter support and hang the casing.
7. Attach the nipple to the lock at the end of the cable.
(Material republished from the website: audimanual.ru)