Repair Chevrolet Repair Toyota Repair Honda Repair AvtoVAZ Repair Mercedes-Benz Repair BMW Repair Opel
Home  |  Contacts  |  Sitemap  |    
English Русский
Български
Беларускі
Український
Српски
Hrvatski
Română
Polski
Slovenský
Magyar
AudiManual.ru


  • AUDI 80
  • AUDI 100
  • AUDI A3
  • AUDI A4
  • AUDI A6
  • AUDI A8
  • AUDI Q
  • OTHER
  • ARTICLES
B8 (2007-2015) B7 (2004-2008) B6 (2000-2006) B6 (2000-2006, petrol) B5 (1994-2001) B5 (1994-2001, petrol)

Front of the car (Audi A4 B5)

  • Home
  • Audi A4
  • B5 (1994-2001, petrol)
  • Body
  • Body parts
  • Front of the car
            0
Table of contents: Removal the lower trim of the engine… ↓ Bringing the front of the vehicle… ↓ Removal the radiator grille ↓
Front of the car


The quick release closures, numbered here "1" through "10", must be removed when removing the lower engine compartment trim.

The quick release closures, numbered here «1» through «10», must be removed when removing the lower…


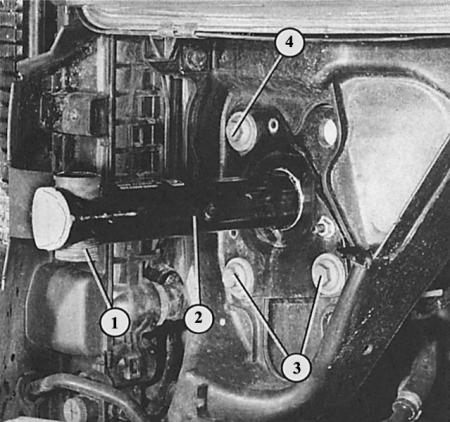
The bumper bracket (2) is attached to the body with three hexagon-head bolts (3). The threaded bushing (1) is used to adjust the bumper height.

The bumper bracket (2) is attached to the body with three hexagon-head bolts (3). The threaded…


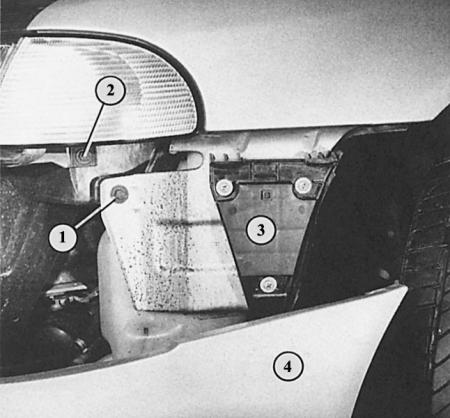
When the bumper (4) is removed, you can see: 1 – wing mounting bolt; 2 – one of the headlight mounting bolts; 3 – side bumper bracket.


Removal the lower trim of the engine compartment


The lower engine compartment trim contributes significantly to the high streamlining coefficient of the Audi body, as well as to noise reduction. Unfortunately, this trim must be removed for many engine maintenance jobs (for example, when changing oil).

1. Raise and support the front of the vehicle.

2. Turn two synthetic quick-release fasteners in the wheel arches on the right and left to the left by 90°.

3. At the rear and front ends of the trim, use a screwdriver to turn three quick-release fasteners 90° to the left.

4. Hang the trim at the front on the plug-in connection of the bumper.

5. When installing, carefully insert the trim into the lower edge of the bumper. Then first fix the rear quick-release fasteners.

5. When installing, carefully insert the trim into the lower edge of the bumper. Then first fix the…


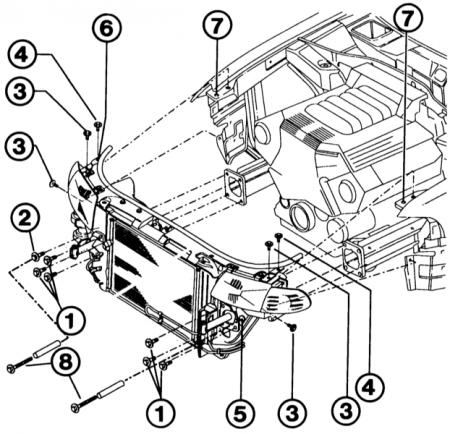
Bring the front part of the vehicle (6) into the service position (main stages of work): Screw the special tool (8) into the holes (5), to do this, unscrew the bolt (2) on the right. Unscrew bolts 1, 3, 4. Pull the front part about 70 mm forward and this time screw bolts 4 into the front threaded holes 7.

Bring the front part of the vehicle (6) into the service position (main stages of work): Screw the…


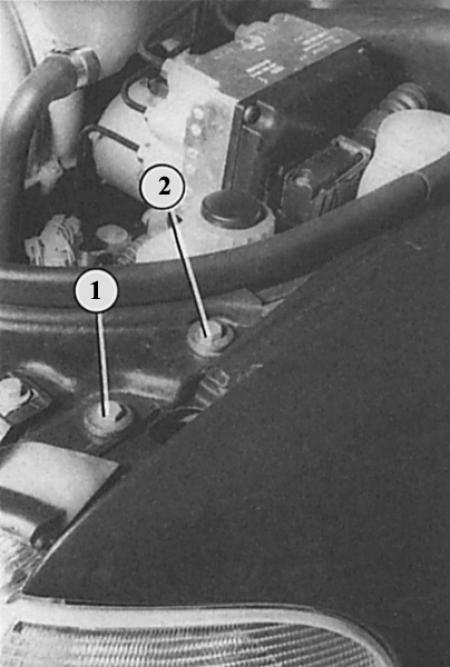
Bringing the front of the vehicle into the service position: it is moved forward to the distance from bolt 1 to bolt 2. Then bolt 1 is screwed into the holes of bolt 2.


Bringing the front of the vehicle into the service position: it is moved forward to the distance…


Bringing the front of the car into service position: the number "2" shows the special tool 3369 screwed in, consisting of a long bolt and a pipe. The numbers "1", "3", "4" and "5" indicate the bolts that must be loosened to move the front part.

Bringing the front of the car into service position: the number «2» shows the special tool 3369…


Rear view of the removed A4 radiator grille:
  • 1 and 2 - fastening clips along the top edge;
  • 3 and 4 - guides along the bottom edge.

Bringing the front of the vehicle into service position


The front of the car needs to be brought into the service position even to change the V-belt on a car with a four-cylinder engine. To do this, the front is pulled slightly forward on two screw-in bolts. The bolts in Audi have tool number 3369, but can be replaced with two pieces of pipe (outer diameter 17 mm, length 80 mm, wall thickness 1 mm), and also two M8 bolts (minimum length 90 mm).


Next, you need to proceed as follows:

1. Remove the bumper.

2. In the holes (see photo below), intended for receiving instruments 3369 (as a replacement our pipe), mark the location of the front part with a felt-tip pen. This way, you can check the correct position of the front part during subsequent assembly.

3. Screw in tool 3369 (as a replacement our pipes) into the holes provided for this purpose. To do this, unscrew the bolt screwed in there on the right.

4. Remove all bumper bracket bolts.

5. Then unscrew one bolt on the right and left under the turn signal lights, as well as two bolts at the top of the headlights.

6. Pull the front part forward approximately 70 mm.

7. To secure the front part, screw the rear of the two bolts at the top of the headlights into the threaded hole of the first.

8. Installation: Move the front part back towards the car and first screw the bumper on – only then unscrew the auxiliary tools.

9. After assembly, check whether the marks made at the beginning are again located in the center of the holes. In this case, the installation position of the front part is correct.

Tip: The front part of the car is removed in the same way as described in the previous section.


Removal the radiator grille


1. Open the hood.

2. At the top on the back side of the grille, press down the fastening clips.

3. Fold the radiator grille forward and then remove it.

4. Installation: Hang the lower edge of the radiator grille with the guides in the mounting hole of the hood.

5. Insert the grille into the mounting hole and press the top edge so that it fits into the groove along the entire width.
The article was checked by auto expert Georgy Rodionov
This article is available at russian, bulgarian, belarusian, ukrainian, serbian, croatian, romanian, polish, slovak, hungarian

Share information:
Previous articles
Audi A4 B5: Body parts
Next articles

Damage resulting from accidents
Front bumper
Hood — dismantling and adjustment
Wings and mudguards
Side planks
Doors — dismantling and adjustment


Similar articles on other Audi car models:
Front seats Audi 80 B3 (1986-1991, petrol)
Front Brake Disc Pads — Checking and Replacing Audi 100 C3 (1982-1990, diesel)
Replacing the front brake pads Audi A3 Type 8L (1996-2003)
Checking the front suspension and steering Audi A6 C5 (1997-2004)
Checking the front suspension and steering Audi A8 D2 (1994-2002)
Front seats Audi Q5 Type 8R (2008-2017)
Removal and installation the front sealing flange Audi A2 (1999-2005)
Link to this page in different formats


Visitor comments

No comments yet


How much will 17 + 15 =


A4(B8, 2007-2015) 
  • General information
  • Operating instructions
  • Power unit
  • Petrol engines 1.8 l
  • Petrol engines 1.8/2.0 l
  • Petrol engines 3.0 l
  • Petrol engines 3.2 l
  • Fuel system (petrol)
  • Diesel engines 2.0 l (CA*)
  • Diesel engines 2.0 l (CJCB)
  • Diesel engines 2.7/3.0 l
  • Diesel engines 3.0 l
  • Fuel system (diesel)
  • Transmission
  • Manual gearbox 0B1
  • Manual gearbox 0B2
  • Manual gearbox 0B3
  • Manual gearbox 0B4
  • Automatic transmission 0B5
  • Automatic transmission 0B6
  • Automatic transmission 0AW
  • All-wheel drive system
  • Chassis
  • Front suspension
  • Rear suspension
  • Brake system
  • Steering system
  • Body
  • Exterior
  • Interior
  • Seats
  • Doors, locks and windows
  • Security system
  • Heating and air conditioning
  • Electrical equipment
  • Audio system
  • Power devices
  • Equipment and devices
  • Lighting and lamps
  • Electrical circuits
 
A4(B7, 2004-2008) 
  • General information
  • Introduction to manual
  • Troubleshooting
  • Operating instructions
  • Maintenance
  • Power unit
  • Petrol engines 2.0 (ALT)
  • Petrol engines 2.0 (TFSI)
  • Petrol engines 1.8 (MPI)
  • Diesel engines
  • Cooling system
  • Air conditioner
  • Fuel and exhaust system
  • Ignition system
  • Starting and charging
  • Transmission
  • Clutch
  • Manual gearbox
  • Automatic gearbox
  • Drive shafts
  • Chassis
  • Brake system
  • Front suspension
  • Rear suspension
  • Steering
  • Body
  • Exterior
  • Interior
  • Electrical equipment
  • Equipment and devices
  • Lighting and signaling
  • Windscreen wipers and washers
  • Electrical diagrams
  • Electrical diagrams (since 2007)
 
A4(B6, 2000-2006) 
  • General information
  • Vehicle Description
  • User manual
  • Maintenance
  • Power unit
  • Gasoline engine
  • Diesel engine
  • Lubrication system
  • Cooling system
  • Supply system
  • Injection system
  • Exhaust system
  • Ignition and control
  • Transmission
  • Gear box
  • Clutch and drive shafts
  • Chassis
  • Brake system
  • Car suspension
  • Steering
  • Body
  • Heating and ventilation
  • Exterior (external elements)
  • Interior (internal elements)
  • Electrical equipment
  • Power devices
  • Lighting and appliances
  • Electrical circuits
 
A4(B6, 2000-2006, petrol) 
  • General information
  • Introduction to the guide
  • Car care
  • Power unit
  • Engine repair
  • Lubrication system
  • Cooling system
  • Injection and control system
  • Ignition system
  • Power and exhaust system
  • Transmission
  • Clutch and drive shafts
  • Car gearbox
  • Chassis
  • Suspension and wheels
  • Steering
  • Brake system
  • Body
  • Interior
  • Exterior
  • Electrical equipment
  • Equipment and devices
  • Lighting and signaling
  • Power devices
  • Electrical circuits
 
A4(B5, 1994-2001) 
  • General information
  • Introduction to the guide
  • Car care
  • Maintenance (gasoline)
  • Maintenance (diesel)
  • Power unit
  • Gasoline engines
  • Diesel engines
  • Engine overhaul
  • Cooling system
  • Fuel injection (gasoline)
  • Fuel system (diesel)
  • Exhaust system
  • Ignition system
  • Transmission
  • Clutch
  • Mechanical gearbox
  • Automatic gearbox
  • Drive shafts
  • Chassis
  • Brake system
  • Car suspension
  • Steering
  • Body
  • Exterior
  • Interior
  • Doors, locks and windows
  • Heating and ventilation
  • Electrical equipment
  • Power devices
  • Equipment and devices
  • Electrical circuits
 
A4(B5, 1994-2001, petrol) 
  • General information
  • Vehicle description
  • Maintenance
  • Power unit
  • Engine repair
  • Turbocharging
  • Exhaust system
  • Cooling system
  • Ignition system
  • Fuel system
  • Motronic injection system
  • MPI and MPFI injection system
  • Transmission
  • Clutch
  • Gearbox and shafts
  • Chassis
  • Steering
  • Car suspension
  • Brake system
  • Wheels and tires
  • Body
  • Heating and ventilation
  • Body parts
  • Electrical equipment
  • Fuses and relays
  • Power devices
  • Lighting and lamps
  • Tools and devices
  • Electrical circuits
 
AudiManual.ru © 2017-2026 · Mobile version · Feedback · Sitemap: EN BG BY UA RS HR RO PL SK HU · Site search · News and articles
80 B2 · 80 B3 petrol · 80 B3 · 80 B4 · 100 C3 diesel · 100 C3 petrol · 100 C3 · 100 C4 petrol · 100 C4 · A3 Type 8L · A4 B5 petrol · A4 B5 · A4 B6 petrol · A4 B6 · A4 B7 · A4 B8 · A6 C4 · A6 C5 · A6 C5 Allroad · A8 D2 · Q5 Type 8R · Q7 Typ 4L · Audi A2 ·
This site uses cookies 🍪. Click the button to accept this fact.