
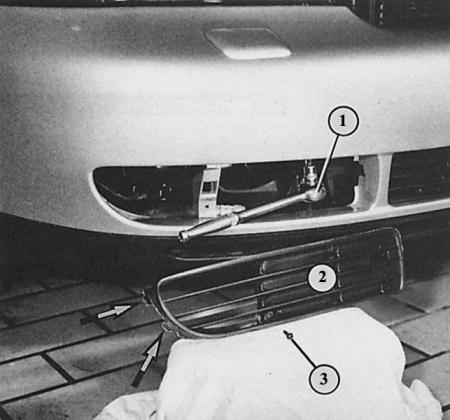
After loosening the screw (3), the grille part (2) can be pulled out of the side plug connections (arrows). A 6 mm Allen key (1) is installed on the bumper mounting bolt.
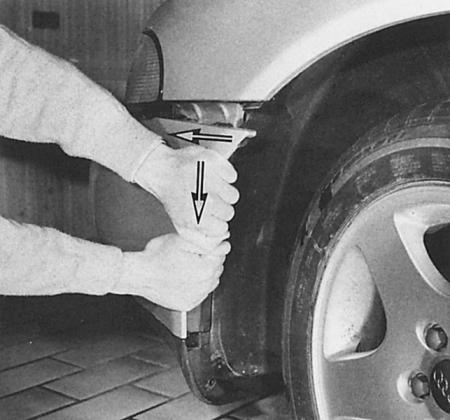
To remove the sides of the bumper from the body brackets, you must first press the bumper down and then pull it to the side.
Dismantling
1. Remove the lower trim of the engine compartment.
2. Remove one Phillips-head screw from the small grille pieces on the right and left bottom of the bumper. Unclip the grille and remove it.
3. There is one 6mm hex head bolt under each grille part. Unscrew it.
4. Unscrew one TORX bolt on the right and left at the rear of the bumper in the wheel cutout.
5. Remove the sides of the bumper from the bracket on the wing. To do this, press the bumper down from the side and simultaneously pull it away from the body.
6. Press the ends of the bumper over the wheel arch cups and remove forward.
7. Now you can pull the bumper forward.
8. Vehicles with headlight cleaning system: remove the hoses to the sprayers and fit them with plugs to prevent the contents of the washer reservoir from leaking out.
9. The spoiler can be removed at the bottom of the bumper after removing the spacer tabs on the connector on the right and left.
Installation
1. Connect the water hoses.
2. First lift the bumper onto the brackets.
3. Now insert the sides of the bumper so that its ends do not touch the wheel arch bowl.
4. First, hang the bumper on the lower edge of the brackets on the wing. Then press the bumper from the sides; the top edge will then enter the grooves.
5. Tighten the bolts.
Bumper alignment
1. After installing the bumper, check whether the gap between the headlights and the bumper is the same everywhere.
2. But the gap between the lower edge of the hood and the bumper is of decisive importance (about 7 mm).
3. If the gap is not within the standard, remove the bumper again and slightly turn the threaded sleeve in the bumper bracket up or down.
[The original source of the article can be found on the website: AudiManual]