
Table of contents: Removal ↓ Installation ↓
Removal
Mark the position of the front wheels in relation to the hubs with paint. This is necessary to reinstall the wheels in their original position, which maintains their balance. With the car standing on its wheels, loosen the front wheel mounting bolts, then lift the car, unscrew the bolts and remove the front wheels.
Release the front part of the inner wing.
Unscrew the hex bolts 10 (Fig. 12.4) on both sides.
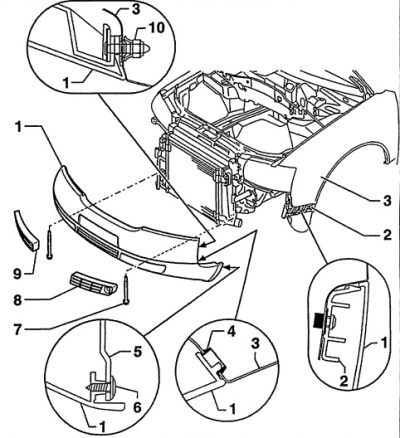
Fig. 12.4. Front bumper
1 - bumper,
2 - guide part,
3 - wing,
4 - clamp,
5 - inner wing,
6 - bolt, 1 Nm,
7 - Allen bolt,
8 - air intake grille,
9 - air intake grille,
10 - flange nut
Remove bolts 6 (Fig. 12.4) on inner wing 5.
Remove the Allen bolts 7 (Fig. 12.4) and pull the bumper forward with an assistant.
Installation
Check whether three spacer clamps 4 (Fig. 12.4) are inserted on the left and right sides of the wing; install them if necessary.
With the help of an assistant, insert the bumper into the impact bracket, while the bumper's fixing tabs 1 (Fig. 12.4) enter the clamps 4 on the wing.
Secure the bumper on the left and right in places 2 (Fig. 12.4).
Tighten the hexagon bolts 10 (Fig. 12.4) and tighten them to a torque of 6 Nm.
Screw in the Allen bolts 7 (Fig. 12.4) and tighten them to a torque of 23 Nm.
Note: The bumper is self-aligning at the crossbar level. When tightening the Allen bolts, this allows the front bumper to return to its previous position.
Apply a thin layer of grease to the flange of the hub that centers the wheel disk. In accordance with the previously applied marks, install the wheel and secure it with bolts. Lower the car and tighten the wheel mounting bolts to a torque of 120 Nm.
[This article was copied from the website «audimanual.ru»]