



Car body elements Audi A6 C5 Allroad

Car body — general information
Along with the change in appearance, measures have been taken to strengthen and increase the rigidity of the body. The base of the body, its side parts, roof...
Along with the change in appearance, measures have been taken to strengthen and increase the rigidity of the body. The base of the body, its side parts, roof...

Safety rules for bodywork
To perform welding work, use a contact butt welding machine. The use of gas welding is only permissible in cases where contact butt welding is impossible, for...
To perform welding work, use a contact butt welding machine. The use of gas welding is only permissible in cases where contact butt welding is impossible, for...
Drying of paint coating
When applying paintwork, heating the car in the dryer or its chamber is allowed within the limits of no higher than +80°C. Otherwise, the electronic control...
When applying paintwork, heating the car in the dryer or its chamber is allowed within the limits of no higher than +80°C. Otherwise, the electronic control...

Engine compartment fastening and protection elements
2.0. Fastening and protection elements of the engine compartment: 1 - bolts for fastening the front part of the engine compartment protection, 3 pcs....
2.0. Fastening and protection elements of the engine compartment: 1 - bolts for fastening the front part of the engine compartment protection, 3 pcs....
Engine Mudguard — Removal and Installation
Removal 1. Unscrew bolts 1 and 3 and remove the front part of the engine protection ( see illustration 2.0 ). 2. Unscrew, if present, the bolts 5 securing the...
Removal 1. Unscrew bolts 1 and 3 and remove the front part of the engine protection ( see illustration 2.0 ). 2. Unscrew, if present, the bolts 5 securing the...

Upper front cross member — installation in service position
When performing some work, for example, to remove the V-belt and toothed belt, the radiator frame and front cross member must be moved to the so-called service...
When performing some work, for example, to remove the V-belt and toothed belt, the radiator frame and front cross member must be moved to the so-called service...

Front bumper — removal and installation
The front crossbar to which the bumper is attached is reinforced on the AUDI ALLROAD (see illustration 4.0). 4.0. Front cross member Removal 1. Mark the...
The front crossbar to which the bumper is attached is reinforced on the AUDI ALLROAD (see illustration 4.0). 4.0. Front cross member Removal 1. Mark the...

Rear bumper — removal and installation
Removal 1. Unscrew, acting from the trunk, hex nuts 14 and 15 (see illustration 5.0). 2. Unscrew the bolts securing the rear part of the right and left...
Removal 1. Unscrew, acting from the trunk, hex nuts 14 and 15 (see illustration 5.0). 2. Unscrew the bolts securing the rear part of the right and left...

Front mudguards — removal and installation
Removal 1. Mark the position of the front wheel on the hub with paint. This will allow you to install the balanced wheel in its original position during...
Removal 1. Mark the position of the front wheel on the hub with paint. This will allow you to install the balanced wheel in its original position during...
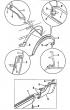
Rear mudguard — removal and installation
Removal 7. Mark the position of the rear wheel on the hub with paint. This will allow you to install the balanced wheel in its original position during...
Removal 7. Mark the position of the rear wheel on the hub with paint. This will allow you to install the balanced wheel in its original position during...

Front wing — removal and installation
Removal 1. Remove the front wheels, corresponding fender liner and bumper. 2. Remove the door bracket 2 from the wing 4 by unscrewing the screws 1 from the...
Removal 1. Remove the front wheels, corresponding fender liner and bumper. 2. Remove the door bracket 2 from the wing 4 by unscrewing the screws 1 from the...

Hood — removal, installation and fitting
Attention! The hood is made of aluminum. For this reason, threaded connections should be made only with appropriate bolts, nuts, gaskets, etc. Otherwise,...
Attention! The hood is made of aluminum. For this reason, threaded connections should be made only with appropriate bolts, nuts, gaskets, etc. Otherwise,...

Radiator grille — removal and installation
Removal 1. Release the top and sides of the grille from the retaining tabs, move the top forward in the direction of the vehicle, and then remove the grille by...
Removal 1. Release the top and sides of the grille from the retaining tabs, move the top forward in the direction of the vehicle, and then remove the grille by...

Instrument panel — removal and installation
16.0. Main elements of the instrument panel: 1 - storage box 2 - pocket on the driver's side 3 - steering column switches 4 - instrument panel 5 - front part...
16.0. Main elements of the instrument panel: 1 - storage box 2 - pocket on the driver's side 3 - steering column switches 4 - instrument panel 5 - front part...

Outside rear view mirror — removal and installation
See Illustration 17.0. 17.0. Outside rearview mirror: 1 - mirror housing 2 - mirror drive. To dismantle, remove the mirror glass, disconnect the heating plugs...
See Illustration 17.0. 17.0. Outside rearview mirror: 1 - mirror housing 2 - mirror drive. To dismantle, remove the mirror glass, disconnect the heating plugs...
This section is available on russian, bulgarian, belarusian, ukrainian, serbian, croatian, romanian, polish, slovak, hungarian
Similar sections of other Audi car models:
Body: Body elements Audi 80 B3 (1986-1991)
Body: Body elements Audi 100 C3 (1982-1990)
Body: Body elements Audi 80 B3 (1986-1991)
Body: Body elements Audi 100 C3 (1982-1990)
Share information:
- General information
- User manual
- Maintenance
- Troubleshooting
- Power unit
- V6 petrol engines
- V8 petrol engines
- Diesel engines
- Cooling and heating system
- Injection system (gasoline)
- Fuel system (diesel)
- Supply system
- Exhaust system
- Ignition system
- Transmission
- Clutch
- Mechanical gearbox
- Automatic gearbox
- Chassis
- Brake system
- Car suspension
- Steering
- Body
- Body elements
- Doors, locks and windows
- Electrical equipment
- Equipment and devices
- Power devices
- Electrical circuits
- Schemes (petrol engine 2.7 l)
- Schemes (petrol engine 4.2 l)
- Schemes (diesel engine 2.5 l)
- General information
- User manual
- Maintenance
- Power unit
- Engine repair
- Cooling system
- Fuel system
- Engine management
- Fuel system (diesel)
- Exhaust system
- Transmission
- Clutch
- Car gearbox
- Chassis
- Front suspension
- Rear suspension
- Steering
- Wheels and tires
- Brake system
- Body
- Exterior
- Interior
- Electrical equipment
- Air conditioner
- Equipment and devices
- Electrical circuits
- General information
- User manual
- Maintenance (gasoline)
- Maintenance (Diesel)
- Gasoline engines
- 4 cylinder engines
- 5 cylinder engines
- 6 cylinder engines
- Diesel engines
- 4 cylinder engines
- 5 cylinder engines
- Engine repair
- Removal and reassembly
- Cooling system
- Single point injection system
- Multipoint injection system
- MPI/MPFI injection system
- Fuel system (diesel)
- Exhaust system
- Ignition system
- Transmission
- Clutch
- Manual transmission
- Automatic transmission
- Drive shafts
- Chassis
- Brake system
- Front suspension
- Rear suspension
- Steering
- Body
- Exterior (external elements)
- Interior (internal elements)
- Electrical equipment
- Power devices
- Lighting and appliances
- Electrical circuits