
Vehicle equipment and devices Audi A6 C5

General information
Consumers are connected to the negative power source via the car body (ground), and to the positive one via wires. In this case, the number of wires is reduced...
Consumers are connected to the negative power source via the car body (ground), and to the positive one via wires. In this case, the number of wires is reduced...
Electrical circuits
The protection of electrical circuits is provided by blade fuses, the color of which corresponds to the fuse protection current. The serviceability of the fuse...
The protection of electrical circuits is provided by blade fuses, the color of which corresponds to the fuse protection current. The serviceability of the fuse...

Fuses
To prevent damage from short circuits and overloads of connecting wires and consumers of electricity, electrical circuits are protected by fuses. Fuses with...
To prevent damage from short circuits and overloads of connecting wires and consumers of electricity, electrical circuits are protected by fuses. Fuses with...
Automatic protection devices
All together, the electric window lifters and sunroof are also protected by a circuit breaker, which automatically switches off in the event of an overload...
All together, the electric window lifters and sunroof are also protected by a circuit breaker, which automatically switches off in the event of an overload...

Rechargeable battery
A battery is a device for storing energy in chemical form that can be used as electricity. A battery works because two different metals, when placed in an...
A battery is a device for storing energy in chemical form that can be used as electricity. A battery works because two different metals, when placed in an...

Generator
Vehicles are equipped with alternators. Depending on the model and the electrical equipment installed in the vehicle, alternators of different power may be...
Vehicles are equipped with alternators. Depending on the model and the electrical equipment installed in the vehicle, alternators of different power may be...

Checking the generator's performance
Check and adjust the alternator drive belt tension if necessary. Connect a voltmeter to the battery terminals. While monitoring the voltmeter readings, start...
Check and adjust the alternator drive belt tension if necessary. Connect a voltmeter to the battery terminals. While monitoring the voltmeter readings, start...

Replacing the generator brushes and voltage regulator
Removal Remove the ground cable from the battery. Attention When the battery terminals are disconnected, the memory units of the control units erase the data...
Removal Remove the ground cable from the battery. Attention When the battery terminals are disconnected, the memory units of the control units erase the data...

Starter
The starter is a DC electric motor with mixed excitation with an electromagnetic traction relay. The starter consists of a housing or stator with excitation...
The starter is a DC electric motor with mixed excitation with an electromagnetic traction relay. The starter consists of a housing or stator with excitation...

Starter solenoid relay
Examination Place the gear shift lever in neutral position. Check that the battery is fully charged. Using additional wires, connect terminal 30 (thick wire)...
Examination Place the gear shift lever in neutral position. Check that the battery is fully charged. Using additional wires, connect terminal 30 (thick wire)...

Replacing external lighting lamps
Incandescent lamps age over time. Therefore, they must be replaced every two years, even if they are in good condition. This does not apply to halogen lamps,...
Incandescent lamps age over time. Therefore, they must be replaced every two years, even if they are in good condition. This does not apply to halogen lamps,...

Low beam headlight bulb
Turn off the ignition. Safety instructions Halogen lamps H1 and H7 have high pressure and may burst when replaced, so gloves and safety glasses should be worn...
Turn off the ignition. Safety instructions Halogen lamps H1 and H7 have high pressure and may burst when replaced, so gloves and safety glasses should be worn...

High beam headlight bulb
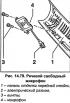
To access the right headlight bulb, remove the air intake B (fig. 14.28). To do this, unscrew the two screws A (Fig. 14.1) securing the air intake. Pull up the...
To access the right headlight bulb, remove the air intake B (fig. 14.28). To do this, unscrew the two screws A (Fig. 14.1) securing the air intake. Pull up the...

Front parking light bulb
To access the right headlight bulb, remove the air intake B (fig. 14.28). To do this, unscrew the two screws A (fig. 14.28) air intake mounts. Pull up the rear...
To access the right headlight bulb, remove the air intake B (fig. 14.28). To do this, unscrew the two screws A (fig. 14.28) air intake mounts. Pull up the rear...

Front turn signal lamp
Open the hood. Turn the lamp holder 1 (fig. 14.32) counterclockwise and remove it from the housing. Press and in this position turn the lamp counterclockwise...
Open the hood. Turn the lamp holder 1 (fig. 14.32) counterclockwise and remove it from the housing. Press and in this position turn the lamp counterclockwise...

Side turn signal repeater lamp
Carefully slide the turn signal repeater forward and, pressing the rear part away from the wing, remove it (see fig. 14.33). Use a plastic wedge if necessary....
Carefully slide the turn signal repeater forward and, pressing the rear part away from the wing, remove it (see fig. 14.33). Use a plastic wedge if necessary....

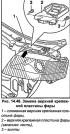
Fog light bulb
Using a screwdriver blade as a lever, remove the grille 2 (fig. 14.34) from the front bumper. Unscrew screws 1 (fig. 14.34), located at the top and remove the...
Using a screwdriver blade as a lever, remove the grille 2 (fig. 14.34) from the front bumper. Unscrew screws 1 (fig. 14.34), located at the top and remove the...

Tail light bulbs
Open the trunk lid/tailgate. Fold back the boot trim where the tail light is located. On the left side of the car, remove the on-board tool. AVANT cars Remove...
Open the trunk lid/tailgate. Fold back the boot trim where the tail light is located. On the left side of the car, remove the on-board tool. AVANT cars Remove...

Rear fog light
Open the trunk lid/tailgate. Remove the interior trim of the trunk. Turn the socket with the incandescent lamp 1 (fig. 14.37) clockwise and remove it from the...
Open the trunk lid/tailgate. Remove the interior trim of the trunk. Turn the socket with the incandescent lamp 1 (fig. 14.37) clockwise and remove it from the...

License plate light
Open the trunk lid/tailgate. Unscrew the screw that secures the lamp and use a screwdriver as a lever to remove it. Replace the spotlight. If the...
Open the trunk lid/tailgate. Unscrew the screw that secures the lamp and use a screwdriver as a lever to remove it. Replace the spotlight. If the...

Additional brake light
Limousine An additional brake light is installed at the base of the rear window. Open the trunk lid. From the bottom of the rear shelf, pull the lamp holder...
Limousine An additional brake light is installed at the base of the rear window. Open the trunk lid. From the bottom of the rear shelf, pull the lamp holder...
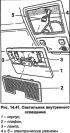
Indoor lighting lamp
Using your fingers, gently press on the lampshade 2 (fig. 14.41) up and remove it. To remove the case 1 (fig. 14.41), pry it up with a thin screwdriver blade,...
Using your fingers, gently press on the lampshade 2 (fig. 14.41) up and remove it. To remove the case 1 (fig. 14.41), pry it up with a thin screwdriver blade,...

Reading lights
Front reading light. Use a thin screwdriver blade to pry up the light fixture 3 (fig. 14.42), remove from the panel and disconnect electrical connectors 1 and...
Front reading light. Use a thin screwdriver blade to pry up the light fixture 3 (fig. 14.42), remove from the panel and disconnect electrical connectors 1 and...

External lighting devices: headlight
The headlight housing is not disassemblable and if there are any defects, the headlight housing must be replaced as a whole. However, if the upper headlight...
The headlight housing is not disassemblable and if there are any defects, the headlight housing must be replaced as a whole. However, if the upper headlight...
Repair of the upper mounting plate of the headlight
Remove the headlight. Cut off the remains of the broken upper headlight mounting plate from the headlight 1 (fig. 14.48). Install the separate upper headlight...
Remove the headlight. Cut off the remains of the broken upper headlight mounting plate from the headlight 1 (fig. 14.48). Install the separate upper headlight...
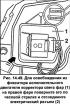
Headlight range control actuator motor
Removal The actuator motor can be removed from the headlight installed on the vehicle. On the right side of the vehicle, the air intake must be removed (see...
Removal The actuator motor can be removed from the headlight installed on the vehicle. On the right side of the vehicle, the air intake must be removed (see...

Headlight adjustment
Correct adjustment of headlights is of great importance for traffic safety. Precise adjustment is only possible with a special device. When adjusting the...
Correct adjustment of headlights is of great importance for traffic safety. Precise adjustment is only possible with a special device. When adjusting the...
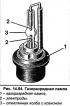
Gas discharge lamps for low beam headlights
Gas-discharge xenon lamps have a higher light intensity, and the light spectrum is close to the spectrum of daylight. After switching on the gas-discharge...
Gas-discharge xenon lamps have a higher light intensity, and the light spectrum is close to the spectrum of daylight. After switching on the gas-discharge...

Rear light
Removal Open the trunk lid/tailgate. Fold back the boot trim where the tail light is located. On the left side of the car, remove the on-board tool. Press both...
Removal Open the trunk lid/tailgate. Fold back the boot trim where the tail light is located. On the left side of the car, remove the on-board tool. Press both...
Instrument cluster
In the instrument cluster on models before 1999, only the bulbs can be replaced. If one of the indicators fails or if there is any other defect, the instrument...
In the instrument cluster on models before 1999, only the bulbs can be replaced. If one of the indicators fails or if there is any other defect, the instrument...

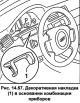
Multi-function steering column switches
Removal Lower the steering wheel all the way down. Remove the ground cable from the battery. Attention When disconnecting the wires from the battery terminals,...
Removal Lower the steering wheel all the way down. Remove the ground cable from the battery. Attention When disconnecting the wires from the battery terminals,...
Switches
Before removing any switch, remove the ground cable from the battery and reconnect it to the battery only after installing the switch.
Before removing any switch, remove the ground cable from the battery and reconnect it to the battery only after installing the switch.

Light switch and headlight corrector
Press the light switch (arrow 1, fig. 14.65) and in this position turn it clockwise (arrow 2). While holding the switch in this position, remove (arrow 3) the...
Press the light switch (arrow 1, fig. 14.65) and in this position turn it clockwise (arrow 2). While holding the switch in this position, remove (arrow 3) the...

Center console switches
Using a thin screwdriver blade, remove the decorative trim 1 (fig. 14.68) from switches 2 of the central console. Remove the desired switch and disconnect the...
Using a thin screwdriver blade, remove the decorative trim 1 (fig. 14.68) from switches 2 of the central console. Remove the desired switch and disconnect the...

Glove box light switch
Remove the glove box. Disconnect the electrical connector 1 (fig. 14.69) and wire tips 2. Remove switch 3 (fig. 14.69) from the holder by moving it in the...
Remove the glove box. Disconnect the electrical connector 1 (fig. 14.69) and wire tips 2. Remove switch 3 (fig. 14.69) from the holder by moving it in the...

Mirror position adjustment switch
Using a thin screwdriver blade, lever out switch 1 (fig. 14.70) from the nest. Disconnect electrical connector 2 (fig. 14.70). Installation is carried out in...
Using a thin screwdriver blade, lever out switch 1 (fig. 14.70) from the nest. Disconnect electrical connector 2 (fig. 14.70). Installation is carried out in...

Radio receiver
When the ground wire is removed from the battery, the memory of the electronic control units and radio receiver is erased. The standard equipment of the car...
When the ground wire is removed from the battery, the memory of the electronic control units and radio receiver is erased. The standard equipment of the car...

Front door speakers
Remove the front door trim. Disconnect the electrical connector 2 (fig. 14.74) from the loudspeaker. Unscrew screws 1 (fig. 14.74) and remove the speaker....
Remove the front door trim. Disconnect the electrical connector 2 (fig. 14.74) from the loudspeaker. Unscrew screws 1 (fig. 14.74) and remove the speaker....

High frequency loudspeaker
Remove the front door trim. Use a screwdriver blade to remove the retaining clip 1 (fig. 14.75). Remove speaker 2 (fig. 14.75). Installation is carried out in...
Remove the front door trim. Use a screwdriver blade to remove the retaining clip 1 (fig. 14.75). Remove speaker 2 (fig. 14.75). Installation is carried out in...
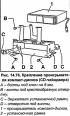
Compact Disc Player (CD Changer)
Removal The CD player is located in the trunk on the left side. Unscrew bolts A (fig. 14.76) 8 mm wrench and two B screws. Disconnect the electrical connector....
Removal The CD player is located in the trunk on the left side. Unscrew bolts A (fig. 14.76) 8 mm wrench and two B screws. Disconnect the electrical connector....
Antenna
Limousine Removal Open the trunk and remove the trunk trim on the left side. Unscrew nut 1 (fig. 14.77) fastening the ground connection wire. Unscrew screw 2...
Limousine Removal Open the trunk and remove the trunk trim on the left side. Unscrew nut 1 (fig. 14.77) fastening the ground connection wire. Unscrew screw 2...

Installing an additional antenna
Limousine Use a felt-tip pen to mark the rear wing for drilling a hole to install the antenna (see fig. 14.78).
Limousine Use a felt-tip pen to mark the rear wing for drilling a hole to install the antenna (see fig. 14.78).
Speech free microphone
Removal Remove the upper front pillar trim panel. Disconnect electrical connector 2 (fig. 14.79) and remove trim panel 1 with microphone 4. Unscrew screws 3...
Removal Remove the upper front pillar trim panel. Disconnect electrical connector 2 (fig. 14.79) and remove trim panel 1 with microphone 4. Unscrew screws 3...

Outdoor antenna
AVANT Removal In the vehicle's interior, remove the rear interior light bulb. Unscrew the antenna mast 1 (fig. 14.80). Fig. 14.80. External antenna of AVANT...
AVANT Removal In the vehicle's interior, remove the rear interior light bulb. Unscrew the antenna mast 1 (fig. 14.80). Fig. 14.80. External antenna of AVANT...

Checking the rear window defroster
The rear window defroster is a plurality of horizontal conductors sprayed onto the inner surface of the rear window. To detect a break in the rear window...
The rear window defroster is a plurality of horizontal conductors sprayed onto the inner surface of the rear window. To detect a break in the rear window...

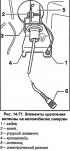
Windshield washer nozzle
Removal Open the hood. Disconnect hose 1 (fig. 14.84) from the nozzle. Disconnect electrical connectors 2 (fig. 14.84) from windshield washer nozzles Pull down...
Removal Open the hood. Disconnect hose 1 (fig. 14.84) from the nozzle. Disconnect electrical connectors 2 (fig. 14.84) from windshield washer nozzles Pull down...

Windscreen wiper arms
Removal Wet the windshield with water. Turn the windshield wiper on and then off until the wiper arm returns to its original position. Disconnect the ground...
Removal Wet the windshield with water. Turn the windshield wiper on and then off until the wiper arm returns to its original position. Disconnect the ground...

Windshield wiper motor
Removal Remove the wiper arms. Release the three clips securing the air grille located under the windshield and remove the grille. Using a 10 mm wrench, remove...
Removal Remove the wiper arms. Release the three clips securing the air grille located under the windshield and remove the grille. Using a 10 mm wrench, remove...

Rear window wiper arm
Removal Wet the windshield with water. Turn the windshield wiper on and then off until the wiper arm returns to its original position. Disconnect the ground...
Removal Wet the windshield with water. Turn the windshield wiper on and then off until the wiper arm returns to its original position. Disconnect the ground...

Rear window wiper motor
Removal Remove the windshield wiper arm. Remove the interior trim from the rear door. Disconnect electrical connector 7 (fig. 14.91). Fig. 14.91. Rear window...
Removal Remove the windshield wiper arm. Remove the interior trim from the rear door. Disconnect electrical connector 7 (fig. 14.91). Fig. 14.91. Rear window...

Main faults of the starter
If you do not hear the solenoid click when you turn on the starter and the starter motor does not run, check to see if there is voltage at terminal 50. When...
If you do not hear the solenoid click when you turn on the starter and the starter motor does not run, check to see if there is voltage at terminal 50. When...
This section is available on russian, bulgarian, belarusian, ukrainian, serbian, croatian, romanian, polish, slovak, hungarian
Similar sections of other Audi car models:
Electrical equipment: Lighting and appliances Audi 80 B3 (1986-1991)
Electrical equipment: Equipment and devices Audi 100 C3 (1982-1990, petrol)
Electrical equipment: Lighting and appliances Audi A3 Type 8L (1996-2003)
Electrical equipment: Equipment and devices Audi A4 B5 (1994-2001)
Electrical equipment: Instruments and switches Audi A8 D2 (1994-2002)
Electrical equipment: Equipment and devices Audi Q7 Typ 4L (2005-2015, diesel)
Electrical equipment: Equipment and devices Audi A2 (1999-2005)
Share information:
- General information
- User manual
- Maintenance
- Troubleshooting
- Power unit
- V6 petrol engines
- V8 petrol engines
- Diesel engines
- Cooling and heating system
- Injection system (gasoline)
- Fuel system (diesel)
- Supply system
- Exhaust system
- Ignition system
- Transmission
- Clutch
- Mechanical gearbox
- Automatic gearbox
- Chassis
- Brake system
- Car suspension
- Steering
- Body
- Body elements
- Doors, locks and windows
- Electrical equipment
- Equipment and devices
- Power devices
- Electrical circuits
- Schemes (petrol engine 2.7 l)
- Schemes (petrol engine 4.2 l)
- Schemes (diesel engine 2.5 l)
- General information
- User manual
- Maintenance
- Power unit
- Engine repair
- Cooling system
- Fuel system
- Engine management
- Fuel system (diesel)
- Exhaust system
- Transmission
- Clutch
- Car gearbox
- Chassis
- Front suspension
- Rear suspension
- Steering
- Wheels and tires
- Brake system
- Body
- Exterior
- Interior
- Electrical equipment
- Air conditioner
- Equipment and devices
- Electrical circuits
- General information
- User manual
- Maintenance (gasoline)
- Maintenance (Diesel)
- Gasoline engines
- 4 cylinder engines
- 5 cylinder engines
- 6 cylinder engines
- Diesel engines
- 4 cylinder engines
- 5 cylinder engines
- Engine repair
- Removal and reassembly
- Cooling system
- Single point injection system
- Multipoint injection system
- MPI/MPFI injection system
- Fuel system (diesel)
- Exhaust system
- Ignition system
- Transmission
- Clutch
- Manual transmission
- Automatic transmission
- Drive shafts
- Chassis
- Brake system
- Front suspension
- Rear suspension
- Steering
- Body
- Exterior (external elements)
- Interior (internal elements)
- Electrical equipment
- Power devices
- Lighting and appliances
- Electrical circuits