
Internal elements of the car body Audi A6 C5

Interior rear view mirror
Removal To remove the interior rearview mirror, tilt it downwards, in the direction of the arrow, away from the base of the holder. The clamp spring retainers...
Removal To remove the interior rearview mirror, tilt it downwards, in the direction of the arrow, away from the base of the holder. The clamp spring retainers...
Automatic dimming interior rearview mirror
Automatic dimming of the interior rearview mirror is carried out steplessly if the driver from behind is blinded. The system consists of a mirror and...
Automatic dimming of the interior rearview mirror is carried out steplessly if the driver from behind is blinded. The system consists of a mirror and...
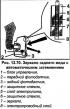
Glove box
Removal Open the glove compartment lid and remove the three bolts 3 (fig. 12.71). Remove two bolts 4 (fig. 12.71) and remove the glove compartment 1 downwards....
Removal Open the glove compartment lid and remove the three bolts 3 (fig. 12.71). Remove two bolts 4 (fig. 12.71) and remove the glove compartment 1 downwards....

Driver's side storage shelf
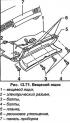
Removal Remove the instrument cluster cover. Release the instrument panel side cover clamps and remove it. Unscrew five bolts 2 (fig. 12.72). Fig. 12.72. Shelf...
Removal Remove the instrument cluster cover. Release the instrument panel side cover clamps and remove it. Unscrew five bolts 2 (fig. 12.72). Fig. 12.72. Shelf...

Central console
Removal Remove the rear ventilation grille A from the center console by moving it downwards (see fig. 12.74). To do this, remove the four wire clips....
Removal Remove the rear ventilation grille A from the center console by moving it downwards (see fig. 12.74). To do this, remove the four wire clips....

Parking brake lever cover
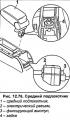
Removal Apply the parking brake 3 (fig. 12.75). Remove plug 4 (fig. 12.75). Loosen screw 1 (fig. 12.75) and remove cover 2. Installation Tighten bolt 1 one to...
Removal Apply the parking brake 3 (fig. 12.75). Remove plug 4 (fig. 12.75). Loosen screw 1 (fig. 12.75) and remove cover 2. Installation Tighten bolt 1 one to...
Middle armrest
Removal Remove the rear air vent from the center console. If equipped, disconnect electrical connector 2 (fig. 12.76) for the phone. To do this, press the...
Removal Remove the rear air vent from the center console. If equipped, disconnect electrical connector 2 (fig. 12.76) for the phone. To do this, press the...

Front center console
Removal Remove the center console. Open the front ashtray and remove the protective frame 2 (fig. 12.77) with six mounting clamps, starting from the bottom....
Removal Remove the center console. Open the front ashtray and remove the protective frame 2 (fig. 12.77) with six mounting clamps, starting from the bottom....

Shelf for drinks and small items
Removal Remove the control bar cover 5 (fig. 12.77) with four mounting clamps 4. Fig. 12.77. Front center console 1 - front center console, 2 - protective...
Removal Remove the control bar cover 5 (fig. 12.77) with four mounting clamps 4. Fig. 12.77. Front center console 1 - front center console, 2 - protective...

Front ashtray
Removal Open the ashtray. Detach the protective frame 2 (fig. 12.77) from six mounting clamps, starting from the bottom. Fig. 12.77. Front center console 1 -...
Removal Open the ashtray. Detach the protective frame 2 (fig. 12.77) from six mounting clamps, starting from the bottom. Fig. 12.77. Front center console 1 -...

Ashtray plug
Removal Remove the ashtray. Press up the two locking tabs 1 with a screwdriver (fig. 12.82) and remove plug 1 with an upward movement. Installation Snap the...
Removal Remove the ashtray. Press up the two locking tabs 1 with a screwdriver (fig. 12.82) and remove plug 1 with an upward movement. Installation Snap the...
Front pillar upper trim
Removal Fold down the screw covers 4 (fig. 12.83). To do this, insert a thin wire, such as a paper clip, into slot 7 and fold the plug down. Note: The closed...
Removal Fold down the screw covers 4 (fig. 12.83). To do this, insert a thin wire, such as a paper clip, into slot 7 and fold the plug down. Note: The closed...
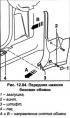
Front lower side trim
Removal Remove plugs 1 (fig. 12.84) closing screws. Remove two screws 2 (fig. 12.84). Pull the side trim in the direction of arrow A (fig. 12.84), until pin 3...
Removal Remove plugs 1 (fig. 12.84) closing screws. Remove two screws 2 (fig. 12.84). Pull the side trim in the direction of arrow A (fig. 12.84), until pin 3...

Threshold trim
Removal Remove the front side trim. Remove the door sill trim 1 (fig. 12.85) three clamping lugs. Disconnect the threshold trim with the holder 5 (fig. 12.85)...
Removal Remove the front side trim. Remove the door sill trim 1 (fig. 12.85) three clamping lugs. Disconnect the threshold trim with the holder 5 (fig. 12.85)...

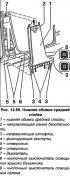
Upper trim of the rear pillar and trunk pillar
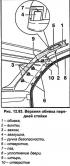
Fold down the coat hooks 4 (fig. 12.90), to do this, press the marking on the handle. Fig. 12.90. Upper trim of the rear pillar and trunk pillar 1 - upper trim...
Fold down the coat hooks 4 (fig. 12.90), to do this, press the marking on the handle. Fig. 12.90. Upper trim of the rear pillar and trunk pillar 1 - upper trim...

Upper trim of the middle pillar
Removal Remove the door sill trim. Loosen the seat belt mounting bolt at the lower mounting location. Fold down the screw caps. To do this, insert a thin wire,...
Removal Remove the door sill trim. Loosen the seat belt mounting bolt at the lower mounting location. Fold down the screw caps. To do this, insert a thin wire,...
Lower trim of the middle pillar
Removal Remove the upper B-pillar trim. Remove the door sill trim. Press up both retaining tabs with a screwdriver and pull up the trim 1 (fig. 12.89) in the...
Removal Remove the upper B-pillar trim. Remove the door sill trim. Press up both retaining tabs with a screwdriver and pull up the trim 1 (fig. 12.89) in the...

Trunk lid trim
Removal Remove the warning triangle. Remove screws 4 (fig. 12.92). Remove the warning triangle holder. Fig. 12.92. Trunk lid trim 1 - trunk lid trim 2 -...
Removal Remove the warning triangle. Remove screws 4 (fig. 12.92). Remove the warning triangle holder. Fig. 12.92. Trunk lid trim 1 - trunk lid trim 2 -...

Trunk lid trim AVANT
Removal Remove screw 3 (fig. 12.94). Open the cover for the warning triangle A (fig. 12.95) on the trunk lid trim and remove the sign. Fig. 12.94. Trunk lid...
Removal Remove screw 3 (fig. 12.94). Open the cover for the warning triangle A (fig. 12.95) on the trunk lid trim and remove the sign. Fig. 12.94. Trunk lid...

Side trim in the trunk
The following describes how to remove the side trim of the trunk with the rear seat in place. Removal Remove the floor mat from your luggage. Remove the rear...
The following describes how to remove the side trim of the trunk with the rear seat in place. Removal Remove the floor mat from your luggage. Remove the rear...

Front seat
Removal To remove the seat, you need the AUDI VAS-5061 airbag adapter/device. The adapter prevents the airbag from deploying when the seat is removed. Power...
Removal To remove the seat, you need the AUDI VAS-5061 airbag adapter/device. The adapter prevents the airbag from deploying when the seat is removed. Power...

Back seat
Removal Raise the seat (arrow A, Fig. 12.105) and pull it forward (arrow B). Remove the airbag electrical connector 1 (fig. 12.106) from the recess. If...
Removal Raise the seat (arrow A, Fig. 12.105) and pull it forward (arrow B). Remove the airbag electrical connector 1 (fig. 12.106) from the recess. If...
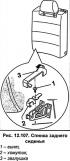
Backrest of the rear seat
Removal Fold both backrests forward. Remove plug 3 (fig. 12.107) from below, use the hole at the bottom if necessary. Remove bolt 1 (fig. 12.107) and remove...
Removal Fold both backrests forward. Remove plug 3 (fig. 12.107) from below, use the hole at the bottom if necessary. Remove bolt 1 (fig. 12.107) and remove...
This section is available on russian, bulgarian, belarusian, ukrainian, serbian, croatian, romanian, polish, slovak, hungarian
Similar sections of other Audi car models:
Body: Interior Audi 80 B3 (1986-1991, petrol)
Body: Interior Audi 100 C4 (1990-1994, petrol)
Body: Interior (internal elements) Audi A3 Type 8L (1996-2003)
Body: Interior Audi A4 B6 (2000-2006, petrol)
Body: Interior (internal elements) Audi A8 D2 (1994-2002)
Body: Interior Audi Q5 Type 8R (2008-2017)
Body: Interior Audi A2 (1999-2005)
Share information:
- General information
- User manual
- Maintenance
- Troubleshooting
- Power unit
- V6 petrol engines
- V8 petrol engines
- Diesel engines
- Cooling and heating system
- Injection system (gasoline)
- Fuel system (diesel)
- Supply system
- Exhaust system
- Ignition system
- Transmission
- Clutch
- Mechanical gearbox
- Automatic gearbox
- Chassis
- Brake system
- Car suspension
- Steering
- Body
- Body elements
- Doors, locks and windows
- Electrical equipment
- Equipment and devices
- Power devices
- Electrical circuits
- Schemes (petrol engine 2.7 l)
- Schemes (petrol engine 4.2 l)
- Schemes (diesel engine 2.5 l)
- General information
- User manual
- Maintenance
- Power unit
- Engine repair
- Cooling system
- Fuel system
- Engine management
- Fuel system (diesel)
- Exhaust system
- Transmission
- Clutch
- Car gearbox
- Chassis
- Front suspension
- Rear suspension
- Steering
- Wheels and tires
- Brake system
- Body
- Exterior
- Interior
- Electrical equipment
- Air conditioner
- Equipment and devices
- Electrical circuits
- General information
- User manual
- Maintenance (gasoline)
- Maintenance (Diesel)
- Gasoline engines
- 4 cylinder engines
- 5 cylinder engines
- 6 cylinder engines
- Diesel engines
- 4 cylinder engines
- 5 cylinder engines
- Engine repair
- Removal and reassembly
- Cooling system
- Single point injection system
- Multipoint injection system
- MPI/MPFI injection system
- Fuel system (diesel)
- Exhaust system
- Ignition system
- Transmission
- Clutch
- Manual transmission
- Automatic transmission
- Drive shafts
- Chassis
- Brake system
- Front suspension
- Rear suspension
- Steering
- Body
- Exterior (external elements)
- Interior (internal elements)
- Electrical equipment
- Power devices
- Lighting and appliances
- Electrical circuits