
Table of contents: Removal ↓ Installation ↓
Removal
Remove screw 3 (fig. 12.94). Open the cover for the warning triangle A (fig. 12.95) on the trunk lid trim and remove the sign.
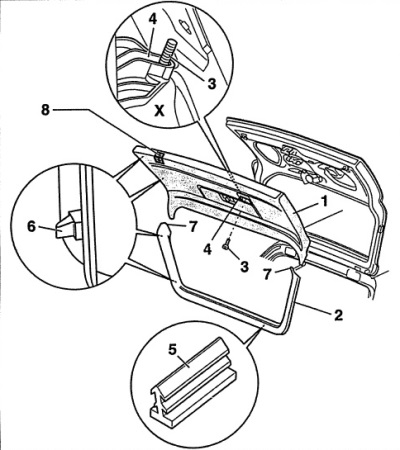
Fig. 12.94. Trunk lid trim for AVANT vehicles
1 - lower casing,
2 - top upholstery,
3 - screw, 5 Nm,
4 - handle insert,
5 - rubber gasket,
6 - clamp,
7 - fixing protrusions,
8 - lamp.
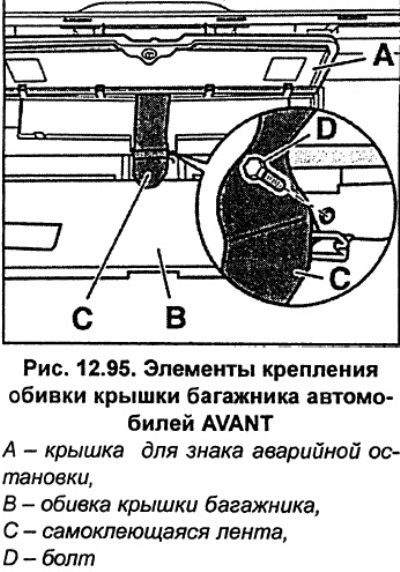
Slide the self-adhesive tape C (fig. 12.95) to the side and unscrew bolt D.
Pull down the trim a little 1 (fig. 12.94) from under the lid.
Use a screwdriver to release the trim 1 (fig. 12.94) of eight clamps 6.
Push out the lamp 8 from the inside (fig. 12.94), disconnect the electrical connector.
Release the locking tabs 7 on the left and right (fig. 12.94).
Release the trim with a light movement 2 (fig. 12.94) of the seven clamps 6.
Installation
Check if 10 rubber gaskets 5 are inserted (fig. 12.94), if not, insert them.
First insert the upholstery 2 (fig. 12.94) from the back of the side edges of the trunk lid, then the top and then snap the side clips into place.
Insert upholstery 1 (fig. 12.94) first at the rear window, then snap the clamps into place.
Fasten with bolt 3 (fig. 12.94) pen insert 4.
Tighten the bolt behind the warning triangle to a torque of 2.5 Nm, then insert the triangle and close the cover.