
External elements of the car body Audi A6 C5

General information
AUDI A6 cars have a monocoque body. The body is a universal welded structure and includes crumple zones in the front and rear with a safety cell in the center...
AUDI A6 cars have a monocoque body. The body is a universal welded structure and includes crumple zones in the front and rear with a safety cell in the center...
Car wash
Frequent washing is an effective means of protecting your car. The best way to protect your car from the harmful effects of the environment is to wash it...
Frequent washing is an effective means of protecting your car. The best way to protect your car from the harmful effects of the environment is to wash it...
Car care
Taking care of your car helps to preserve it. Regular qualified car maintenance helps to preserve your vehicle. The necessary car care products can be...
Taking care of your car helps to preserve it. Regular qualified car maintenance helps to preserve your vehicle. The necessary car care products can be...
Body damage repair
Treatment of car body scratches If the scratch is superficial and does not reach the metal, rub the area around the scratch with paint renewer or fine-grained...
Treatment of car body scratches If the scratch is superficial and does not reach the metal, rub the area around the scratch with paint renewer or fine-grained...

Installing the front cross panel in the service position
Remove the front bumper. Loosen the lower guard at the front, but do not remove it. Disconnect the air duct between the carrier part and the air filter....
Remove the front bumper. Loosen the lower guard at the front, but do not remove it. Disconnect the air duct between the carrier part and the air filter....

Front bumper
Removal Mark the position of the front wheels in relation to the hubs with paint. This is necessary to reinstall the wheels in their original position, which...
Removal Mark the position of the front wheels in relation to the hubs with paint. This is necessary to reinstall the wheels in their original position, which...

Rear bumper
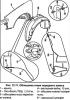
Limousine Removal Remove bumper cover 6 (Fig. 12.5) Fig. 12.5. Rear bumper 1 - bolt, 23 Nm, 2 - rear bumper, 3 - bumper crossbar, 4 - rear trim for rear...
Limousine Removal Remove bumper cover 6 (Fig. 12.5) Fig. 12.5. Rear bumper 1 - bolt, 23 Nm, 2 - rear bumper, 3 - bumper crossbar, 4 - rear trim for rear...

Front wing
Removal Remove the front bumper. Unscrew the screws and remove the front wheel well trim. Remove the wing end piece (see fig. 12.9). Remove the headlights....
Removal Remove the front bumper. Unscrew the screws and remove the front wheel well trim. Remove the wing end piece (see fig. 12.9). Remove the headlights....
Front wheel well trim
Removal Mark the position of the front wheels in relation to the hubs with paint. This is necessary to reinstall the wheels in their original position, which...
Removal Mark the position of the front wheels in relation to the hubs with paint. This is necessary to reinstall the wheels in their original position, which...
Rear wheel well trim
Removal Mark the position of the rear wheels in relation to the hubs with paint. This is necessary to reinstall the wheels in their original position, as a...
Removal Mark the position of the rear wheels in relation to the hubs with paint. This is necessary to reinstall the wheels in their original position, as a...

Hood
Attention. The hood is made of aluminum. Therefore, when assembling, make sure that the intended fasteners are used (bolts, nuts, washers, etc.). In other...
Attention. The hood is made of aluminum. Therefore, when assembling, make sure that the intended fasteners are used (bolts, nuts, washers, etc.). In other...

Adjusting the hood position
Loosen nuts 4 (fig. 12.13). Close the hood and place it in the middle of the wings. Close the hood so that an equal parallel gap is formed between it and the...
Loosen nuts 4 (fig. 12.13). Close the hood and place it in the middle of the wings. Close the hood so that an equal parallel gap is formed between it and the...

Hood release cable
Removal Remove the lower instrument panel trim on the driver's side. Remove the mounting bolts of the bracket with the hood lock opening handle 3 (fig. 12.18)....
Removal Remove the lower instrument panel trim on the driver's side. Remove the mounting bolts of the bracket with the hood lock opening handle 3 (fig. 12.18)....

Radiator grille and bonnet latch catch
Removal Unscrew nuts 2 (fig. 12.19) and remove the hood lock catch 1. Release the clamps (arrows, Fig. 12.20). Press on the radiator grille from above 1 (fig....
Removal Unscrew nuts 2 (fig. 12.19) and remove the hood lock catch 1. Release the clamps (arrows, Fig. 12.20). Press on the radiator grille from above 1 (fig....

Trunk lid
Limousine Removal Remove the warning triangle with the mount 5 (fig. 12.21). Fig. 12.21. Trunk lid 1 - trunk lid, 2 - thrust shock absorber, 3 - expansion nut,...
Limousine Removal Remove the warning triangle with the mount 5 (fig. 12.21). Fig. 12.21. Trunk lid 1 - trunk lid, 2 - thrust shock absorber, 3 - expansion nut,...
Adjusting the position of the locking pin
Loosen nuts 7 (fig. 12.21) and tighten them manually. The locking pin should still move. Carefully close the trunk lid and slide it until the lid fits snugly...
Loosen nuts 7 (fig. 12.21) and tighten them manually. The locking pin should still move. Carefully close the trunk lid and slide it until the lid fits snugly...
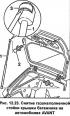
Adjusting the position of the trunk lid on AVANT vehicles
To adjust the trunk lid, the gas strut must be in place. Remove the trim around the perimeter of the trunk. Unscrew nuts 1 (fig. 12.25) and remove the cover...
To adjust the trunk lid, the gas strut must be in place. Remove the trim around the perimeter of the trunk. Unscrew nuts 1 (fig. 12.25) and remove the cover...

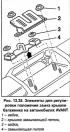
Trunk lid lock
Removal Remove the trunk lid trim. Disconnect the operating rod 4 (fig. 12.28) from the handle control. Fig. 12.28. Trunk lid lock 1 - lock, 2 - articulated...
Removal Remove the trunk lid trim. Disconnect the operating rod 4 (fig. 12.28) from the handle control. Fig. 12.28. Trunk lid lock 1 - lock, 2 - articulated...

Front door/front door frame
Removal Remove the door trim. Disconnect the electrical connectors connecting the front door to the A-pillar. Remove the corrugated protective cover between...
Removal Remove the door trim. Disconnect the electrical connectors connecting the front door to the A-pillar. Remove the corrugated protective cover between...

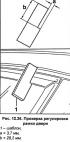
Adjusting the position of the front door
Note: The rear door must be adjusted first. Unscrew bolts 2 (fig. 12.32) front door lock retainer 1. Adjust the door position in the longitudinal direction. To...
Note: The rear door must be adjusted first. Unscrew bolts 2 (fig. 12.32) front door lock retainer 1. Adjust the door position in the longitudinal direction. To...

Door frame adjustment
The door position must be adjusted. Loosen the bolts on the door frame enough to allow the door frame or adjuster plate to move. To adjust the position of the...
The door position must be adjusted. Loosen the bolts on the door frame enough to allow the door frame or adjuster plate to move. To adjust the position of the...
Checking the door frame adjustment
To check, you need a template, which is made from plastic or plywood according to the dimensions shown in Figure 12.36. Place the template 100 mm from the...
To check, you need a template, which is made from plastic or plywood according to the dimensions shown in Figure 12.36. Place the template 100 mm from the...

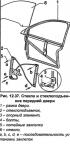
Front door glass
Removal Roll down the glass 6 (fig. 12.37) down to the stop. Remove the door trim. Remove door frame 1 (fig. 12.37). Mark the glass position lengthwise on both...
Removal Roll down the glass 6 (fig. 12.37) down to the stop. Remove the door trim. Remove door frame 1 (fig. 12.37). Mark the glass position lengthwise on both...
Front door window lifts
Removal Remove the door frame. Use a drill to cut off the heads on the blind rivets. Use a punch to knock out the remaining rivets. Remove window regulator 2...
Removal Remove the door frame. Use a drill to cut off the heads on the blind rivets. Use a punch to knock out the remaining rivets. Remove window regulator 2...

Window lift motor
Remove the door trim. Remove the door frame. Remove the Torx bolts of the TZO (arrows, Fig. 12.38) Remove the window lift motor. Installation Install the...
Remove the door trim. Remove the door frame. Remove the Torx bolts of the TZO (arrows, Fig. 12.38) Remove the window lift motor. Installation Install the...

Front door trim
Removal Remove the window switch. Insert a thin screwdriver 1 (fig. 12.40) at the bottom into the hole 2 of the door handle. On the passenger door next to the...
Removal Remove the window switch. Insert a thin screwdriver 1 (fig. 12.40) at the bottom into the hole 2 of the door handle. On the passenger door next to the...

Door lock
Removal Remove the door trim. Raise the door glass fully. Disconnect the central lock electrical connector on the door lock. Disconnect the operating rod 8...
Removal Remove the door trim. Raise the door glass fully. Disconnect the central lock electrical connector on the door lock. Disconnect the operating rod 8...

Door handle plug
Pull up the door handle B (fig. 12.47). Use a small screwdriver to push out the locking element A (fig. 12.47) and remove the plug C. Installation is carried...
Pull up the door handle B (fig. 12.47). Use a small screwdriver to push out the locking element A (fig. 12.47) and remove the plug C. Installation is carried...

Door handle
Attention: When replacing a door handle, it is painted and mounted at a service station before installation. Removal To facilitate removal and installation, it...
Attention: When replacing a door handle, it is painted and mounted at a service station before installation. Removal To facilitate removal and installation, it...
Central lock
The doors, fuel tank cap and trunk are locked using electric motors. The central lock consists of a control unit and separate servo drives. The door remote...
The doors, fuel tank cap and trunk are locked using electric motors. The central lock consists of a control unit and separate servo drives. The door remote...

Remote control fuel tank flap
Removal Remove the right side trim in the trunk. Disconnect the electrical connector. Unscrew bolts 2 (fig. 12.54), pull down and remove remote control 1....
Removal Remove the right side trim in the trunk. Disconnect the electrical connector. Unscrew bolts 2 (fig. 12.54), pull down and remove remote control 1....
Remote control of the trunk lid
Removal Remove the trunk lid trim. Remove the handle with the lock cylinder. Pull out the left lever 1 (fig. 12.55) from handle 4. To do this, press the...
Removal Remove the trunk lid trim. Remove the handle with the lock cylinder. Pull out the left lever 1 (fig. 12.55) from handle 4. To do this, press the...

Sliding sunroof plugs
Removal Lift the sliding sunroof up Slide the glass all the way back Remove the lower plug 1 (fig. 12.56) in the direction of arrow A and slide it forward,...
Removal Lift the sliding sunroof up Slide the glass all the way back Remove the lower plug 1 (fig. 12.56) in the direction of arrow A and slide it forward,...

Sliding sunroof
Removal Remove the sunroof plugs. Use a T25 screwdriver to unscrew the bolts, arrows (fig. 12.59) on both sides. Lift the cover up. Installation Replace the...
Removal Remove the sunroof plugs. Use a T25 screwdriver to unscrew the bolts, arrows (fig. 12.59) on both sides. Lift the cover up. Installation Replace the...

Sliding sunroof seals
Removal Remove the sliding sunroof 3 (fig. 12.61). Get the sliding hatch 2 (fig. 12.61) from the roof 3. Installation Insert the new roof seal into the...
Removal Remove the sliding sunroof 3 (fig. 12.61). Get the sliding hatch 2 (fig. 12.61) from the roof 3. Installation Insert the new roof seal into the...

Checking and adjusting the initial position of the sliding sunroof
Return the sunroof motor to its original (zero) position. Close the sliding sunroof. Remove the front interior light bulb. Using a T25 screwdriver, unscrew the...
Return the sunroof motor to its original (zero) position. Close the sliding sunroof. Remove the front interior light bulb. Using a T25 screwdriver, unscrew the...

Checking/cleaning water drainage hoses
Vehicles with a sunroof have hoses to drain water from the sunroof tracks. Examination With the sliding sunroof open, carefully pour water into the water...
Vehicles with a sunroof have hoses to drain water from the sunroof tracks. Examination With the sliding sunroof open, carefully pour water into the water...

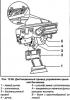
Mechanism for adjusting the position of the outside rearview mirror
Removal Remove the mirror glass 7 (fig. 12.64). Loosen the three screws securing the adjustment mechanism. Fig. 12.64. Outside rearview mirror 1 - mirror...
Removal Remove the mirror glass 7 (fig. 12.64). Loosen the three screws securing the adjustment mechanism. Fig. 12.64. Outside rearview mirror 1 - mirror...

Glass of the outside rear view mirror
Removal Tape the top and bottom of the case to protect the case from damage. Using a flat plastic spatula, carefully remove the mirror glass, first from the...
Removal Tape the top and bottom of the case to protect the case from damage. Using a flat plastic spatula, carefully remove the mirror glass, first from the...

Outside rear view mirror housing
Removal Remove the mirror glass. Remove two bolts D (fig. 12.65). Press back on the locking tabs B (fig. 12.65) and remove cover C downwards. Remove screws A...
Removal Remove the mirror glass. Remove two bolts D (fig. 12.65). Press back on the locking tabs B (fig. 12.65) and remove cover C downwards. Remove screws A...

Side body trim
Removal Attention: When removing, the side body trim is damaged and must be replaced. Gradually warm up the door trim with a hair dryer, soften the adhesive...
Removal Attention: When removing, the side body trim is damaged and must be replaced. Gradually warm up the door trim with a hair dryer, soften the adhesive...

Lower door trim
Removal Remove bolt 3 (fig. 12.67). Push the lower cover with the clip 4 back out of the retainer (fig. 12.67). Remove the threshold trim from the side....
Removal Remove bolt 3 (fig. 12.67). Push the lower cover with the clip 4 back out of the retainer (fig. 12.67). Remove the threshold trim from the side....
This section is available on russian, bulgarian, belarusian, ukrainian, serbian, croatian, romanian, polish, slovak, hungarian
Similar sections of other Audi car models:
Body: Exterior Audi 80 B3 (1986-1991, petrol)
Body: Exterior Audi 100 C3 (1982-1990, diesel)
Body: Exterior (external elements) Audi A3 Type 8L (1996-2003)
Body: Exterior Audi A4 B7 (2004-2008)
Body: Exterior (external elements) Audi A8 D2 (1994-2002)
Body: Exterior Audi Q7 Typ 4L (2005-2015, diesel)
Body: Exterior Audi A2 (1999-2005)
Share information:
- General information
- User manual
- Maintenance
- Troubleshooting
- Power unit
- V6 petrol engines
- V8 petrol engines
- Diesel engines
- Cooling and heating system
- Injection system (gasoline)
- Fuel system (diesel)
- Supply system
- Exhaust system
- Ignition system
- Transmission
- Clutch
- Mechanical gearbox
- Automatic gearbox
- Chassis
- Brake system
- Car suspension
- Steering
- Body
- Body elements
- Doors, locks and windows
- Electrical equipment
- Equipment and devices
- Power devices
- Electrical circuits
- Schemes (petrol engine 2.7 l)
- Schemes (petrol engine 4.2 l)
- Schemes (diesel engine 2.5 l)
- General information
- User manual
- Maintenance
- Power unit
- Engine repair
- Cooling system
- Fuel system
- Engine management
- Fuel system (diesel)
- Exhaust system
- Transmission
- Clutch
- Car gearbox
- Chassis
- Front suspension
- Rear suspension
- Steering
- Wheels and tires
- Brake system
- Body
- Exterior
- Interior
- Electrical equipment
- Air conditioner
- Equipment and devices
- Electrical circuits
- General information
- User manual
- Maintenance (gasoline)
- Maintenance (Diesel)
- Gasoline engines
- 4 cylinder engines
- 5 cylinder engines
- 6 cylinder engines
- Diesel engines
- 4 cylinder engines
- 5 cylinder engines
- Engine repair
- Removal and reassembly
- Cooling system
- Single point injection system
- Multipoint injection system
- MPI/MPFI injection system
- Fuel system (diesel)
- Exhaust system
- Ignition system
- Transmission
- Clutch
- Manual transmission
- Automatic transmission
- Drive shafts
- Chassis
- Brake system
- Front suspension
- Rear suspension
- Steering
- Body
- Exterior (external elements)
- Interior (internal elements)
- Electrical equipment
- Power devices
- Lighting and appliances
- Electrical circuits