Removal
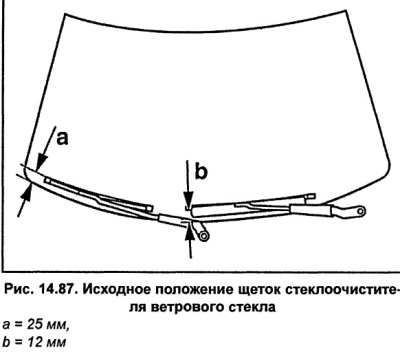
Remove the wiper arms.
Release the three clips securing the air grille located under the windshield and remove the grille.
Using a 10 mm wrench, remove three bolts 1 (fig. 14.88) windshield wiper mechanism mounts.
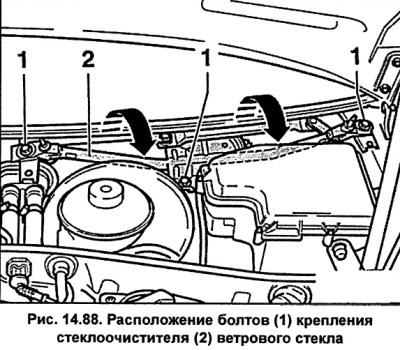
Remove the windshield wiper mechanism 2 (fig. 14.88) from the car, first moving it to the right, then up.
Disconnect the multi-pin electrical connector from the wiper motor.
Remove the rods 3 (fig. 14.89) windshield wipers from the engine crank.
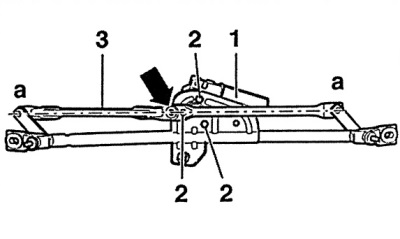
Fig. 14.89. Windscreen wiper drive elements
1 - windshield wiper motor,
2 - windshield wiper motor mounting bolts,
3 - windshield wiper rods
Remove three bolts 2 (fig. 14.89) windshield wiper motor mounts and remove it.
When installing a new wiper motor, reset it to its original position. To do this, connect the multi-pin electrical connector to the wiper motor and connect the ground wire to the battery. Turn the wiper mode on and off, and the wiper motor will reset to its original position. Remove the ground wire from the battery and disconnect the electrical connector from the wiper motor.
Install the motor onto the windshield wiper mechanism and secure it with bolts.
Install the crank on the engine shaft in such a position that it is in line with the windshield wiper rods.
Attach the windshield wiper rods to the crank.
Insert the windshield wiper mechanism into the vehicle and secure with bolts.
Connect the electrical connector to the windshield wiper motor.
Install the air grille.
Install the windscreen wiper arms and secure them with nuts, tightening them to a torque of 16 Nm.
Connect the ground wire to the battery.
Check the operation of the windshield wipers.