
Repair Chevrolet Repair Toyota Repair Honda Repair AvtoVAZ Repair Mercedes-Benz Repair BMW Repair Opel
Home  |  Contacts  |  Sitemap  |    
English Русский
Български
Беларускі
Український
Српски
Hrvatski
Română
Polski
Slovenský
Magyar
AudiManual.ru


  • AUDI 80
  • AUDI 100
  • AUDI A3
  • AUDI A4
  • AUDI A6
  • AUDI A8
  • AUDI Q
  • OTHER
  • ARTICLES
B4 (1991-1996) B3 (1986-1991) B3 (1986-1991, petrol) B2 (1979-1986)

Removal and installation the windshield wiper motor (Audi 80 B3)

  • Home
  • Audi 80
  • B3 (1986-1991)
  • Electrical equipment
  • Lighting and appliances
  • Removal and installation the windshield wiper motor
            0
Table of contents: Removal ↓ Installation ↓
The windshield wiper motor is removed as a set from the frame. In this case, the brush holders must occupy a certain position.

Before removing, mark the position of the brush holders on the glass with adhesive tape.

Removal


Turn on the ignition.

Turn on the windshield wiper and turn off the ignition when the left brush holder reaches an angle of α = 45°.

Unscrew the brush holders and remove them from the axles, first removing the caps with a narrow screwdriver.

Remove the windshield wiper motor cover in the water collection compartment by pressing the retaining buttons

Unscrew the 3 bolts securing the windshield wiper frame and remove the frame together with the motor.

Disconnect the drive rods from the leash.

Unscrew the motor from the frame.

Unscrew the leash from the motor axle.
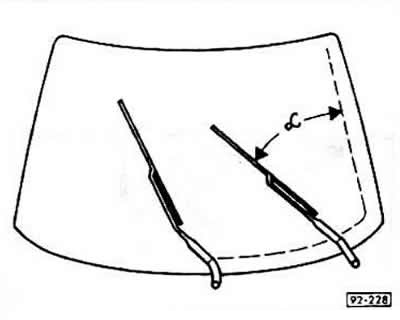
Unscrew the leash from the motor axle.


Installation


When installing the motor, set it to the parking position. To do this, connect the connector and turn on the motor. Then turn off the motor with the windshield wiper switch and let it reach the end position.

Disconnect the connector.
Disconnect the connector.


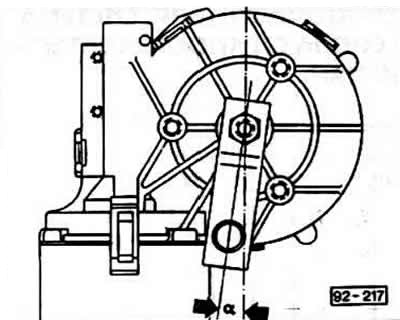
Place the crank on the engine axle at approximately an angle of α = 6° and tighten to 22 Nm.


Secure the motor to the wiper frame.

Turn the motor shaft enough to allow the drive rods to be fitted without any play.

Install the motor with the frame and secure it.

Connect the connector and let the motor reach the parking position.
Connect the connector and let the motor reach the parking position.


Install the casing in the water collection compartment.

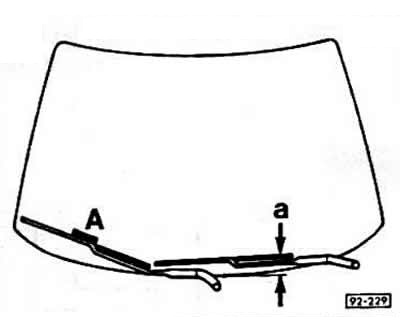
Install and secure the brush levers with a force of 16 Nm in accordance with the marking "A" made during removal. For the left brush holder, the size should be a = 60 mm (Coupe: a = 65 mm).

Put on the caps.

Check the operation of the windshield wiper.
The article was checked by auto expert Elisey Ermolaev
This article is available at russian, bulgarian, belarusian, ukrainian, serbian, croatian, romanian, polish, slovak, hungarian

Share information:
Previous articles
Audi 80 B3: Lighting and appliances
Next articles

Windscreen wiper drive
Removal, installation and adjusting the windshield wiper nozzle
Replacing the wiper blade rubber
Removal and installation the radio
Fuses and relays
Replacing fuses


Similar articles on other Audi car models:
Windshield wiper motor replacement Audi 100 C4 (1990-1994)
Checking the windshield wiper motor Audi A3 Type 8L (1996-2003)
Checking the windshield wiper motor Audi A4 B6 (2000-2006)
Windshield wiper motor Audi A6 C5 (1997-2004)
Motor oil Audi A8 D2 (1994-2002)
Rain and light sensor, windshield wiper motor control unit Audi Q5 Type 8R (2008-2017)
Removal and installation the windshield wiper motor with bracket Audi A2 (1999-2005)
Link to this page in different formats


Visitor comments

No comments yet


How much will 44 + 22 =


80(B4, 1991-1996) 
  • General information
  • User manual
  • Maintenance
  • Troubleshooting
  • Power unit
  • Engine
  • Cooling system
  • Heating and ventilation
  • Petrol injection
  • Diesel fuel system
  • Fuel system
  • Exhaust systems
  • Ignition system
  • Transmission
  • Clutch
  • Car gearbox
  • Chassis
  • Brake system
  • Suspension and steering wheel
  • Body
  • Body and trim
  • Electrical equipment
  • Electrical system
  • Electrical circuits
 
80(B3, 1986-1991) 
  • General information
  • Repair characteristics
  • Maintenance
  • Power unit
  • Gasoline engine
  • Diesel engine
  • Engine lubrication system
  • Fuel system (gasoline)
  • Injection system (gasoline)
  • Fuel system (diesel)
  • Ignition system
  • Cooling system
  • Heater
  • Exhaust system
  • Transmission
  • Clutch and gearbox
  • Chassis
  • Steering
  • Brake system
  • Car suspension
  • Body
  • Body elements
  • Electrical equipment
  • Power devices
  • Lighting and appliances
  • Electrical circuits
 
80(B3, 1986-1991, petrol) 
  • General information
  • User manual
  • Maintenance
  • Power unit
  • Engine 4-cylinder
  • Engine 5-cylinder
  • Cooling system
  • Fuel and exhaust systems
  • Ignition system
  • Transmission
  • Clutch
  • Mechanical transmission
  • Automatic transmission
  • Drive shafts
  • Chassis
  • Brake system
  • Suspension
  • Steering
  • Body
  • Exterior
  • Interior
  • Electrical equipment
  • Equipment and devices
  • Electrical circuits
 
80(B2, 1979-1986) 
  • General information
  • User manual
  • Power unit
  • Engine FZ
  • Engine EP, YP, YZ, DT, DS, DZ
  • Transmission
  • Clutch
  • 4 speed gearbox
  • 5 speed gearbox
  • Front wheel drive
  • Chassis
  • Front suspension
  • Rear suspension
  • Steering
  • Brake system
  • Electrical equipment
  • Equipment and devices
  • Electrical circuits
 
AudiManual.ru © 2017-2026 · Mobile version · Feedback · Sitemap: EN BG BY UA RS HR RO PL SK HU · Site search · News and articles
80 B2 · 80 B3 petrol · 80 B3 · 80 B4 · 100 C3 diesel · 100 C3 petrol · 100 C3 · 100 C4 petrol · 100 C4 · A3 Type 8L · A4 B5 petrol · A4 B5 · A4 B6 petrol · A4 B6 · A4 B7 · A4 B8 · A6 C4 · A6 C5 · A6 C5 Allroad · A8 D2 · Q5 Type 8R · Q7 Typ 4L · Audi A2 ·
This site uses cookies 🍪. Click the button to accept this fact.