



4-cylinder car engine Audi 80 B3, petrol

Engine specifications
General information Code designations: 1.6 l - RN 1.8 l — RU, DZ, NE, PM, JN 2.0 l - FOR Working volume: 1.6 l - 1595 cm³ 1.8 l - 1781 cm³ 2.0 l - 1984 cm³...
General information Code designations: 1.6 l - RN 1.8 l — RU, DZ, NE, PM, JN 2.0 l - FOR Working volume: 1.6 l - 1595 cm³ 1.8 l - 1781 cm³ 2.0 l - 1984 cm³...
General description of the engine
The engine is a 4 - cylinder, in-line, overhead camshaft, traditionally mounted at the front of the car. The crankshaft has five main bearings, the center main...
The engine is a 4 - cylinder, in-line, overhead camshaft, traditionally mounted at the front of the car. The crankshaft has five main bearings, the center main...

Engine maintenance
Perform the following procedures at the intervals given in Section " Maintenance " at the beginning of the Guide. Replace engine oil and oil filter 1. To...
Perform the following procedures at the intervals given in Section " Maintenance " at the beginning of the Guide. Replace engine oil and oil filter 1. To...
Basic actions possible with the engine
In the car (a) Removing the camshaft and timing belt (b) Removing and servicing the cylinder head (c) Removing the flywheel/drive disc (after removing the...
In the car (a) Removing the camshaft and timing belt (b) Removing and servicing the cylinder head (c) Removing the flywheel/drive disc (after removing the...

Engine — removal and installation
1. Remove the hood as described in Section 11 . 2. Disconnect the negative battery cable. 3. Unscrew and remove the mudguard from under the engine. 4. Place a...
1. Remove the hood as described in Section 11 . 2. Disconnect the negative battery cable. 3. Unscrew and remove the mudguard from under the engine. 4. Place a...
Engine disassembly — general description
1. If possible, place the engine on a table. Two or three wooden blocks will be needed to support the engine in a standing position 2. It is very important to...
1. If possible, place the engine on a table. Two or three wooden blocks will be needed to support the engine in a standing position 2. It is very important to...
Auxiliary parts — removal and installation
Once the engine is removed from the vehicle, the external accessory parts listed below can be removed. The order of removal does not matter. Intake and exhaust...
Once the engine is removed from the vehicle, the external accessory parts listed below can be removed. The order of removal does not matter. Intake and exhaust...

Engine — complete disassembly
1. Mark the position of the flywheel relative to the end of the crankshaft. 2. Remove the flywheel/drive plate bolts. Temporarily insert the bolt into the...
1. Mark the position of the flywheel relative to the end of the crankshaft. 2. Remove the flywheel/drive plate bolts. Temporarily insert the bolt into the...

Timing Belt and Sprockets — Removal, Check and Installation
1. Remove the radiator ( Section 2 ), and drive belts for the alternator, power steering pump and air conditioning compressor (if any). 2. Disconnect the...
1. Remove the radiator ( Section 2 ), and drive belts for the alternator, power steering pump and air conditioning compressor (if any). 2. Disconnect the...

Camshaft and tappets — removal, inspection and installation
1. If the hydraulic lifters are noisy when the engine is at normal operating temperature, the following method will help you identify the faulty lifter....
1. If the hydraulic lifters are noisy when the engine is at normal operating temperature, the following method will help you identify the faulty lifter....

Cylinder head — removal and installation
1. Disconnect the negative battery cable. 2. Drain the cooling system as described in Section 2 . 3. Remove the intake and exhaust manifolds ( see Section 3 ),...
1. Disconnect the negative battery cable. 2. Drain the cooling system as described in Section 2 . 3. Remove the intake and exhaust manifolds ( see Section 3 ),...

Cylinder head — overhaul
1. Having removed the cylinder head as previously described, the valves can be removed as follows. The valves are deeply embedded in the top of the cylinder...
1. Having removed the cylinder head as previously described, the valves can be removed as follows. The valves are deeply embedded in the top of the cylinder...

Flywheel/Drive Disc — Removal, Inspection and Installation
1. On models with manual transmission, remove the gearbox ( Section 6 ) and clutch ( Section 5 ). 2. On models with automatic transmission, remove the...
1. On models with manual transmission, remove the gearbox ( Section 6 ) and clutch ( Section 5 ). 2. On models with automatic transmission, remove the...
Intermediate shaft — removal, inspection and installation
1. Remove the distributor (Section 4) and on carbureted models, the fuel pump (Section 3). 2. Remove the timing belt as described in Chapter 10 , but do not...
1. Remove the distributor (Section 4) and on carbureted models, the fuel pump (Section 3). 2. Remove the timing belt as described in Chapter 10 , but do not...
Pallet — removal and installation
1. Apply the parking brake, then jack up the front of the vehicle and support it on axle stands placed under the bottom. 2. Unscrew and remove the mudguard...
1. Apply the parking brake, then jack up the front of the vehicle and support it on axle stands placed under the bottom. 2. Unscrew and remove the mudguard...
Front and rear crankshaft seals — replacement
Front oil seal 1. Remove the timing belt and crankshaft sprocket as described in Chapter 10 . 2. If you have a special tool, the seal can be replaced without...
Front oil seal 1. Remove the timing belt and crankshaft sprocket as described in Chapter 10 . 2. If you have a special tool, the seal can be replaced without...

Oil pump — removal, inspection and installation
1. Remove the pan as described in Chapter 16 . 2. Using a socket wrench, loosen the bolts and remove the suction pipe from the oil pump. Remove the O-ring. 3....
1. Remove the pan as described in Chapter 16 . 2. Using a socket wrench, loosen the bolts and remove the suction pipe from the oil pump. Remove the O-ring. 3....
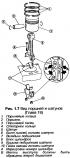
Pistons and connecting rods — removal and disassembly
1. Remove the cylinder head ( Chapter 12 ), pallet ( Chapter 16 ) and oil pump ( Chapter 18 ). 2. Turn the engine so that the journal of connecting rod No.1 is...
1. Remove the cylinder head ( Chapter 12 ), pallet ( Chapter 16 ) and oil pump ( Chapter 18 ). 2. Turn the engine so that the journal of connecting rod No.1 is...

Pistons and cylinder bores — inspection
1. Examine the condition of the pistons and cylinder bores. If they are in satisfactory condition, perform the following checks. 2. Measure the piston diameter...
1. Examine the condition of the pistons and cylinder bores. If they are in satisfactory condition, perform the following checks. 2. Measure the piston diameter...

Pistons and connecting rods — assembly and installation
1. Heat the piston in hot water, then insert the connecting rod and push the pin (photo). Make sure that the protrusion marks on the connecting rod and the...
1. Heat the piston in hot water, then insert the connecting rod and push the pin (photo). Make sure that the protrusion marks on the connecting rod and the...

Crankshaft and main bearings — check
1. Clean and check the condition of the crankshaft. 2. Check the wear of the connecting rod and main journals. If the engine has a high mileage, or there are...
1. Clean and check the condition of the crankshaft. 2. Check the wear of the connecting rod and main journals. If the engine has a high mileage, or there are...

Engine Mounting Brackets — Replacement
1. Unscrew the front support beam from the block. 2. Support the weight of the engine with a winch. 3. Loosen the mounting nuts, then lift the engine and...
1. Unscrew the front support beam from the block. 2. Support the weight of the engine with a winch. 3. Loosen the mounting nuts, then lift the engine and...
Engine assembly — general description
To ensure maximum performance and minimum troubles of the repaired engine, not only must all parts be assembled correctly, but they must be perfectly clean....
To ensure maximum performance and minimum troubles of the repaired engine, not only must all parts be assembled correctly, but they must be perfectly clean....

Engine — assembly
1. Place the cylinder block on a bench, crankcase side up. 2. Position the upper main bearing shells in the crankcase so that the tabs fit into the recesses....
1. Place the cylinder block on a bench, crankcase side up. 2. Position the upper main bearing shells in the crankcase so that the tabs fit into the recesses....
Engine — preparation for starting after repair
Note: Before starting the engine, see Chapter 25, paragraph 80 . 1. Check all connections to ensure that no rags or tools are left in the engine compartment....
Note: Before starting the engine, see Chapter 25, paragraph 80 . 1. Check all connections to ensure that no rags or tools are left in the engine compartment....
This section is available on russian, bulgarian, belarusian, ukrainian, serbian, croatian, romanian, polish, slovak, hungarian
Similar sections of other Audi car models:
Power unit: Engines 4-cylinder Audi 100 C3 (1982-1990)
Diesel engines: 4 cylinder engines Audi A6 C4 (1994-1997)
Power unit: Engines 4-cylinder Audi 100 C3 (1982-1990)
Diesel engines: 4 cylinder engines Audi A6 C4 (1994-1997)
Share information:
- General information
- User manual
- Maintenance
- Troubleshooting
- Power unit
- Engine
- Cooling system
- Heating and ventilation
- Petrol injection
- Diesel fuel system
- Fuel system
- Exhaust systems
- Ignition system
- Transmission
- Clutch
- Car gearbox
- Chassis
- Brake system
- Suspension and steering wheel
- Body
- Body and trim
- Electrical equipment
- Electrical system
- Electrical circuits
- General information
- Repair characteristics
- Maintenance
- Power unit
- Gasoline engine
- Diesel engine
- Engine lubrication system
- Fuel system (gasoline)
- Injection system (gasoline)
- Fuel system (diesel)
- Ignition system
- Cooling system
- Heater
- Exhaust system
- Transmission
- Clutch and gearbox
- Chassis
- Steering
- Brake system
- Car suspension
- Body
- Body elements
- Electrical equipment
- Power devices
- Lighting and appliances
- Electrical circuits
- General information
- User manual
- Maintenance
- Power unit
- Engine 4-cylinder
- Engine 5-cylinder
- Cooling system
- Fuel and exhaust systems
- Ignition system
- Transmission
- Clutch
- Mechanical transmission
- Automatic transmission
- Drive shafts
- Chassis
- Brake system
- Suspension
- Steering
- Body
- Exterior
- Interior
- Electrical equipment
- Equipment and devices
- Electrical circuits