



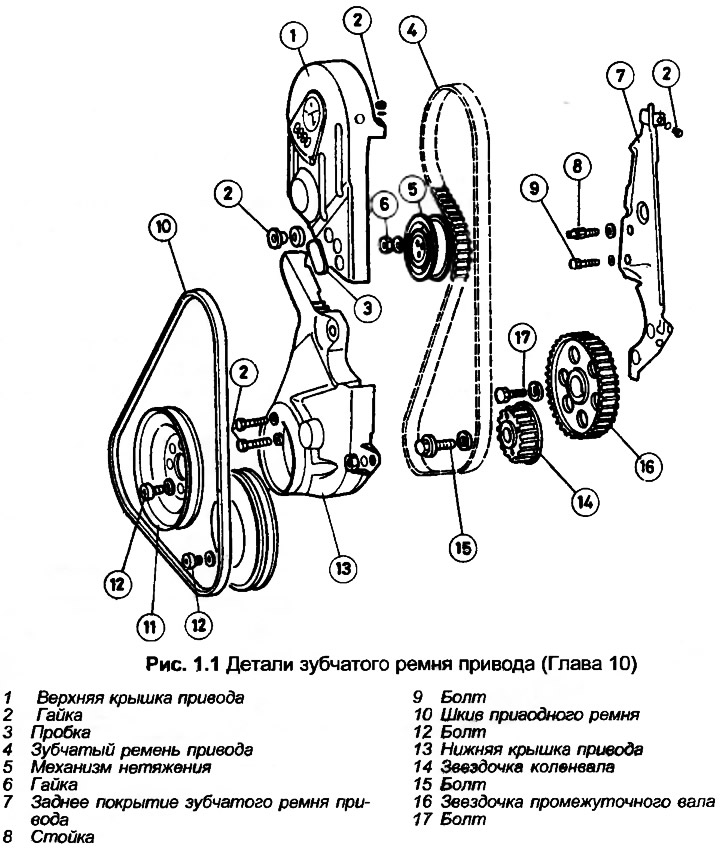
1. Remove the radiator (Section 2), and drive belts for the alternator, power steering pump and air conditioning compressor (if any).
2. Disconnect the negative battery cable.
3. Unscrew and remove the splash guard under the engine.
4. For better access, the alternator, power steering pump and A/C compressor can be removed without disconnecting the lines from the pump and compressor.
5. Using a socket wrench, loosen the bolts and remove the pulley from the water pump.
6. Unscrew the nut, remove the special bolt securing the lower drive cover to the water pump assembly.
7. Release the staples and (where is it used) unscrew the nut, then remove the top cover of the drive.
8. Mark the position of the drive belt pulley and crankshaft sprocket relative to each other, then unscrew the pulley with a socket wrench.
9. Unscrew the bolts, remove the lower cover of the toothed belt drive. For one of the bolts you will need a socket wrench. Remove the special gasket on top of the cover.
10. Turn the crankshaft clockwise until the mark on the rear of the camshaft sprocket aligns with the top of the cylinder head on the left side.
11. Loosen the nut, turn the tensioner hub counterclockwise to remove tension from the timing belt.
12. Mark the direction of rotation of the timing belt with an arrow, then remove it from the tensioner, camshaft sprocket, intermediate shaft sprocket and crankshaft sprocket.
13. Loosen the nut, remove the washer and remove the tensioner wheel and hub from the rack on the cylinder head.
14. Unscrew the camshaft sprocket bolt, locking the sprocket with a tool as shown in photo 25.53. Remove the bolt, washer, sprocket and key.
15. Unscrew the intermediate shaft sprocket bolt in the same way. Remove the bolt, sprocket and key.
16. Unscrew the crankshaft sprocket bolt and remove the sprocket. The bolt is tightly clamped, so the crankshaft must be locked. On models with a manual transmission, engage the highest gear and apply the parking brake. On models with an automatic transmission, unscrew the front transmission cover and use a wide screwdriver to lock the crankshaft by the toothed ring.
17. Clean all sprockets and check their condition. Quickly rotate the tensioner to check that it rotates freely and easily.
18. Check the condition of the timing belt, especially at the base of the teeth. Audi does not specify the interval for replacing the belt, but if the mileage is approximately 60,000 km or more, it is better to replace the belt as a precaution.
19. Assembly is carried out in the reverse order, but note the following additional points:
- (a) Tighten all nuts and bolts to the specified torque Specification
- (b) Guided by Chapter 25 points 29 and 30, install the crankshaft sprocket, blocking the crankshaft as described in point 16 in this Chapter
- (c) Guided by Chapter 25 points 55-62, tighten the toothed drive belt
- (d) Adjust the tension of the power steering pump, alternator and air conditioning compressor drive belts as described in Sections 12, 10 and 11 respectively.
(The original version is on the portal audimanual)