
Table of contents: Tensioner ↓ Camshaft sprocket ↓ Crankshaft sprocket ↓ Auxiliary shaft sprocket ↓ Fuel injection pump sprocket ↓
1. Disconnect the battery as described in chapter 5A.
2. To gain access to the components, remove the accessory belts as described in paragraph 6.
Tensioner
Removal
3. As described in the relevant paragraphs paragraphs 2 and 4, set the engine to TDC of the first cylinder and remove the upper part of the outer timing belt cover.
4. Loosen the tensioner pulley hub mounting nut and allow the assembly to rotate counterclockwise, releasing the timing belt tension. Unscrew the nut and remove the washer.
5. Remove the tensioner from the mounting stud.
6. Wipe the tensioner, but do not use any solvents to avoid damaging the bearing. Turn the tensioner pulley on the hub by hand. There should be no jamming or noise from the bearing. Replace a faulty or worn tensioner with a new one.
Installation
7. Place the tensioner onto the mounting stud.
8. Install the washer and tighten the tensioner nut - do not tighten completely at this stage.
9. As described in paragraph 4, install and tension the timing belt.
10. Install the timing belt covers as described in paragraph 4.
11. Install the auxiliary belts as described in paragraph 6. Connect the battery as described in chapter 5A.
Camshaft sprocket
Removal
12. Set the engine to TDC as described in paragraph 2 and remove the upper timing belt cover as described in paragraph 4.
13. Remove the valve cover as described in paragraph 7.
14. Loosen the tensioner hub mounting nut and allow the assembly to rotate counterclockwise, releasing the belt tension. Slide the belt off the camshaft sprocket.
15. When loosening the camshaft sprocket mounting bolt, it must be held still; if the Audi/VW tool is not available, you can make your own. To fix the camshaft, do not use the fixing film; it must be removed before loosening the bolt to avoid bending.
16. Hold the sprocket from turning with a homemade tool and loosen its mounting bolt by half a turn. Release the sprocket from the conical fit by tapping it through a punch inserted into the hole in the rear timing belt cover.
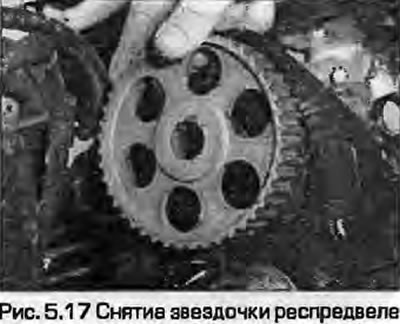
17. Loosen the bolt and remove the sprocket from the camshaft (Fig. 5.17).
18. After removing the sprocket, check the condition of the camshaft oil seal - if necessary, replace it as described in paragraph 8.
19. Wipe clean the mating surfaces of the sprocket and camshaft.
Installation
20. Install the sprocket on the shaft and tighten the bolt of its fastening, tightening it only by hand at this stage.
21. As described in paragraphs 2 and 4, set the engine to TDC of the first cylinder. Install the timing belt and tighten it.
22. Install the upper timing belt cover and valve cover. Install the accessory belts as described in paragraph 6. Connect the battery as described in chapter 5A.
Crankshaft sprocket
Removal
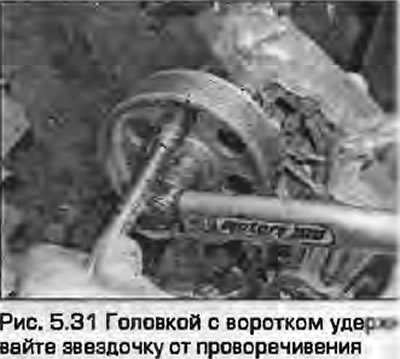
23. Remove the upper and lower outer timing belt covers and the timing belt itself as described in paragraph 4. If you are going to reinstall the belt, mark it to indicate the direction of rotation.
24. To loosen the mounting bolt, the crankshaft sprocket must be held still. If you do not have access to the Audi/WV tool, remove the starter and have an assistant hold the flywheel with a screwdriver against the teeth of the ring gear.
25. Unscrew the bolt, remove the washer and sprocket.
26. After removing the sprocket, check the condition of the oil seal - if necessary, replace it as described in paragraph 10.
27. Wipe the mating surfaces of the shaft and sprocket clean.
Installation
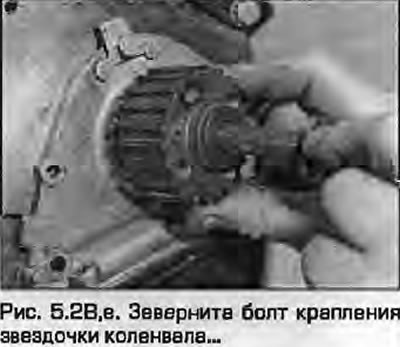
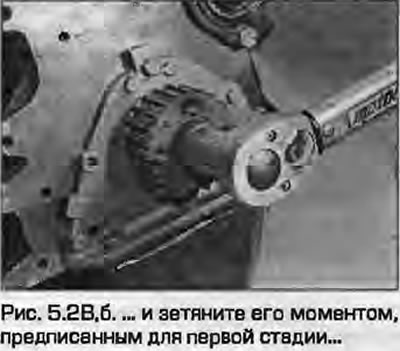
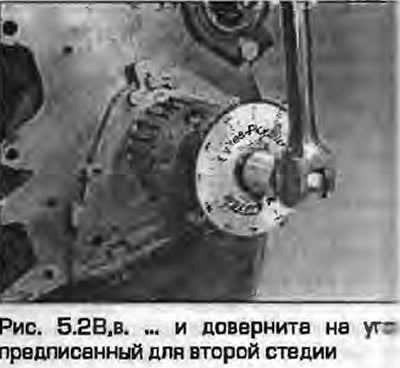
28. Place the sprocket on the crankshaft, aligning the lug with the slot in the crankshaft. Insert the mounting bolt and tighten it to the specified torque for stage 1, holding the crankshaft still using the method used during removal. Tighten the bolt to the specified angle (fig. 5.28, a-c).
 |
 |
29. Make sure that the engine is still at TDC of the first cylinder (see paragraphs 2 and 4). Install and tension the timing belt. Install the outer timing belt covers as described in paragraph 6 and connect the battery as described in chapter 5A.
Auxiliary shaft sprocket
Removal
30. Remove the upper and lower timing belt covers and the timing belt itself as described in paragraph 4. If the belt is to be reinstalled, mark it to indicate the direction of its rotation.
31. To loosen the bolt, the intermediate sprocket must be held still. If you do not have access to an Audi/VW tool, make a homemade one as described in the corresponding subparagraph for the camshaft sprocket. You can lock the sprocket by inserting a socket with an extension into the sprocket hole (Fig. 5.31).
32. Loosen and unscrew the bolt securing the sprocket and remove it from the shaft. Remove the key from the slot in the shaft.
33. After removing the sprocket, check the condition of the shaft seal. If necessary, replace it as described in paragraph 9.
34. Wipe the mating surfaces of the sprocket and shaft clean.
Installation
35. Install the key onto the shaft with the flat surface facing out. Place the sprocket onto the shaft, aligning it with the key.
36. Install and tighten the sprocket mounting bolt to the specified torque. Hold the sprocket from turning using the method used during removal.
37. Make sure that the engine is still at TDC of the first cylinder (see paragraphs 2 and 4). Install and tension the timing belt. Install the outer timing belt covers as described in paragraph 6 and connect the battery as described in chapter 5A.
Fuel injection pump sprocket
38. The procedure is described in chapter 4B.