Repair Chevrolet Repair Toyota Repair Honda Repair AvtoVAZ Repair Mercedes-Benz Repair BMW Repair Opel
Home  |  Contacts  |  Sitemap  |    
English Русский
Български
Беларускі
Український
Српски
Hrvatski
Română
Polski
Slovenský
Magyar
AudiManual.ru


  • AUDI 80
  • AUDI 100
  • AUDI A3
  • AUDI A4
  • AUDI A6
  • AUDI A8
  • AUDI Q
  • OTHER
  • ARTICLES
B4 (1991-1996) B3 (1986-1991) B3 (1986-1991, petrol) B2 (1979-1986)

Removal and installation the radio (Audi 80 B3)

  • Home
  • Audi 80
  • B3 (1986-1991)
  • Electrical equipment
  • Lighting and appliances
  • Removal and installation the radio
            0
Table of contents: Removal ↓ Installation ↓ Instructions for self-installation… ↓
Factory installed radios have a retractable design that allows for quick removal and installation. But this can only be done with a special tool that is included with the purchase of the radio. Whether the radio has a retractable design is usually visible by the 4 holes on the front panel.

Removal


Disconnect the battery ground.

Attention: When the terminals are removed from the battery, the memory in the radio receiver and electronic control units is erased. Receivers installed in series on AUDI cars are equipped with a security coding system. It does not allow the receiver to be switched on after a power failure. The power may be interrupted, for example, when the cables are removed from the battery or when the corresponding fuse burns out. If the receiver is coded, you must know the code before removing the cables from the battery. If the code is unknown, the receiver can only be put into operation again by a VAG service station.


The individual code of the receiver is given in the operating instructions of the receiver. It should not be kept in the car.

The individual code of the receiver is given in the operating instructions of the receiver. It…


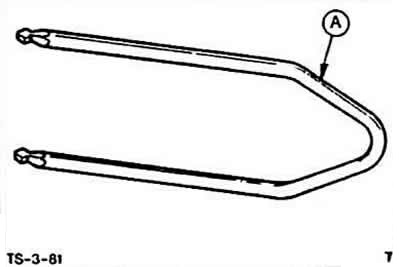
Insert two handles-pullers "A" into the holes on the front panel on the left and right. If there is no hole, remove the control heads and the cover. Insert the pullers.


Pull out the receiver without distorting it.

Mark (left/right) and disconnect the speaker connectors. Remove the antenna. Disconnect the plug connection (+) of the battery and ground. For digital instruments, disconnect the power plug (terminal 30).

Mark (left/right) and disconnect the speaker connectors. Remove the antenna. Disconnect the plug…


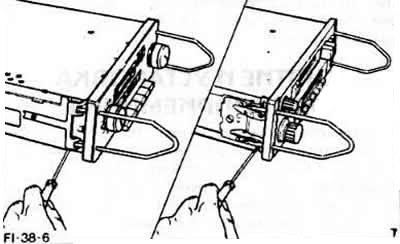
Remove the pullers. To do this, press the clip-holder with a small screwdriver.

Installation


Connect the electrical wires and antenna to the rear of the receiver, see Removal section.

Insert the receiver into the instrument panel until the springs snap into place.

Connect ground to the battery.

Turn on the receiver and check its operation. If the receiver is encrypted, set the secret code first.

Note: If the radio receiver is installed additionally, it should be matched with the antenna. To do this, tune in to a weak signal in the medium-wave range and adjust the receiver with the adjusting screw with a small screwdriver to the maximum signal.


Instructions for self-installation of the radio receiver


The factory fitted connector fits all VAG fitted radios with a separate connection for the gauge illumination.

For other receivers there are VAG adapters.


Caution: If the adapter cable is not used, pay attention to the fact that there are no uninsulated wires. A possible short circuit will cause the cable to burn out.


Please ensure that the correct anti-interference kit for this type of vehicle is used, otherwise the vehicle may be invalidated.
The article was checked by auto expert Elisey Ermolaev
This article is available at russian, bulgarian, belarusian, ukrainian, serbian, croatian, romanian, polish, slovak, hungarian

Share information:
Previous articles
Audi 80 B3: Lighting and appliances
Next articles

Checking the speedometer sensor
Adjusting the fuel gauge
Checking the voltage stabilizer
Removal and installation of indicator devices and control lamps
Replacing the wiper blade rubber
Removal, installation and adjusting the windshield wiper nozzle
Windscreen wiper drive
Removal and installation the windshield wiper motor


Similar articles on other Audi car models:
Radio and loudspeakers — removal and installation Audi 100 C3 (1982-1990, diesel)
Removal, installation and coding of the radio receiver Audi A3 Type 8L (1996-2003)
Removal and installation radio/navigation device/CD changer Audi A4 B6 (2000-2006)
Removal and installation the radio antenna Audi A6 C4 (1994-1997)
Removal and installation the engine Audi A8 D2 (1994-2002)
Turbocharger — removal and installation Audi Q5 Type 8R (2008-2017)
Removal and installation the engine Audi A2 (1999-2005)
Link to this page in different formats


Visitor comments

No comments yet


How much will 38 + 33 =


80(B4, 1991-1996) 
  • General information
  • User manual
  • Maintenance
  • Troubleshooting
  • Power unit
  • Engine
  • Cooling system
  • Heating and ventilation
  • Petrol injection
  • Diesel fuel system
  • Fuel system
  • Exhaust systems
  • Ignition system
  • Transmission
  • Clutch
  • Car gearbox
  • Chassis
  • Brake system
  • Suspension and steering wheel
  • Body
  • Body and trim
  • Electrical equipment
  • Electrical system
  • Electrical circuits
 
80(B3, 1986-1991) 
  • General information
  • Repair characteristics
  • Maintenance
  • Power unit
  • Gasoline engine
  • Diesel engine
  • Engine lubrication system
  • Fuel system (gasoline)
  • Injection system (gasoline)
  • Fuel system (diesel)
  • Ignition system
  • Cooling system
  • Heater
  • Exhaust system
  • Transmission
  • Clutch and gearbox
  • Chassis
  • Steering
  • Brake system
  • Car suspension
  • Body
  • Body elements
  • Electrical equipment
  • Power devices
  • Lighting and appliances
  • Electrical circuits
 
80(B3, 1986-1991, petrol) 
  • General information
  • User manual
  • Maintenance
  • Power unit
  • Engine 4-cylinder
  • Engine 5-cylinder
  • Cooling system
  • Fuel and exhaust systems
  • Ignition system
  • Transmission
  • Clutch
  • Mechanical transmission
  • Automatic transmission
  • Drive shafts
  • Chassis
  • Brake system
  • Suspension
  • Steering
  • Body
  • Exterior
  • Interior
  • Electrical equipment
  • Equipment and devices
  • Electrical circuits
 
80(B2, 1979-1986) 
  • General information
  • User manual
  • Power unit
  • Engine FZ
  • Engine EP, YP, YZ, DT, DS, DZ
  • Transmission
  • Clutch
  • 4 speed gearbox
  • 5 speed gearbox
  • Front wheel drive
  • Chassis
  • Front suspension
  • Rear suspension
  • Steering
  • Brake system
  • Electrical equipment
  • Equipment and devices
  • Electrical circuits
 
AudiManual.ru © 2017-2026 · Mobile version · Feedback · Sitemap: EN BG BY UA RS HR RO PL SK HU · Site search · News and articles
80 B2 · 80 B3 petrol · 80 B3 · 80 B4 · 100 C3 diesel · 100 C3 petrol · 100 C3 · 100 C4 petrol · 100 C4 · A3 Type 8L · A4 B5 petrol · A4 B5 · A4 B6 petrol · A4 B6 · A4 B7 · A4 B8 · A6 C4 · A6 C5 · A6 C5 Allroad · A8 D2 · Q5 Type 8R · Q7 Typ 4L · Audi A2 ·
This site uses cookies 🍪. Click the button to accept this fact.