



Table of contents: Switching the independent… ↓ Terms and Conditions ↓ Switching the independent… ↓ Setting up an autonomous… ↓
Note: The remote radio control device for the independent heater has several versions (with different transmitting signals, so pay attention to strict compliance). After removing the batteries, you should determine the version of the remote control by the part number on the "arrow" sticker (pay attention to strict compliance).
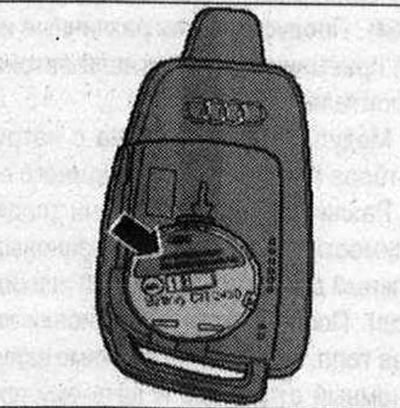
Currently, a radio key fob without a display is provided for radio remote control of an independent heater. In an independent heater with a used additional heater "J364" with a part number of 8xx xxx. xxx, adjustment is provided only by a radio key fob without a display. Since 10.2010, independent heaters with "J364" with a part number of 4xx xxx xxx are used, in these independent heaters the design of the key fob (with or without display) "3364" must be coded correctly. This is also true if in service 1 "J364" with part number 8xx xxx xxx is replaced by another "J364" with part number 4xxxxxx xxx. Ensure correct matching of the radio remote control of the independent heater to the radio receiver of the independent heater "R64" (various designs in radio key fob with and without display) and for correct matching and coding "J364". The range of the remote control is approximately 600 m. It may be significantly reduced by obstacles (buildings, etc.), which are located between the remote control and the car.
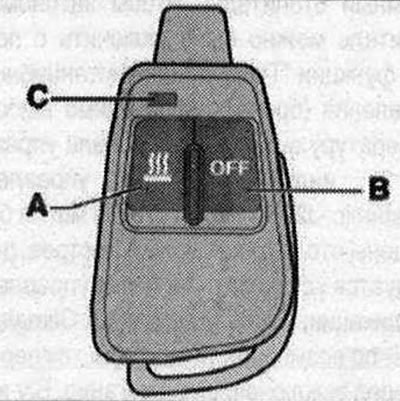 A- power button; "B" power button; "C" Control lamp (flashes red or green).
Note. In order for the remote control to recognise the pressing of the keys and transmit a radio signal, the corresponding key must be pressed for approx. 3 seconds. If the power sources of the remote control are so discharged that a radio signal of sufficient power cannot be transmitted, the indicator lamp "C" does not light up when the on/off key "A" or "B" is pressed. The indicator lamp "C" lights up green briefly (approx. 2 s) when the on/off key "A" is pressed to indicate that a functional test is being performed. If the signal for switching on the used auxiliary heater "J364" is received correctly and there is no fault with the auxiliary heater, the auxiliary heater control unit "J364" transmits a feedback signal and the indicator lamp "C" then flashes 30 times at a frequency of 1 Hz (1 pulse per second) green light (feedback signal confirming that the system is operating normally). If the signal for switching on the used additional heater "J364" is not received correctly, for example, due to the distance to the vehicle being too great (unable to contact used) the control lamp "C" flashes red 30 times. If there is a malfunction in the car or the independent heater (for example, switching on the independent heater is impossible due to the lack of fuel in the fuel tank) the auxiliary heater control unit "J364" transmits a fault message and the indicator lamp "C" flashes red 30 times. The indicator lamp "C" lights up red briefly (approx. 2 s) after pressing the off button "B" to check the operation, and then the indicator lamp "C" flashes 30 times at a frequency of 1 Hz (1 pulse per second) red light. If the signal to turn off the used additional heater "J364" is not received correctly, for example, due to the distance to the car being too great (contact with used is impossible) control lamp "C" after pressing the key flashes 10 times with a frequency of 4 Hz (4 pulses per second) red light. When sending a radio signal, hold the remote control with the antenna facing up. Ensure that there is a sufficiently large distance to the car antenna when pressing the remote control buttons. If the radio signal is strong, problems may arise when entering. If necessary, cover the transmitting antenna with your hand or maintain a minimum distance of 10 m to the car. The radio receiver of the independent heater "R64" can be switched to the used additional heater "J364" power saving mode (the radio signal can no longer be received, and the quiescent current consumption decreases from approximately 1 mA to 0.04 mA). Depending on the selected operating mode ("auxiliary heater" or "auxiliary ventilation"), certain fault messages that have a negative effect on the auxiliary heater/auxiliary ventilation mode are not stored in the memory of the auxiliary heater control unit "J364". Therefore, if there are complaints about the auxiliary heater, also read the fault memory of the control and display panel of the Climatronic control unit "J255" using the VAS5051 diagnostic system.
Switching the independent heating/ventilation on and off via the Multimedia Interface (MMI)
Note: The following illustration shows the instrument cluster of the Audi A5 Coupe, the instrument cluster of the Audi Q5 is slightly different, but switching on and off is the same
Terms and Conditions
The independent heater is adapted from the control and display unit, the Climatronic control unit "J255" (check and perform coding). In order for the auxiliary heater to be switched on via the auxiliary heater control unit "J364" or for the "Auxiliary heater on" function to be activated, there must be sufficient fuel in the fuel tank. When the ignition is on, the fuel gauge "A" must not be in the "red zone". There must be no fault codes in the auxiliary heater control unit "J364". The vehicle battery "A" must be sufficiently charged. The presence of faults in the vehicle data bus is not permitted. Transport mode and the protection of the auxiliary heater components must not be active.
Switching the independent heater/autonomous ventilation on and off
Press the "A" button on the remote control to switch on or the "B" button (the "OFF" button) to switch off the independent heater/independent ventilation. Or switch on the ignition. Press the "CAR" button on the MMI keyboard. Press the "KLIMA" button to send control signals. Select "Independent heater" or "Independent ventilation" using the rotary push button and make the desired settings.
Setting up an autonomous heater/autonomous ventilation
Switch on the ignition. Press the "CAR" button on the MMI keyboard. Press the "KLIMA" button to send control signals. Select "Autonomous heating" or "Autonomous ventilation" using the rotary push wheel and make the desired settings. Select the desired temperature on the control panel and display unit Climatronic "J255".