
Table of contents: Programming the transmitter ↓ From the sun visor side ↓ From the front bumper side ↓ Dynamic Code Programming ↓ Dynamic code identification ↓ Enabling the garage door opener… ↓ Programming from the sun visor side ↓ Using HOME LINK ↓ Resetting HOME LINK ® Key Programmed… ↓ Reprogramming a single HOME LINK ®… ↓
The universal HOME LINK ® radio remote control can be programmed with handheld transmitters of already programmed devices.
The universal HOME LINK ® radio remote control provides the convenient ability to operate various devices, such as garage doors/property gates, security systems, home lighting, etc., without leaving your car.
The HOME LINK ® universal radio remote control allows you to replace three different portable transmitters of the corresponding devices with one (universal radio remote control). These devices most often include mechanisms for garage and external gates. Programming portable transmitters to your remote radio control is done near the front bumper on the right. The control unit is located there.
In order to be able to control different devices with the universal HOME LINK ® radio remote control, the corresponding transmitter must first be programmed. If the devices do not function after the first programming, these devices must be checked for the presence of a dynamic code.
Warning: A list of compatible portable transmitters can be obtained by fax: +49 (0) 6838 907 283 3333. For further information regarding HOME LINK ® and/or HOME LINK ® compatible products, please call the HOME LINK ® toll free hotline on (0) 08000466 35465 or +49 (0) 6838 907 277 or visit the HOME LINK ® website: www.homelink.com
Programming the transmitter
The universal HOME LINK ® radio remote control is programmed using buttons located in the driver's sun visor and also on the front bumper.
From the sun visor side
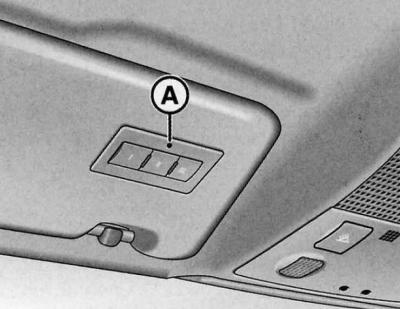
Driver's sun visor
1. Turn on the ignition/engine is not running.
2. Press both outer keys of the HOME LINK ® universal remote control until the LED (A) starts flashing (in about 20 seconds).
3. Press the HOME LINK ® key you want to program.
4. Wait until the LED (A) starts flashing. The 5-minute programming phase of the HOME LINK ® module begins.
5. Exit your vehicle and stand in front of it with the original handheld transmitter of your garage door opener or other device you wish to program the HOME LINK ® key to.
From the front bumper side
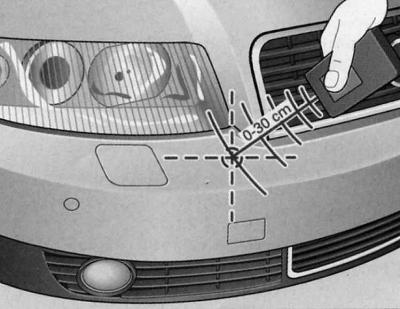
Right side of the front bumper
1. Hold the original handheld transmitter approximately 0 - 30cm below the right front headlight near the bumper of your car.
2. Press the power key of the original portable transmitter.
3. With the handheld transmitter function activated, observe the vehicle's direction indicators. A positive result of HOME LINK ® programming is confirmed by the hazard warning lights flashing three times.
4. If the lights do not flash three times, repeat the programming process at a different distance from the bumper.
The distance between the handheld transmitter and the HOME LINK ® module in the bumper is determined by the device you want to program. It may take several attempts to program.
Exceeding the five-minute programming stage is confirmed by a single flash of the hazard warning light system. In this case, it is necessary to repeat the programming stage from the sun visor side.
When programming the other two keys, follow the above description. You should also start with step 3 on the sun visor side if programming is carried out immediately after programming the first key.
If after positive programming, the HOME LINK ® keys still fail to open the garage door or other systems, then there is a possibility that the specific system is operating with a dynamic code. In this case, dynamic code programming is necessary.
Dynamic Code Programming
Some devices require additional programming of the HOME LINK ® universal radio remote control dynamic code.
Dynamic code identification
1. Press and hold the HOME LINK ® key you programmed earlier again.
2. Observe the HOME LINK ® LED (A). If the LED initially flashes quickly and then lights up continuously after 2 seconds, this indicates the presence of a dynamic code for the corresponding device, such as a garage door opener.
3. Dynamic code is programmed in the following sequence:
Enabling the garage door opener motor mechanism function
1. Locate the key for adjusting the mechanism of the electric motor of the garage door opener. The exact location and color of the key depends on the brand of the manufacturer of the device.
2. Press the setting key of the electric motor mechanism of the garage door opener. (In this case, as a rule, the "settings" LED of the electric motor mechanism is lit). You now have about 30 seconds to program the HOME LINK ®key located in the sun visor.
Programming from the sun visor side
1. Press and release the HOME LINK ® key you programmed earlier again.
2. To complete dynamic code programming, press the HOME LINK ® key again.
After programming the sun visor button, the garage door opener should recognize the HOME LINK ® signal and open the gate when the HOME LINK button is pressed. If required, further buttons can now be programmed.
Warning: If you have an assistant, the dynamic code programming process can be simplified and accelerated. Some garage door openers require a third press of the HOME LINK ® button to complete the setup process.
If you have difficulty programming the dynamic code, it may help to review the operating manual for your garage door opener/other device.
Using HOME LINK
The programmed devices are operated via the HOME LINK ® buttons located in the driver's sun visor.
1. Turn on the ignition/engine is not running.
2. Press the programmed HOME LINK ® key. The device programmed to this key is controlled (for example, a garage door opener).
While you are manipulating the control keys, the HOME LINK® LED lights up.
Resetting HOME LINK ® Key Programmed Data
Both outer control keys can be used to reset all programmed HOME LINK ® data.
1. Turn on the ignition/engine is not running.
2. Press both outer keys until the LED starts flashing.
3. Release the keys.
After resetting the programming data of the HOME LINK ® universal radio remote control keys, the device is again in the setup mode and is ready for new programming.
Warning: It is not possible to reset programmed keys separately.
Warning: For safety reasons, reset the HOME LINK key programming before selling the vehicle.
Reprogramming a single HOME LINK ® key
It is possible to reprogram one HOME LINK ® key without changing the programmed positions of other keys.
From the sun visor side
1. Press the current HOME LINK ® key until the LED starts flashing slowly.
From the front bumper side
1. Hold the original portable transmitter of the garage door opener or other device approximately 0-30 cm below the right front headlight near the bumper of your car. The required distance is determined by the device you want to program.
2. Press the power button on the original portable transmitter of the garage door opener or other device.
3. With the handheld transmitter function activated, observe the vehicle's direction indicators. A positive result of HOME LINK ® programming is confirmed by the hazard warning lights flashing three times.
4. If the lights do not flash three times, repeat the programming process at a different distance from the bumper.
After the hazard warning light flashes three times, the previously programmed HOME LINK:® data is reset and the new device is programmed. To use the new device, press the programmed HOME LINK ® button.
Warning: Programming may require several attempts. The duration of the setting position process for each attempt should be at least 15 seconds. Only then can you move on to another position. Keep an eye out for the turn signal lights.