
Table of contents: Ignition switch ↓ Models with petrol engine ↓ Models with diesel engine ↓ Locking the key in the ignition… ↓ Starting the engine ↓ Gasoline engine ↓ Diesel engine ↓ Engine shutdown ↓ Handbrake ↓ Tightening the handbrake ↓ Releasing the handbrake ↓ Parking ↓ Acoustic parking assistance ↓ Rear Parking Assistance (4-channel… ↓ 8-channel parking assistance system ↓ Tempostat ↓ Speed programming ↓ Changing the programmed speed ↓ Temporary system shutdown ↓ Complete system shutdown ↓ Electronic skid control system (ESP) ↓ Shutdown ↓ Electronic Differential Lock (EDS) ↓ Introduction ↓ Operating principle ↓ Anti-Slip Regulation (ASR) ↓ Braking ↓ Vacuum brake booster ↓ Anti-lock brake device (ABS) ↓ Emergency Brake Assist ↓ Power steering ↓ System "Servotronic" ↓ All-wheel drive ↓ Winter tires ↓ Anti-skid chains ↓ Tire replacement ↓ Catalytic converter ↓ Sending a car abroad ↓ How to avoid damage to your car? ↓ Economically and environmentally… ↓ Be able to anticipate the situation… ↓ Energy-saving gear shifting ↓ Avoid accelerating with the… ↓ Reduce the duration of idling… ↓ Regular maintenance ↓ Avoid short distance travel ↓ Check the air pressure in your tires ↓ Don't carry useless ballast ↓ Save electricity ↓ Fuel consumption control ↓ Environmental properties of the car ↓
1. Move the handle down.
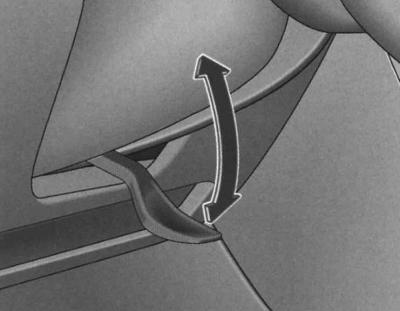
2. Set the desired tilt and length of the steering wheel.
3. Press the handle up towards the steering column and lock it in its original position.
Ignition switch
Models with petrol engine
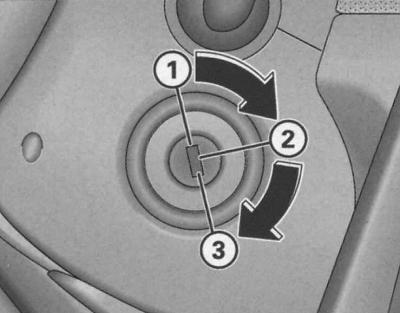
Ignition switch positions
Ignition off (1)
In position (1) the ignition is off, the engine is not running and the steering wheel can be locked.
To lock the steering wheel, remove the key from the lock and turn the steering wheel until you hear it lock. Always lock the steering wheel when leaving the vehicle. This makes it more difficult for potential car theft.
Ignition on (position "on for driving") (2)
If the key turns with difficulty or does not turn at all in this position, then it is necessary to turn the steering wheel slightly to relieve the anti-theft device.
Starting the engine (3)
In this position, the engine starts. At the same time, the headlights switch to parking lights, and powerful power consumers are switched off. After starting the engine, the ignition key returns to position (2).
Before each subsequent engine start, return the ignition key to position (1). The restart lock in the ignition switch prevents damage to the starter by preventing its pinion from engaging with the flywheel ring gear when the engine is already running.
Warning: If the battery is disconnected and then reconnected, wait with the ignition key in position (2) for about 5 seconds before starting the engine.
Models with diesel engine
Fuel supply has been interrupted (ignition off) (1)
In position (1) the fuel supply is cut off, the engine is not running and the steering wheel may be locked.
To lock the steering wheel, remove the key from the lock and turn the steering wheel until you hear it lock. Always lock the steering wheel when leaving the vehicle. This makes it more difficult for potential car theft.
Pre-glow position and "on for driving" position (2)
In this position, preheating is possible. During preheating of the engine, do not turn on powerful current consumers, so as not to overload the battery uselessly.
If the key turns with difficulty or does not turn at all in this position, then it is necessary to turn the steering wheel slightly to relieve the anti-theft device.
Starting the engine (3)
In this position, the engine starts. At the same time, the headlights switch to parking lights, and powerful power consumers are switched off. After starting the engine, the ignition key returns to position (2).
Before each subsequent engine start, return the ignition key to position (1). The restart lock in the ignition switch prevents damage to the starter by preventing its pinion from engaging with the flywheel ring gear when the engine is already running.
Locking the key in the ignition switch
The ignition key on models with automatic transmission can only be removed when the selector lever is in the "P" position.
After turning off the ignition, the key can only be removed from the ignition switch when the selector lever is in the "P" position (parking lock). After this, the selector lever is locked.
Starting the engine
The engine can only be started with an original Audi key.
1. Fully apply the handbrake.
2. Set the gear shift lever to neutral (automatic transmission selector lever to position "P" or "N").
3. Fully depress the clutch pedal of a vehicle with a manual transmission.
After a cold start, the engine may run noisily for a short time until the required oil pressure is established in the hydraulic valve clearance compensation system. This is normal and should not cause alarm.
If the engine does not start...
Cm. Starting the engine from an auxiliary battery and Jacking and towing Introduction.
Warning: Until the engine reaches operating temperature, avoid high revs, driving with the accelerator pedal fully depressed, and heavy engine loads. Risk of engine damage!
Warning: To avoid unnecessary emission of harmful substances into the atmosphere, do not warm up the engine at idle speed. Start driving immediately.
Gasoline engine
1. Turn the ignition key to position (3). Do not press the accelerator pedal!
2. As soon as the engine starts, release the key - the starter should not rotate together with the crankshaft.
When starting a cold engine or one that has warmed up to operating temperature, do not press the accelerator pedal either before engaging the starter or while it is running.
If the engine does not start immediately, then after about 10 seconds, stop trying to start it and try again after about half a minute. After starting a very hot engine, you may need to press the accelerator pedal slightly.
Diesel engine
1. Turn the ignition key to position (2). The preheating system indicator lamp lights up, indicating preheating.
2. To start the engine, turn the ignition key to position (3) when the indicator lamp goes out. Do not press the accelerator pedal.
3. As soon as the engine starts, release the key - the starter should not rotate together with the crankshaft.
Preheat system
Diesel engines are equipped with a preheating system. The required preheating time is determined by the coolant temperature and the outside temperature.
During the pre-heating period, do not turn on powerful current consumers, so as not to unnecessarily overload the battery.
Start the engine as soon as the glow plug indicator lamp goes out.
When starting the engine warmed up to operating temperature, as well as at an ambient temperature above +8°C, the pre-heating system control lamp lights up for about one second. This means that the engine can be started immediately.
If the engine does not start immediately, then after about 10 seconds stop trying to start it and try again after about half a minute.
Starting the engine after running out of fuel
If the diesel fuel in the tank has been completely used up, then after refueling the engine start process may take longer than usual - up to one minute. This is due to the need to remove air from the fuel system during engine start.
Engine shutdown
1. Turn the ignition key to position (1).
Warning: When switching off the engine after a long period of heavy load, heat may accumulate in the engine compartment - there is a risk of engine damage! Therefore, let the engine idle for about 2 minutes and only then switch it off.
Warning: After the engine has stopped, the cooling fan may continue to run for up to 10 minutes, even if the ignition is switched off. The fan may also turn on again after a while if the engine coolant temperature rises or if there is strong sun exposure.
Handbrake
A fully applied handbrake prevents the vehicle from moving unintentionally.
Tightening the handbrake
The handbrake is applied by moving the lever upward until it stops.
Releasing the handbrake
1. Pull the lever up slightly and press the lock button (arrow) at the same time.
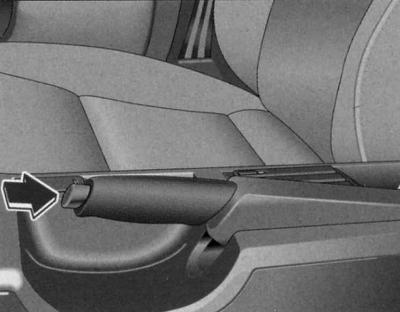
2. While holding the button down, lower the lever all the way down.
When driving carelessly with the handbrake applied, a buzzer sounds (sound signal) and the display shows the instruction: Handbremse angezogen (the handbrake is tightened).
This warning appears when driving for more than 3 seconds at a speed of more than 5 km/h. The warning goes out immediately after the car is released from the handbrake.
When the handbrake is applied and the ignition is on, the handbrake indicator light comes on.
Warning: After stopping the vehicle, first apply the handbrake fully and then engage the manual transmission or, if equipped with an automatic transmission, the parking lock "P".
Parking
To avoid unintentional movement of a parked vehicle, follow the rules below.
1. Stop the car with the brake pedal.
2. Apply the handbrake fully.
3. Turn off the engine.
4. Engage 1st gear of the manual transmission, and if there is an automatic transmission, engage the parking lock "P".
Additionally, when parking on inclines and slopes
Turn the steering wheel so that in case of an unintentional movement the car hits the curb.
Acoustic parking assistance
Rear Parking Assistance (4-channel parking assistance system)
The parking assistance system warns of obstacles at the rear.
Description
When reversing, the 4-channel device uses ultrasonic sensors to measure the distance to an obstacle. The sensors are located in the rear bumper.
The sensors begin to react when an obstacle is found at a distance of approximately:
- 0.60 m - side
- 1.50 m - in the center
Turning on
The parking aid is activated when reverse gear is engaged. This is confirmed by a short beep.
Reversing
The reversing warning sound starts to sound when an obstacle is detected (the range of distances is given above). As the distance to the obstacle decreases, the time pauses between sound pulses are shortened.
If the distance is less than 0.30 m, a continuous signal sounds. This means that reversing must be stopped.
Low obstacles registered by the sensors may, as you approach them, cease to be recorded by the system and, accordingly, there will be no warning sound signal.
Operation of the trailer
On vehicles with a factory-fitted towing hitch, the parking aid is not activated when a trailer is attached and reverse gear is engaged.
Device malfunction
A warning sound that sounds for a few seconds when the ignition is turned on means that the device is faulty. If the fault persists until the ignition is turned off, the system will not work if you try to turn it on again.
Fix the problem.
If the system is faulty, there is no confirmation sound when reverse gear is engaged.
To ensure the parking assist function works properly, keep the sensors clean and free of ice.
Warning: Low obstacles detected by the sensors may no longer be detected by the system as you approach them and, accordingly, there will be no warning signal. Also, objects such as barrier chains, trailer drawbars, thin varnished vertical bars or fences are not detected by the system under certain circumstances and may cause damage to the vehicle.
8-channel parking assistance system
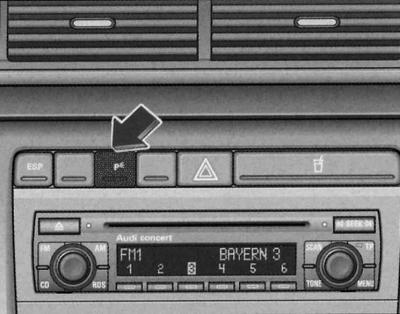
Detail of the center console: parking assistance switch
When moving forward or backward, the 8-channel device uses ultrasonic sensors to measure the distance to an obstacle. Four sensors are installed in the front and rear bumpers to measure the distance (2 in the center, 2 on the sides). The sensors begin to react when an obstacle is found in the distance:
- 0.60 m - side
- 1.50 m - in the center
- 1.00 in the center ahead
Turning on
The parking aid is automatically activated when reverse gear is engaged. This is confirmed by a short audible signal.
The device can also be switched on manually by pressing the button on the center console
Manual activation of the device is necessary when parking the car with the front bumper or when approaching an obstacle with the front bumper and you want to use the device.
Disconnection
The parking aid is automatically switched off at speeds above approximately 15 km/h. In addition, the aid is switched off when the engine is stopped.
The parking assistance device can also be switched off using the button
Signal tone
The driver is warned of the distance to an obstacle by means of audible signals from the front and rear sound sensors. The volume and pitch of the signals can be changed.
Reversing
The reversing warning sound starts to sound when an obstacle is detected (the range of distances will nestle above). As the distance to the obstacle decreases, the time pauses between sound pulses are shortened.
If the distance is less than 0.30 m, a continuous signal sounds. This means that reversing must be stopped.
Low obstacles registered by the sensors may, as you approach them, cease to be recorded by the system, and, accordingly, there will be no warning sound signal.
Moving forward
The distance warning to an obstacle is the same as when reversing. However, the obstacle is detected at a shorter distance from the vehicle.
Maneuvering
The audible signals are temporarily switched off if you change gear while maneuvering (for example, reverse/forward gear). However, as soon as the system detects that you are approaching an obstacle, the warning signal will sound again.
Operation of the trailer
On vehicles with a factory-fitted towing hitch, when a trailer is attached and reverse gear is engaged, the rear parking aid sensors are not activated and no obstacle warning is issued. The front sensors remain in operation and warn of an obstacle approach with the front bumper.
Device malfunction
A continuous beeping sound for several seconds when the reverse gear is engaged or the device is turned on with the key, as well as a blinking LED in the key, indicates a system malfunction. The presence of a malfunction until the ignition is turned off indicates that when you try to turn on the system again, the LED in the key will blink and there will be no acoustic signal. Fix the malfunction.
If the system is faulty, there will be no confirmation sound when the parking assistance system is activated.
To ensure the parking assist function works properly, keep the sensors clean and free of ice.
Warning: Low obstacles detected by the sensors may, as you approach them, no longer be detected by the system and, accordingly, there will be no warning signal. Also, objects such as barrier chains, trailer drawbars, thin varnished vertical bars or fences are not detected by the system under certain circumstances and may cause damage to the vehicle.
Tempostat
The cruise control maintains the set speed.
With this system, any set speed can be maintained, within the limits of engine power/engine braking efficiency, starting at approximately 30 km/h. This eliminates the need to keep your foot on the accelerator pedal, which is particularly convenient on long journeys.
When the device is operating, the control lamp on the dashboard lights up
Warning: On vehicles with a manual gearbox, when the system is on, do not shift to neutral without depressing the clutch pedal! Otherwise, a sharp increase in engine speed is possible, which in certain circumstances can lead to engine failure!
Warning: When driving on a steep incline, the cruise control cannot maintain the set speed. The speed increases due to the unladen weight of the vehicle. Therefore, shift to a lower gear in time or brake with the brake pedal.
Speed programming
The current speed must be programmed.
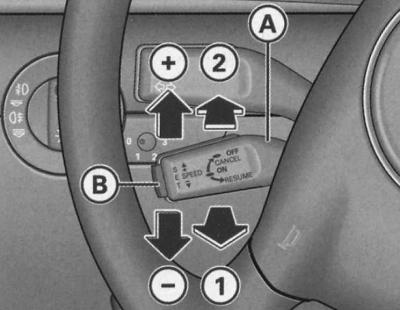
Tempostat controls
1. Move at your chosen speed.
2. To turn on the device, pull the handle (A) to position (1).
3. Press and release button (B).
After releasing the button (b), programming and maintaining the current speed occurs.
Changing the programmed speed
The programmed speed can be changed.
Increase speed
1. Press the handle (A) upwards in the (+) direction.
2. To program the current speed, release the handle.
Decrease speed
1. Press the handle (B) downwards in the (-) direction.
2. To program the current speed, release the handle.
The speed can be increased beyond the programmed value by pressing the accelerator pedal. After releasing the pedal, the system will adjust the speed back to the previously programmed value.
This does not apply if the programmed speed is exceeded by more than 10 km/h for more than 5 minutes. In this case, reprogram the speed.
Short press of the handle 0
Each time you briefly press the handle 0 upwards, in the (+) direction, the speed increases by approximately 2 km/h.
Each time you briefly press the 0 handle downwards in the (-) direction, the speed decreases by approximately 2 km/h.
Temporary system shutdown
Temporary shutdown of the tempostat occurs in the following cases:
- when pressing the brake pedal, or
- when pressing the clutch pedal (if available), or
- when pressing the handle (A) to position (2) (without fixation).
When temporarily switched off, the programmed speed is saved in memory.
To play the programmed speed, release the brake or clutch pedal and move the lever (A) to position (1).
If the desired speed has not been programmed at the time of temporary shutdown, it can be programmed as follows: While driving at the desired speed, press and release the (B) (SET) button.
Complete system shutdown
While moving
1. Press the handle (A) to position (2) (fixed position).
On a stationary vehicle
1. Turn off the ignition.
Electronic skid control system (ESP)

ESP switch center console
ESP increases the effectiveness of control over the vehicle's driving dynamics in unusual situations, such as when accelerating and cornering. ESP reduces the risk of skidding under all driving conditions and thus improves vehicle stability while driving across the entire speed range.
The electronic anti-skid system includes anti-lock brakes (ABS), electronic differential lock (ESP) and traction control system (ASR).
Operating principle
Along with the data obtained from these devices, the ESP control unit requires additional parameters obtained from highly sensitive sensors. The vehicle's rotation speed around its vertical axis, lateral acceleration, brake hydraulic pressure and front wheel rotation are measured.
The steering wheel rotation and vehicle speed are used to determine the driver's intended direction of travel, which is continuously compared with the vehicle's actual operating mode. In the event of discrepancies, such as the vehicle beginning to skid, the ESP device automatically brakes the corresponding wheel.
As a result of the impact on the wheel during braking, effective forces stabilize the car. When the rear axle begins to skid, the braking force acts mainly on the outer front wheel in relation to the skid. When the front part of the body begins to skid, the rear wheel closest to the direction of the skid is braked. The operation of the ESP is accompanied by noise.
The device works in combination with ABS. If ABS fails, ESP does not work either.
Shutdown
The ESP device is activated automatically when the engine is started and carries out self-diagnostics.
If necessary, the ESP device can be switched on and off by pressing a button. When the device is switched off, the ESP indicator lamp lights up, see. Controls and instruments.
Normally, the ESP device should always be switched on. Only in certain exceptional cases, when slippage is necessary, does it make sense to switch off the device, namely:
- when driving with snow chains;
- when driving on deep snow or loose ground;
- when trying to rock out after getting stuck. Then turn on the ESP again.
Electronic Differential Lock (EDS)
The electronic differential lock prevents the corresponding wheel from slipping.
Introduction
In very adverse road conditions, the electronic differential lock (EDS) makes starting off, accelerating and driving uphill much easier or even possible at all.
Operating principle
EDS operates automatically, i.e. without driver intervention. Using ABS sensors, the device monitors the rotation speed of the drive wheels. If the rotation speed of the drive wheels diverges, (approximately 100 rpm), for example, on a road that is not completely slippery, the wheel that is slipping is braked, and the wheels that have better grip on the road receive increased traction. EDS operates at speeds of approximately 40 km/h (front wheel drive) or 80 km/h (all wheel drive). The regulation process is accompanied by a characteristic noise.
Moving off
When a wheel slips due to the difference in adhesion between the drive wheels (for example, one wheel on ice), press the accelerator pedal until the car starts moving.
Heating of the brake mechanism
EDS is switched off for a short time to prevent the disc brake of the braking wheel from overheating under unusually high load. At the same time, the car is ready for use and has the same dynamic properties as a car without EDS.
EDS is automatically switched on again immediately after the brake mechanism has cooled down.
Warning: If the ABS warning light comes on, it may also indicate a fault in the EDS.
Anti-Slip Regulation (ASR)
Prevents slippage of the drive wheels when accelerating the vehicle.
Traction control system (ASR) is part of the Electronic Stability Program (ESP).
In adverse road conditions, the traction control system (ASR) makes starting off, accelerating and driving uphill much easier or even possible at all.
Operating principle
ASR operates automatically, i.e. without driver intervention. Using ABS sensors, the device monitors the rotation speed of the drive wheels. When the wheels slip, the engine speed decreases, thereby adjusting the traction force to the road conditions. The device operates in the entire speed range.
ASR works together with ABS. If ABS fails, ASR will not work either.
Warning: A prerequisite for trouble-free operation of the ASR is the installation of identical tires on all four wheels of the vehicle. Different tires may lead to an undesirable reduction in engine power.
Braking
Factors that negatively affect the braking effect.
Wear
Wear of brake pads is largely determined by operating conditions and driving style. Wear is significantly accelerated by frequent driving in urban conditions and over short distances or by sporty driving.
Wet weather or road salt
In certain situations, such as driving through water, in heavy rain or after washing the car, the braking effect may be delayed due to moisture, and in winter, even icing of the brake pads or discs may occur. In this case, dry the brakes by braking.
A delay in braking effect is also possible after a long break in using the brakes when driving on roads sprinkled with salt. First of all, remove the layer of salt on the brake discs and linings by braking.
Corrosion
The appearance of corrosion of brake discs and contamination of linings is facilitated by prolonged idle time of the car, low mileage and low loads of the brake system.
At low load of the brake system, and also in case of corrosion, it is recommended to clean the brake discs and linings by sufficiently strong repeated braking at the average speed of the car.
Brake system failure
A sudden increase in the brake pedal travel may be due to a failure of one of the circuits of the dual-circuit brake system. Drive slowly to the repair shop, and on the way remember about the increased force on the brake pedal and the increased braking distance.
Low brake fluid level
If the brake fluid level drops, the brake system may malfunction. The brake fluid level is controlled electronically.
Warning: Never apply the brakes lightly unless absolutely necessary. This will cause the brakes to overheat, resulting in longer braking distances and increased wear.
When driving downhill for a long time, first reduce speed and engage the next lower gear (manual transmission) or lower range (automatic transmission). This utilizes the engine's braking effect and reduces the load on the brake system. Brake in intervals if necessary, rather than continuously.
Warning: If you install a front spoiler or full-size wheel covers, make sure that these or any other components do not obstruct the air supply to the front wheels. Otherwise, the brake system may overheat.*
Vacuum brake booster
The booster increases the pressure when the brake pedal is pressed. The booster only operates when the engine is running.
Warning: When the booster is not working, for example because it is damaged or the vehicle needs to be towed, the force on the brake pedal must be much greater than usual.
Anti-lock brake device (ABS)
ABS prevents wheels from locking when braking.
The anti-lock braking system (ABS) significantly contributes to increasing the active safety of the vehicle. The decisive advantage of the ABS braking system compared to the conventional one is that the wheels do not lock even during emergency braking on a slippery road. Thanks to this, the controllability and stability of the vehicle are preserved to the maximum extent.
However, you cannot count on the fact that the braking distance will be shorter under all circumstances thanks to ABS. When driving on gravel or freshly fallen snow lying on a slippery road, when it is already necessary to drive extremely carefully and at a minimum speed, the braking distance may even increase slightly.
Operating principle of ABS
When the vehicle speed reaches approximately 6 km/h, an automatic control process occurs. At this time, the noise of the pump can be heard.
If a wheel tends to lock, the pressure in the brake drive of that wheel decreases. This regulation process is noticeable by the pulsation of the brake pedal and is accompanied by characteristic noise manifestations. Thus, the driver is specifically given a warning signal about the operation of one or more wheels in a mode close to skidding. To ensure the optimal effect of regulation in this mode by means of ABS, keep the brake pedal pressed and under no circumstances brake in several pumps!
Warning: A faulty ABS is indicated by the warning lamp, see. Controls and instruments.
Emergency Brake Assist
The emergency brake assist system helps increase braking force.
The brake assist system helps increase the braking force and thus helps to shorten the braking distance. When the brake pedal is pressed very quickly, the brake assist system automatically increases the braking force to the locking limit (ABS start date). Keep the brake pedal depressed. Immediately after releasing the pedal, the emergency brake assist automatically switches off.
If ABS fails, the emergency brake assist will not function.
Power steering
The booster makes it easier to control the car. As a result, the driver only needs to apply a small amount of force to control the car.
The power steering only works when the engine is running. If the engine is not running, much more force must be applied to the steering wheel.
Each full turn of the wheels of a stationary vehicle with the engine running places a heavy load on the amplifier and is accompanied by noise. In addition, the idle speed is reduced for a short time.
Warning: Turning the steering wheel to the stop with the engine running should not last longer than 15 seconds. The amplifier may be damaged!
Warning: If the booster fails or if you drive with the engine off (towing) the car's control is fully preserved. However, more force must be applied to the steering wheel.
The hydraulic system of the power steering is filled with a special fluid for hydraulic systems. The filling tank is located on the left side of the engine compartment, see Chapter Routine care and maintenance. Maintaining the correct fluid level in the reservoir is essential for trouble-free operation of the power steering. The level is checked as part of the inspection maintenance.
System "Servotronic"
The electronic system controller controls the power steering.
On vehicles with the system "Servotronic" the electronic regulator controls the operation of the power steering depending on the speed of movement.
If the Servotronic system fails, the power steering remains functional. However, the power steering efficiency is no longer adjusted in accordance with the driving speed. Failure of the electronic regulator is most clearly recognized by an unusual increase in the force on the steering wheel when maneuvering (i.e. at low speed).
All-wheel drive
The drive of an all-wheel drive vehicle is carried out on all four wheels.
Your vehicle's all-wheel drive operates fully automatically. Torque is distributed to all 4 wheels automatically in optimal accordance with the vehicle's driving dynamics and specific road conditions.
All-wheel drive models are equipped with more powerful engines, which determines extraordinary efficiency and excellent driving characteristics both under normal road conditions and in extreme conditions, in snow or ice. This is why it is imperative to follow safety rules.
Winter tires
All-wheel drive vehicles, even with serial tires, have good traction and dynamic qualities in winter conditions. Despite this, in winter it is recommended to install tires with a winter tread pattern or tires designed for all weather conditions on all 4 wheels. This primarily improves braking efficiency.
Anti-skid chains
The rules requiring the mandatory use of snow chains also apply to all-wheel drive vehicles.
Tire replacement
All-wheel drive vehicles must be fitted with identical tyres, see. Specifications.
Your Audi is not a cross-country vehicle. The ground clearance is too low for this. Therefore, avoid driving on dirt roads.
Catalytic converter
- Fuel your vehicle with unleaded fuel only, see. Specifications.
- Never run out of fuel completely.
- Do not exceed the maximum engine oil level, see Chapter Routine care and maintenance.
- The maximum towing distance for engine starting purposes is 50 m, see. Introduction.
Never run the fuel tank down to empty. A fuel supply failure can cause misfiring. This allows unburned fuel to enter the exhaust system. This can cause overheating and damage to the catalytic converter.
If the vehicle has been driven in a country where unleaded fuel is not available, then when importing it to a country where a catalytic converter is required, be sure to replace the catalytic converter.
Warning: Even a single fill of leaded gasoline will reduce the effectiveness of the catalytic converter.
If, while driving, the car experiences misfiring, loss of power, and loss of engine rotation uniformity, the cause may be a malfunction in the ignition system. In this case, unburned fuel may enter the exhaust system and from there into the atmosphere. In addition, the catalytic converter may fail due to overheating. Reduce speed immediately and check the car.
Warning: Also, if the catalytic converter is operating smoothly, in certain engine operating modes, a sulfur smell may be felt in the exhaust gases. This depends on the sulfur content of the fuel. In this case, refueling at a different gas station or refueling with unleaded fuel with an octane rating of 98 or 95 may help.
Sending a car abroad
Unleaded petrol
Unleaded fuel may not be available in other countries.
Make sure that unleaded petrol is available along the route in advance.
Fuel vehicles with a catalytic converter with unleaded fuel only.
Headlights
When driving on the roads of countries with left-hand traffic, asymmetrical low beam headlights will blind oncoming drivers.
Headlights (standard version)
To avoid dazzlement, cover the appropriate areas of the headlight lenses with opaque adhesive tape.
Headlights with gas discharge lamps (xenon light)*
To avoid blinding oncoming drivers, headlights need to be readjusted.
Warning: The asymmetrical low beam of your headlights illuminates the edge of the road in your lane more brightly. When driving on the roads of countries with left-hand traffic, you will blind oncoming drivers.
How to avoid damage to your car?
On bad roads, as well as when driving onto platforms with steep edges, curbs, etc., make sure that the components and parts below, such as the spoiler and exhaust pipe, do not touch the above surfaces to prevent damage.
This is especially true for vehicles with a lower chassis position (sports chassis) and when the vehicle is fully loaded.
Economically and environmentally optimal driving
Personal driving style is an important factor.
Fuel consumption, environmental impact, engine wear, brakes and tires depend mainly on three factors:
- Personal driving style;
- Specific operating conditions;
- Technical conditions.
A predictive and economical driving style makes it possible to reduce fuel consumption by 10-15 percent without much effort.
Be able to anticipate the situation on the road
Avoid unnecessary acceleration and braking.
The car uses the most fuel when accelerating. If possible, coast, for example, if the next traffic light is red.*
Energy-saving gear shifting
Upshifting earlier saves fuel.
Manual gearbox
The first gear should be driven for a distance approximately equal to the length of the car. Shift to the next higher gear at 2000 rpm.
Automatic transmission
Press the accelerator pedal smoothly. Do not press the pedal all the way down (kick-down position).
An effective way to save fuel is to shift up early.
Avoid accelerating with the accelerator pedal fully depressed
Moderate speed saves fuel.

Fuel consumption in l/100 km and speed in km/h
The speed should be significantly less than the maximum.
As speed increases, fuel consumption, emissions and noise levels increase disproportionately.
The illustration shows the relationship between fuel consumption and speed in the upper speed range. Driving your car at only three-quarters of its maximum speed halves your fuel consumption.
Reduce the duration of idling operation
Idling also consumes fuel.
- Turn off the engine when traveling due to traffic conditions.
- Do not warm up the engine by idling.
It is advisable to turn off the engine in traffic jams, at railroad crossings and at traffic lights with long red light cycles. Turning off the engine for 30-40 seconds saves more fuel than it would take to start the engine again.
Warming up the engine at idle takes a lot of time. And it is at the warm-up stage that the intensity of engine wear and the level of toxic emissions are especially high. Therefore, as soon as the engine starts, immediately start driving, while avoiding high revs.
Regular maintenance
A poorly tuned engine consumes more fuel.
Get regular maintenance.
A poorly tuned engine can consume 10% more fuel!
When refueling the car, also check the oil level. Oil consumption largely depends on the load and engine speed. Oil consumption, depending on driving style, can be up to 0.5 l / 1000 km.
Oil consumption depends significantly on the engine load and speed. It is normal for oil consumption of a new engine to reach its minimum level only after running for a certain period of time. Therefore, it is only possible to reliably judge oil consumption after the first 5,000 km.
Warning: Using oils with improved anti-friction properties also provides the opportunity for additional fuel savings.
Avoid short distance travel
Driving short distances means unnecessarily high fuel consumption.
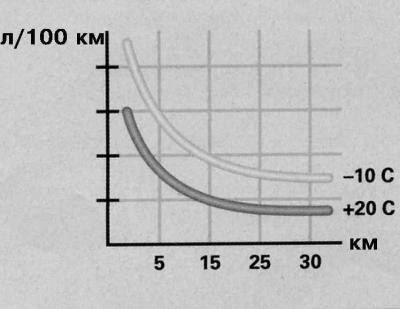
Fuel consumption (l/100 km) when driving the same distance (km) at a temperature of +20°C and -10°C. In winter, a car always consumes more fuel than in summer.
After starting a cold engine, avoid driving less than 4 km.
To effectively reduce fuel consumption and emissions, optimum operating temperatures of the engine and catalytic converter are required.
A cold engine of a mid-range car consumes about 30-40 liters of fuel per 100 km immediately after starting. After about one kilometer, the consumption decreases to 20 liters per 100 km. Only after about four kilometers does the engine reach operating temperature and the consumption normalizes. Based on this, short-distance trips should be avoided.
A significant factor in this regard is also the ambient temperature.
Check the air pressure in your tires
Correct tire pressure saves fuel.
- Make sure your tires are properly inflated.
- Do not use winter tires all year round.
Always monitor the standard air pressure in the tires. A pressure drop of only 0.5 atm. increases fuel consumption by up to 5 percent. In addition, a pressure drop below the norm leads to accelerated tire wear due to increased rolling resistance. At the same time, the dynamic properties of the car deteriorate.
Always check air pressure when tires are cold.
Avoid using winter tires all year round as they are noisier and increase fuel consumption by up to 10 percent.
Don't carry useless ballast
Transporting ballast means fuel consumption.
Don't carry useless ballast.
Each additional kilogram increases fuel consumption. Therefore, it is recommended to look in the trunk more often, so as not to carry useless ballast.
Often, for convenience, the roof rack is not removed, although it is not necessary. As a result of increased aerodynamic resistance, your car with an unloaded roof rack, at a speed of 100-120 km/h, already consumes about 12 percent more fuel.
Save electricity
The more electrical consumers are turned on in the vehicle, the greater the load on the generator and the higher the fuel consumption.
Fuel consumption control
To control your fuel consumption, keep a diary. You will be able to identify changes in a timely manner (positive and negative) and, if necessary, take appropriate measures.
If you find that your fuel consumption is too high, you should consider how, where and under what conditions you drove after your last refueling.
Environmental properties of the car
Constructive measures for industrial processing
The design of the connections does not present any difficulties in dismantling.
Simplified dismantling thanks to the modular assembly principle.
Improved purity of grades of materials used.
Marking of all large plastic parts according to VDA recommendation 260 (Association of the German Automobile Industry).
Application of materials
The use of recycled materials is much more efficient.
Elimination of the use of fluorochlorinated hydrocarbons as air conditioner refrigerants.
Use of identical types of plastics inside units.
Use of recycled materials.
No more cadmium.
Refusal to use asbestos.
Reducing the emission of volatile substances from synthetic materials.
Manufacturing
Use of recycled materials in the manufacture of synthetic parts.
Refusal to use solvents when preserving body cavities.
Preservation of a vehicle before shipment without the use of solvents.
Use of solvent-free hot melt adhesive.
Refusal to use fluorochlorinated hydrocarbons in the production of cars.
Much more efficient use of waste materials for energy production and auxiliary building materials.
Reducing the volume of wastewater.
Use of heat recovery units.
Use of water-soluble varnishes.