
Table of contents: Temperature control (-) (+) ↓ Heating (defrosting) glass ↓ Fan adjustment (-) (+) ↓ Air distribution ↓ Circulation mode ↓ Turning the fan on and off OFF ↓ Nozzles and deflectors ↓ Recommendations for setting up ↓ Air conditioner ↓ Governing bodies ↓ Automatic mode AUTO ↓ Temperature control (-) (+) ↓ Heating (defrosting) glass ↓ Manual circulation mode ↓ Economy mode ECON ↓ Automatic circulation mode ↓ Switching temperature units ↓ Turning the air conditioner on and… ↓ Fan speed correction (-) (+) ↓ Nozzles and deflectors ↓ Air distribution ↓ Air conditioning and fuel economy ↓ Key controlled air conditioning ↓ Solar Powered Fan/Solar Roof Panel ↓ Autonomous heater and fan ↓ Programming ↓ Selecting a timer, setting the time… ↓ Turning on the timer ↓ Operational inclusion ↓ Operational shutdown ↓ Remote radio control ↓ Additional heater ↓ Heated seats ↓ Heated steering wheel ↓
The heater and ventilation maintain a pleasant temperature inside the car.
Heating and ventilation controls
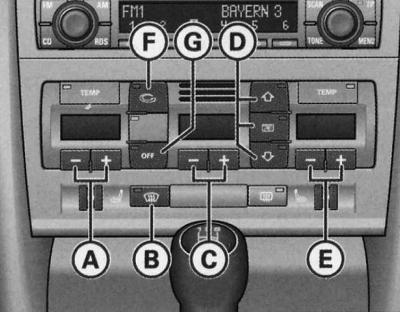
- A—Driver side temperature control buttons
- B—Heating (blowing) of glass
- C—Fan keys
- D—Air distribution keys
- E—Temperature control buttons on the front passenger side
- F—Air circulation key
- G—Turning off the heating system
The left display serves to indicate the set temperature on the driver's side, and the right display serves to indicate the set temperature on the front passenger's side.
All air conditioner modes are switched on and off by pressing the keys. When the mode is on, the LED in the corresponding key lights up.
Filter
The filter significantly reduces the amount of dust, pollen, gases, etc. contained in the outside air.
Replace the filter element according to the Maintenance Schedule.
If the air is heavily polluted, it may be necessary to replace the filter element more frequently.
Warning: For the heating and ventilation system to function properly, it is important that the air intake in front of the windshield is not blocked by snow, ice or leaves.
The air coming through the supply ducts and then distributed throughout the entire cabin is removed through the exhaust slots under the rear window. Therefore, do not cover them with clothing or similar items.
Temperature control (-) (+)
The interior temperature can be set separately for the driver's side and the front passenger's side.
Driver's side
1. By pressing keys (-) or (+) (A) Set the desired temperature.
Front passenger side
1. By pressing keys (-) or (+) (E) Set the desired temperature.
The actual temperature value is displayed in the form of a segment indicator located above the display keys.
In the maximum heat output mode, the display shows MAX. At the minimum set temperature (outside temperature) the display shows MIN.
Longer simultaneous key presses (-) and (+) the driver or front passenger side switches the temperature value for the driver to the front passenger side and vice versa. The newly set temperature is displayed on the corresponding display. It is possible to return to the previously set temperature. To do this, the driver or front passenger must set the temperature on their display again.
Heating (defrosting) glass
Defrosts and dries the windshield and side windows as quickly as possible.
1. To turn on, press the key
2. To turn off, press the key again
The temperature is regulated automatically. Maximum air supply is carried out mainly through channels 1 and 2.
Pressing the key turns off the air circulation mode.
Fan adjustment (-) (+)
The fan speed may decrease or increase.
1. To adjust the fan speed (air supply) press the key (-) or (+) (C).
The actual fan speed is displayed as a segment indicator on the display located above the keys.
We recommend that when driving at low speed, turn on the fan at low power.
To prevent polluted outside air from entering the passenger compartment, press the recirculation mode button (F).
Air distribution
It is possible to change the air distribution mode.
Both separate and combined key manipulation is possible
Air supply to the glass 
All air consumption is realized through channels 1 and 2. Unlike the mode
Air supply from the instrument panel 
All air consumption is realized with supply through deflectors 3 and 4 of the instrument panel, as well as the central console at the rear.
Air supply to the footwell 
All air flow is realized through the supply channels 5 and nozzles under the front seats.
Warning: In the given air distributor positions, there is always some air leakage through the other deflectors.
Circulation mode 
In recirculation mode, polluted outside air is largely prevented from entering the vehicle interior.
Turning on circulation mode
1. Press the key
Turning off circulation mode
1. Press the key again
2. Press the key
In the circulation mode, the air supply from outside is blocked, and its volume is distributed in the cabin in a circle. It is recommended to turn on the circulation mode in the following situations:
When driving through a tunnel or in a traffic jam, to prevent outside air from entering the passenger compartment.
Warning: For safety reasons, air circulation mode is not possible when the key is pressed.
Turning the fan on and off OFF
1. Press the (OFF) key. The fan turns off and the outside air supply is blocked.
In addition, the fan can be turned on again by pressing the (OFF) key again or by pressing the fan or temperature control (+) key.
Nozzles and deflectors
Instrument panel: location of air nozzles and deflectors
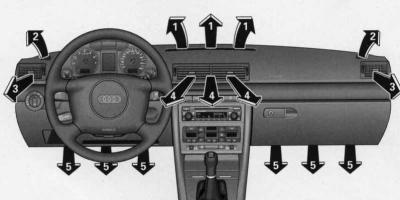
The air supply (3) and (4) can be adjusted as follows:
Deflectors (3) and (4)
1. The deflectors are opened and closed by rotating the ribbed controls located on the sides.
2. The direction of the air flow through the deflectors is adjusted by moving the handle located in the center of the corresponding deflector in the desired direction.
Depending on the selected distribution option (B) and (D), the air can be supplied as heated, unheated or cooled outside air.
The footwell air vents are located under the front seats and are controlled together with the vents (5).
Recommendations for setting up
Heated windshield and side windows
1. Press the temperature key (+) until MAX appears on the display.
2. Press the key
Preventing fogging of windshield and side windows
Segment indication of the fan on the display IIIII or IIIIII.
Use the temperature control keys (A) and (E) to increase the temperature slightly if necessary.
Set the air distribution keys to position
Accelerated heating of the passenger compartment
Segment indication of the fan on the display IIIIII.
Air distributor in position
Temperature regulator to MAX position.
Open deflectors 3.
Comfortable interior heating mode
Once the windows are clear and the desired temperature is reached in the cabin, it is recommended to set the system as follows:
Segment indication of the fan on the display III or IIII.
Adjust the temperature regulator (-) (+) to the desired heater performance.
Set the air distributor to the position
Deflectors 3 and 4 are adjustable as desired.
Outside air supply mode
In the configuration option described below, unheated outside air enters through deflectors 3 and 4:
Use the fan button (+) to set the desired mode (IIIIII corresponds to maximum air flow).
Temperature control key (-) to MIN.
Open deflectors 3 and 4.
Air conditioner
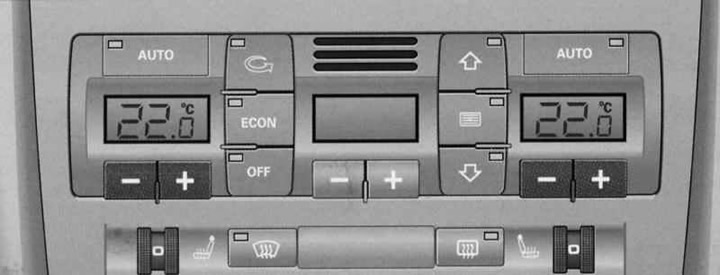
Air Conditioning Controls
| Keys | Purpose |
| AUTO | Automatic mode |
| (-) (+) (left and right) | Temperature control for driver and front passenger |
| Glass heating | |
| Manual circulation mode | |
| ECON | Compressor shutdown |
| OFF | Turning off the air conditioner (alternatively with |
| Automatic circulation mode (alternatively with OFF) | |
| (-) (+) in the center | Fan speed correction |
| Air supply to the glass | |
| Air supply from the instrument panel | |
| Air supply to the footwell |
The air conditioner automatically maintains the set temperature in the car at any time of the year.
Recommended all-season typical setting:
1. Set the temperature to 22°C (71°F),
2. Press the "AUTO" key.
This setting ensures the fastest possible creation of a comfortable microclimate in the cabin. Therefore, it makes sense to deviate from it only if this is dictated by your own well-being.
The air conditioner is a combination of a heater, fan and refrigerator, working in automatic mode. The air conditioner reduces humidity and cools the air in the cabin.
The air conditioner fully automatically maintains the set temperature in the car. To do this, the temperature and amount of air coming through the supply ducts are automatically changed, and air flows are distributed. The air conditioner also reacts to solar radiation and therefore does not require manual adjustment. For this reason, the automatic mode is almost always the best option for feeling good in the car at any time of year.
In cooling mode, the humidity in the cabin is reduced. This prevents the windows from fogging up.
When the outside temperature and humidity are high, condensed water may drip from the evaporator, forming a puddle under the car. This is normal and does not indicate a leak!
In cold weather, the fan only turns on after the coolant has warmed up to the required temperature. The exception is the windshield heating mode.
When starting off abruptly with the accelerator pedal fully depressed, the air conditioning compressor is switched off for a while to realize the full power of the engine.
The compressor switches off when the coolant temperature is too high to ensure normal engine cooling under extreme load conditions.
Fine filter
Filter (consisting of a microparticle filter and activated carbon) significantly reduces the amount of dust, pollen, gases, etc. contained in the outside air.
Replace the filter element according to the Maintenance Schedule.
Warning: If you suspect that the air conditioner is faulty, you must immediately turn on the ECON mode and check the air conditioner.
Warning: To avoid loss of heating and cooling performance and fogging of the windows, it is important that the air intake in front of the windshield is not blocked by snow, ice or leaves.
The air coming through the supply ducts and then distributed throughout the entire cabin is removed through the exhaust slots under the rear window. Therefore, do not cover them with clothing or similar items.
The air conditioner works most effectively with the sunroof* closed and the windows up. However, if the air inside the vehicle has become hot as a result of the vehicle being parked in the sun for a long time, lowering the windows briefly before turning on the air conditioner can speed up the cooling process.
Governing bodies
Illustration Air Conditioning Controls will help you quickly master the air conditioner controls.
The left display serves to indicate the set temperature on the driver's side, and the right display serves to indicate the set temperature on the front passenger's side.
All air conditioner modes are switched on and off by pressing the keys. When the mode is on, the LED in the corresponding key lights up.
It is possible to use the air distributor keys in combination
Automatic mode AUTO
Recommended all-season typical setting.
Enabling automatic mode
1. Set the temperature between +18°C (64°F) and +29°C (86°F)
2. Press the "AUTO" key.
In automatic mode, the set temperature is maintained and the air humidity in the cabin is reduced. The temperature, quantity and distribution of air are regulated automatically according to the criterion of the fastest achievement and subsequent maintenance of the desired temperature in the cabin. At the same time, automatic response to fluctuations in the outside air temperature, as well as to the effect of the sun, is ensured.
This mode is only possible in the temperature range from +18°C to +29°C. When the set temperature is less than +18°C, the display shows "LO". When the temperature is more than +29°C, the display shows "HI". In the "LO" and "HI" end positions, the system constantly operates in the maximum cooling or heating capacity mode. In this case, the temperature is not regulated.
Warning: By pressing and holding the "AUTO" button on the driver's side, the temperature control mode can be switched to the front passenger side and vice versa. The new temperature is displayed on the screen.
Temperature control (-) (+)
The interior temperature can be set separately for the driver's side and the front passenger's side.
1. Press the (-) or (+) buttons located below the display to set the desired temperature on the driver and front passenger sides.
The set temperature is indicated on the display located above the keys.
By pressing the "AUTO" button on the driver's side for a longer period of time, the temperature value for the driver switches to the front passenger's side and vice versa. The newly set temperature is displayed on the corresponding display. It is possible to return to the previously set temperature. To do this, the driver or front passenger must set the temperature on their side again.
Heating (defrosting) glass 
Defrosts and dries the windshield and side windows as quickly as possible.
1. To turn on, press the key
2. To turn off, press the key again or the "AUTO" key.
The temperature is regulated automatically. Maximum air supply is carried out mainly through channels 1 and 2.
By pressing a key
Manual circulation mode 
In recirculation mode, polluted outside air is largely prevented from entering the vehicle interior.
Turning on circulation mode
1. Press the key
Turning off circulation mode:
1. Press the key again
2. Press the "AUTO" key, or
3. Press the key
In the circulation mode, the air supply from outside is blocked, and its volume is distributed in the cabin in a circle. It is recommended to turn on the circulation mode in the following situations:
When driving through a tunnel or in a traffic jam, to prevent outside air from entering the passenger compartment.
Economy mode ECON
Economy mode helps save fuel.
1. To turn on, press the (ECON) key.
2. To turn off, press the (ECON) key again or the "AUTO" key.
In ECON mode, the compressor does not work. The heater and fan function are adjusted automatically. "ECON" means "economy". Fuel is saved by switching off the refrigeration unit (compressors).
Remember that in ECON mode the interior temperature should not be lower than the outside temperature. Otherwise, the air will not be cooled and its humidity will not be reduced. As a result, the windows may fog up.
By turning on the ECON mode of a diesel-powered vehicle, the auxiliary heater is switched off, thereby saving fuel.
Automatic circulation mode 
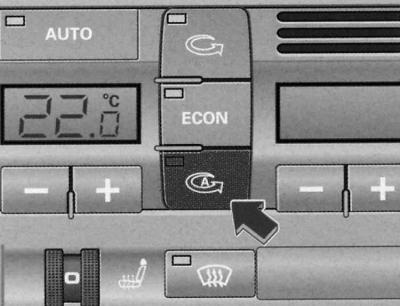
Automatic circulation mode key
The air quality sensor detects increased concentrations of harmful substances in the outside air and automatically switches on the circulation mode.
Turning on circulation mode
1. Press the key
Turning off circulation mode
1. Press the key again
2. Press the "AUTO" key, or
3. Press the key
Automatic circulation mode should be switched on whenever possible.
The device is ready for operation 30 seconds after the ignition is turned on/the engine is started. During this period, only outside air enters the car.
The degree of pollution of the outside air is assessed by an air quality sensor located in the air conditioner, which, depending on the level of pollution, gives a command to clean the air using a standard-installed harmful substance filter or a command to turn on the recirculation mode. If the concentration of harmful substances is high, the air conditioner automatically switches to recirculation mode and, thus, blocks the flow of outside air into the passenger compartment. When the degree of pollution of the outside air decreases, outside air begins to flow into the passenger compartment again.
The maximum duration of the automatic circulation mode is 12 minutes. If the glass fogs up, immediately press the button
Under certain operating conditions (e.g. program position
Switching temperature units
The temperature display can be switched from Celsius to Fahrenheit and vice versa.
1. Hold down the key
Turning the air conditioner on and off OFF
Turning off the air conditioner
1. Press the (OFF) key. The air conditioner turns off and the outside air supply is blocked.
Turning on the air conditioner
1. Press the (OFF) key again, or
2. Press the "AUTO" key, or
3. Press one of the keys
In addition, the air conditioner can be turned on again by pressing one of the fan or temperature control buttons.
Fan speed correction (-) (+)
The fan speed set automatically can be increased or decreased.
1. To adjust the fan speed, press the (-) or (+) keys located in the center of the control panel.
The air conditioner automatically adjusts the fan speed depending on the interior temperature. The amount of air can also be adjusted manually if desired. The actual speed is displayed as a segment indicator on the display above the keys.
Nozzles and deflectors
Air supply (see fig. Instrument panel: location of air nozzles and deflectors) can be adjusted as follows:
Deflectors (3) and (4)
1. The deflectors are opened and closed by rotating the ribbed controls located on the sides.
2. The direction of the air flow through the deflectors is adjusted by moving the handle located in the center of the corresponding deflector in the desired direction. The direction of air flow through the deflectors can be adjusted in the vertical and horizontal planes.
The air supply is regulated automatically or manually depending on the selected control mode. Heated, unheated or cooled outside air can be supplied.
The rear footwell air vents are located under the front seats. The air is controlled together with the vents (5).
Warning: When the air conditioner is operating in cooling mode, air flows mainly through ducts (3) and (4). In order to effectively cool the interior, never completely close ducts (3) and (4).
Air distribution
It is possible to change the automatic air distribution mode.
It is possible to use the keys separately or in combination. If you need to return to the automatic air distribution mode, turn off the corresponding functions by pressing these keys separately or by pressing the "AUTO" key.
The three keys have the following meaning. The numbers correspond to the streams shown in Fig. Instrument panel: location of air nozzles and deflectors.
Air supply to the glass 
All air consumption is realized through channels 1 and 2. Unlike the mode
Air supply from the instrument panel 
All air consumption is realized with supply through deflectors 3 and 4 of the instrument panel, as well as the central console at the rear.
Air supply to the footwell 
All air flow is realized through the supply channels 5 and nozzles under the front seats.
Air conditioning and fuel economy
Proper use of the air conditioner helps save fuel.
The air conditioner operating in cooling mode reduces engine power and affects fuel consumption. Therefore, to minimize the time of switching on this mode, it is necessary to remember the following:
- To save fuel, turn on the (ECON) mode.
- When opening the windows or the sliding/tilting roof panel* while driving, switch to (ECON) mode.
- If the car becomes very hot due to exposure to the sun, open the doors and windows for a short time.
Warning: Fuel economy results in reduced emissions of harmful substances into the atmosphere.
Key controlled air conditioning
When the ignition is turned on, the air conditioning parameters programmed into the key are automatically reproduced.
The air conditioning settings are programmed automatically and correspond to the key used. When the engine is started, the settings programmed for this key are automatically reproduced. Thus, each driver can automatically reproduce the setting he prefers with his key, without having to resort to a new setting each time.
Warning: If another driver uses your key and changes the air conditioning settings, then the settings set by that driver are programmed into your key
Solar Powered Fan/Solar Roof Panel
If there is sufficient solar radiation, the fan continues to operate on solar energy in the outside air supply mode after the ignition is turned off.
After the ignition is switched off, the fan automatically switches to power from the solar energy located in the roof panel. For optimal ventilation, deflectors 3 and 4 must be open.
Ventilation only works when the roof panel is closed/raised.
When the engine is turned off in recirculation mode, the air conditioner automatically switches to outside air supply mode.
Autonomous heater and fan
The independent heater/fan can operate independently of the engine.
Autonomous heater works independently of the engine. Its operating principle is based on fuel combustion. It is primarily intended to warm up the interior and facilitates defrosting of the windows.
Autonomous heater can be used as an additional heater both when the engine is off and when driving (for example, at the engine warm-up stage).
Autonomous fan it also works independently of the engine and effectively helps reduce the temperature inside a car left in the sun.
The independent heating/ventilation mode is controlled via the driver information system (FIS). The time and duration of operation can be programmed in the menu. The duration of operation of the independent heating/ventilation can vary between 15 and 60 minutes. The independent heating/ventilation can also be switched on and off via the radio remote control*.
With a programmed timer and when switched on using a radio remote control, the operating mode (independent heater or fan) is determined by comparing the temperature set by you using the relevant controls of the heating/ventilation system or air conditioner with the actual temperature in the passenger compartment.
Warning: If the fuel level in the tank has reached the reserve level, the independent heater cannot be switched on.
The independent heater fan switches off immediately when the battery is weak. To preserve the battery, do not turn on the independent heater several times in a row.
The operation of the independent fan heater does not require special adjustment of the air conditioner. It is recommended to open the air supply.
When operating the vehicle on RME fuel (diesel engine) the use of an independent heater is not permitted.
To speed up the cooling of the autonomous heater, after each time it is switched off, the circulation pump and fan continue to operate for some time, supplying hot air.
Programming
The independent heater fan is controlled by a rotary/push button on the central console.
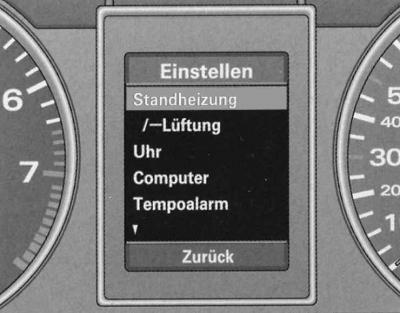
FIS instrument cluster display: Installation menu, Standby line selected
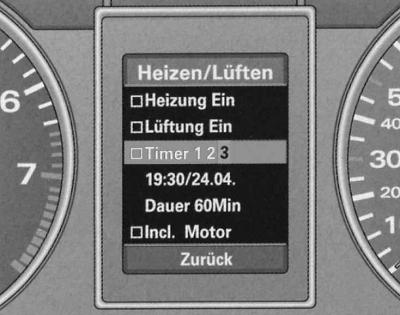
FIS instrument panel display: Heizen/Luften menu, Timer 3 selected
Programming and control is carried out via the display settings modes of the driver information system FIS, see. Driver Information System (FIS).
1. Press the "Menu" key. The initial menu appears, see fig. Types of indication.
2. Turn the rotary/push button to set the selection line to Einstellen (setting) (on a red background).
3. Confirm the selection by pressing the rotary/push button. A menu list appears.
4. In the same way, from this menu select the Standheizung/- Luften menu (autonomous heater/fan).
5. Press the rotary/push button. The Heizen/Luften menu appears (heating/ventilation).
6. Turn on the current function by rotating/pressing the rotary/push button (
The following types of settings are possible:
- Heizung ein/luftung ein: quick activation of an independent heater/fan
- Timer 1 2 3: Turning on the current timer
- Xx:xx/xx.xx.: turn-on time
- Dauer xx Min: duration of operation for the current timer or for use without a timer
- Incl. motor: residual heat for engine warm-up
In mode "Incl. motor" (only some modifications of the car) part of the heat from the independent heater is additionally used to warm up the engine.
Selecting a timer, setting the time and duration of switching on
The independent fan heater is configured via FIS.
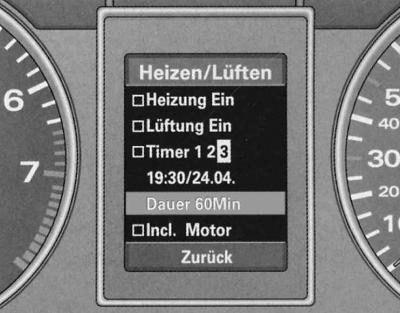
FIS dashboard display: Hizen/Luften menu, Timer 3 running time set
Selecting a timer
1. Select the menu Hizen/Luften (heater/fan).
2. Turn the rotary/push button to set the selection line to Timer 1 2 3.
3. Press the rotary/push button until one of the timer digits starts flashing.
4. Turn the rotary/push button to select the current timer.
5. Press the rotary/push button again to confirm the selection of the current timer.
Setting the turn-on time
1. Turn the rotary/push button to set the selection line to xx:xx/xx.xx.
2. Press the rotary/push button. The hour indication flashes.
3. Turn the rotary/push button to set the hour indication.
4. Press the rotary/push button again. The minutes display flashes.
5. Set the minutes, day and month indication in the same way.
6. Press the rotary/push button. Now you can set other functions or exit the menu via the Zuruck command.
Setting the duration of work
1. Turn the rotary/push button to set the selection line to Dauer xx Min (duration xx minutes).
2. Press the rotary/push button. The power-on time indicator flashes.
3. Rotate the rotary/push button to select the duration setting (5-minute values ranging from 15 to 60 minutes).
4. Press the rotary/push button. Now you can set other functions or exit the menu via the Zuruck command.
After switching on the independent heater fan via the menu Heating or Lufting (quick activation of the heater or fan) or the remote radio control updates the set parameters of the timer 1 operating time.
The maximum pre-programming time for the independent heater/fan is 30 days. If a value greater than this figure is entered, the setting marker is set to the maximum possible date.
When setting a date that has already expired, the setting marker returns to the indication of today's date. If the entered clock time (timer) has already expired, then an automatic switch to tomorrow's date occurs.
Turning on the timer
The timer switches on the independent heater/fan at a specified time.
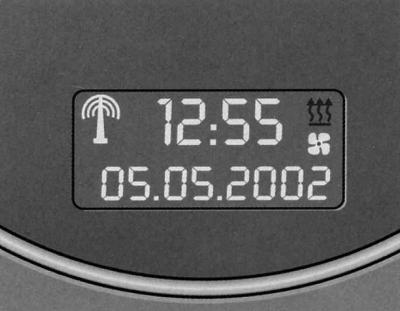
Digital clock display: timer on
After selecting the timer, setting the time and duration of the switch-on, turn on the timer function as follows:
1. Turn the rotary/push button to set the selection line to Timer 1 2 3.
2. Press and hold the rotary/push button to set the check mark
3. Now it is possible to configure other functions or exit the menu via the Zuruck command.
Timers that have been brought into operation are represented on the digital clock display as the following symbols:
After setting the timer, both symbols are displayed on the watch display simultaneously.
When the independent heater or fan is operating, the corresponding symbol flashes.
Operational inclusion
It is also possible to quickly turn on an independent heater/fan.
In the menu Hizen/Luften (heater/fan) select the line What is it (quick heater activation) or a flight (operational fan activation).
1. Press the rotary/push button to set the check mark
2. Now it is possible to configure other functions or exit the menu via the Zuruck command
The duration of operation after prompt activation is determined by the preset time setting of timer 1 (Timer 1).
Operational shutdown
The independent heater/fan can also be switched off manually.
1. In the menu Hizen/Luften (heating/ventilation) select the line What is it (quick heater activation) or a flight (operational fan activation).
2. Press the rotary/push button to remove the check mark
3. Now it is possible to configure other functions or exit the menu via the Zuruck command.
Remote radio control
It is also possible to radio-controlledly switch on or off the independent heater/fan.
Turning on
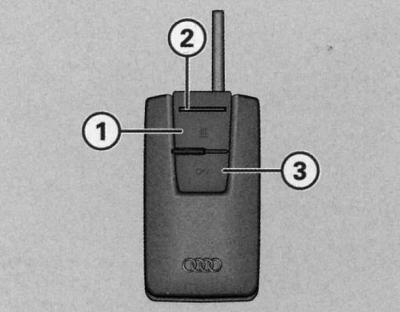
Remote control of independent heater/fan
1. Press the power button (1) until the indicator lamp (2) lights up. This switches on the Heizung ein function (quick heater activation) or a flight (operational fan activation).
Shutdown
1. Press the switch-off button (3) until the indicator lamp (2) lights up. This switches off the heating function (quick heater activation) or a flight (operational fan activation).
Replacing the batteries
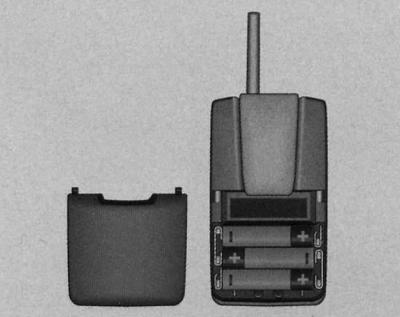
Remote control for independent heater/fan: replacing batteries
1. Slide back and remove the transmitter cover.
2. Replace the batteries. The batteries are marked for proper installation. New batteries (1.5 V) must match the specifications of the original batteries.
3. Close the lid.
Working hours (independent heater or independent fan) is determined by comparing the temperature you set using the appropriate controls for your heating/ventilation or air conditioning system with the actual temperature in the passenger compartment.
The duration of operation of the self-contained heater / fan is determined by the preset time setting of timer 1 (Timer 1).
If you want to turn the independent heater/fan back on after its operating time has expired, you must first press the off button (3) and only then the on button (1).
When switched off using key (3), the control lamp (2) of the transmitter lights up for about three seconds.
Additional heater
For quick heating of the passenger compartment, cars with diesel engines are equipped with an additional heater. The additional heater switches on and off automatically depending on the coolant temperature, when the outside air temperature is below +5°C and the engine is running.
The additional heating for fuel economy can be switched off by pressing the (Econ) button on the air conditioner.
Heated seats
It is possible to electrically heat the cushions and backrests of the front seats, as well as both rear outboard seats.
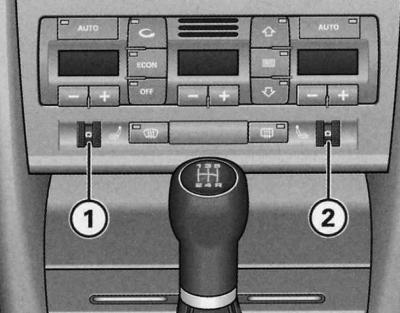
Instrument panel detail: ribbed seat heating controls

Rear centre console: ribbed seat heating controls
Front seats
1. To turn on and adjust the driver's or front passenger's seat heating, turn the control (1) or (2).
Rear seats
1. To turn on and adjust the heating of the left or right rear seat, turn the control (A) or (B).
To turn on the heating, the corresponding knurled handle is moved from position 0 and turned to one of six possible temperature ranges.
The rear seats are heated only when there are passengers in them.
Warning: Do not sit on the seats, kneel or otherwise expose individual points of the seat surface to damage the heating elements.
Heated steering wheel
The steering wheel heating is switched on/off together with the driver's seat heating.
Turning on
1. Set the regulator (1) by turning it to the position for turning on the driver's seat heating.
Shutdown
1. Set the regulator (1) by turning it to position 0.
Warning: If the interior temperature is below 20°C, the heated steering wheel is automatically switched on when the seat heating is switched on. The steering wheel heating temperature is preset and cannot be adjusted.
This article was copied from an online resource: audimanual.ru