
Table of contents: Spare key ↓ Replacing the key battery ↓ Electronic anti-theft lock ↓ Single control lock system ↓ Automatic locking* ↓ Unlocking with a key ↓ Locking with a key ↓ Locking the car without activating… ↓ Single control lock system switch ↓ Locking system with single control… ↓ Unlocking the driver's door and fuel… ↓ Unlocking all doors, trunk and fuel… ↓ Trunk lid ↓ Emergency door locking ↓ Locking children from the rear doors ↓ Remote control of locks ↓ Synchronization ↓ Security alarm ↓ Interior control system ↓ Electric windows ↓ Driver's door controls ↓ Controls in the front passenger door… ↓ Opening and closing windows with a… ↓ Functional disorders ↓ Lift and slide roof panel ↓ Move/lift ↓ Closing ↓ Comfortable locking ↓ Lift and slide roof panel with solar… ↓ Emergency closing ↓
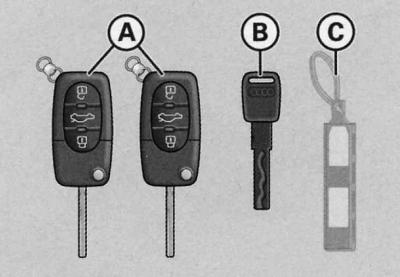
Set of keys and pendant with number
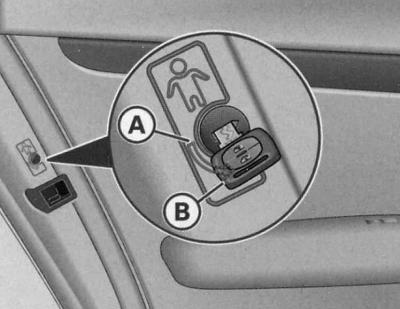
Master Key (folding radio remote control key)
1. To remove and fold the key, press the unlock button (arrow on the illustration)
The car comes with two (in some countries four) main keys (folding radio remote control keys) (A) and one emergency key (IN). These keys fit all locks.
The car kit also includes a plastic suspension (WITH) with a number. The number is necessary to make a new key in case of loss.
Use the emergency key only temporarily if the radio key is lost or cannot be used.
Warning: Never leave the pendant (C) in the vehicle to prevent unauthorized key duplication.
Spare key
If you need to order spare keys, please remember the following:
- For safety reasons, please contact an Audi service center.
- Please indicate the key number printed on the pendant.
If you lose a key, contact an Audi service station to block its function. To do this, you must present all keys and the pendant. In addition, you must notify your insurance company about the loss of the key or pendant.
A spare key can only be made based on the key number. The key number is located on the plastic hanger (WITH), included in the vehicle delivery set.
When selling your car, please pass on the plastic suspension to the new owner.
Replacing the key battery

Folding master key
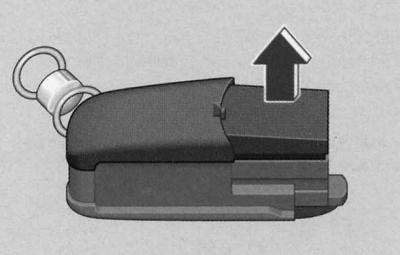
Transmitter housing without key component
Each main key is equipped with a disk power element located in the cover (B) transmitter housing.
Remove the key by pressing the button.
Neat turn the screwdriver to separate the key component (A) from the transmitter body (B).
Remove the transmitter housing cover in the direction indicated by the arrow.
Remove the used battery from the case cover.
Install a new battery.
Install the battery so that the "+" marking is at the bottom. The correct polarity is also indicated on the transmitter housing cover.
Insert the cover with the installed battery into the transmitter body and press both parts together.
Insert the transmitter housing into the key component and connect the two parts until they click into place.
Warning: The power supply must match the specification of the original power supply.
Synchronize the remote control if you cannot open or close the car with it after replacing the battery.
Electronic anti-theft lock 
Electronic anti-theft lock prevents unauthorized use of the vehicle.
A microcircuit is built into the key handle, with the help of which the anti-theft lock is automatically disabled when the key is inserted into the ignition switch. When the key is removed from the ignition switch after the car is stopped, the anti-theft lock automatically enters guard mode.
Warning: Your vehicle's engine can only be started with a properly coded original Audi key, see. Controls and instruments.
Under certain circumstances, the engine may not start if another vehicle's ignition key is on the keychain.
Single control lock system
The single-control locking system allows all doors, the trunk and the fuel filler flap to be locked or unlocked simultaneously.
When the vehicle is unlocked and locked with the single control locking system, all doors and the fuel filler flap are simultaneously unlocked or locked. The trunk lid is unlocked and then opened using the handle. The vehicle can be unlocked and locked using the radio remote control or the key on the driver's side door.
You can also open and close windows at the same time.
The sliding and lifting roof panel* can only be closed using a single lock.
The single control lock system is equipped with protection against hacking. When the car is locked from the outside, the door release handles inside the car do not work. This makes it more difficult to break into the car.
If the single control locking system fails, all locks can be opened and closed separately with the key. The exception is the fuel filler flap. Emergency release of the fuel filler flap, see. Refueling a car.
Automatic locking*
When the vehicle speed exceeds 15 km/h, all doors and the trunk are automatically locked.
The vehicle will automatically unlock again once the ignition key is removed from the lock. The vehicle can also be unlocked by pressing the button located in the driver's door
Locks with a single control provide the possibility of an automatic locking function.
Warning: Locks with a single control can be equipped with an additional level of security function if desired.
If the single control locking system is faulty, the driver's door and boot can be unlocked and locked with the key in the normal mode. Emergency release of the fuel filler flap, see. Refueling a car. Emergency door locking, see below.
If the single-control lock system fails, it is impossible to activate the burglar protection and security alarm*.
Never leave valuables unattended in your vehicle.
Unlocking with a key
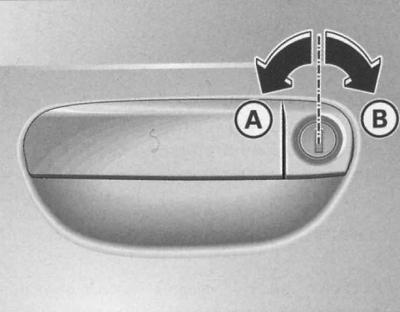
Key positions when unlocking and locking the car
1. Turn left to unlock position (A) the key inserted into the driver's door lock.
2. To open the doors, lift the handle.
All doors, fuel filler cap and trunk are unlocked. The anti-burglary protection is disabled.
Locking with a key
1. Turn right to lock position (IN) the key inserted into the driver's door lock.
All doors and the trunk are locked.
The interior lights that are in the door contact trigger position are switched off.
Holding the key in the lock position closes the windows and sliding roof panel*.
Protection against hacking is immediately activated.
Locking the car without activating the anti-burglary protection
The anti-burglary system is activated, making it more difficult to break into the vehicle. When the anti-burglary system is activated, the door handles and the switch for the single-control lock system do not work.
When there are passengers in the vehicle, the doors can be locked without activating the burglar protection.
For this twice turn to the locking position in short intervals in succession (IN) the key inserted into the driver's door lock.
With the anti-burglary protection disabled, the car can be unlocked from the inside. To do this, one-time pull back the handle of the corresponding door. The door opens repeated by moving the handle away.
Warning: Also, when you lock the car without activating the anti-burglary protection, the security alarm* is activated. Therefore, first disable the interior monitoring function, otherwise the alarm may be triggered unintentionally.
The driver's door cannot be locked when it is open. This can only be done after it is closed, and only for that door. This prevents all doors from being accidentally locked.
Single control lock system switch
The switch located in the driver's door allows the use of a single-control locking system throughout the vehicle.
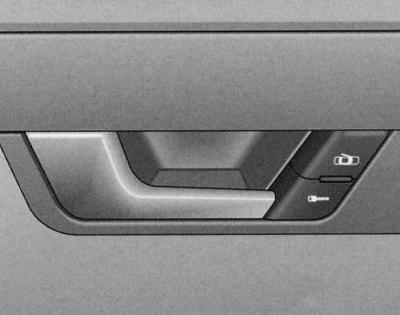
Driver's door detail: single control lock system switch
Locking all doors and trunk
1. Press the lower switch.
Unlocking all doors and, if necessary, the trunk
1. Press the top switch.
When locking the vehicle with the single control locking system switch, remember the following:
Doors and trunk cannot be opened from the outside (prevents unwanted entry into the interior, for example when stopping at traffic lights).
The doors can be unlocked and opened from the inside separately by pulling the door handles.
The open driver's door cannot be locked by pressing this switch. This can only be done after it is closed, and only for this door. This prevents accidental locking of all doors.
In the event of an accident with airbag deployment, doors locked from the inside are automatically unlocked to provide rescuers with access to the vehicle.
Warning: When the burglar protection is enabled, the single control lock system switch is not active.
Locking system with single control and additional security function
The single-control locking system with an additional security function allows only the driver's door and the fuel filler flap to be unlocked. The other locks remain locked.
Unlocking the driver's door and fuel filler flap
1. Turn the key once in the unlock direction or press the unlock button of the radio remote control locks once.
Unlocking all doors, trunk and fuel filler flap
1. Within 5 seconds, turn the key in the unlock direction twice or press the radio remote control unlock button twice within 5 seconds.
Also, when only the driver's door is unlocked, the anti-burglary protection and security alarm* are immediately disabled.
Trunk lid
As a rule, the trunk should only be unlocked and locked using the radio remote control locking system.
Opening the trunk
Press the handle and lift the trunk lid at the same time.
Closing the trunk
1. Pull the trunk lid down and slam it shut with a light blow.
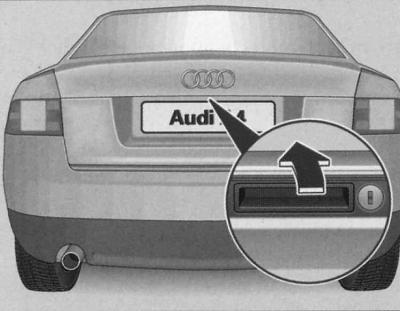
Locking the trunk in the locked position

Trunk Keyhole Positions
When turning the key to the right (IN) and when it is removed with the keyhole in a horizontal position, the trunk lock is removed from the control of the single-control lock system and is locked in a permanently locked position.
In this case, the trunk can only be unlocked using the remote radio control system's unlocking button.
When the key is returned to the vertical position, the trunk lock is again controlled by the single control lock system.
Unlocking and opening the trunk
When turning the key to the left (A) in the horizontal position of the keyhole, the trunk opens. In this position, the key cannot be removed from the lock.
When the key is returned to the vertical position, the trunk lock is again under the control of the single control lock system and the key can be removed.
Emergency door locking
In case of failure of the locking system with a single control (power supply) it is necessary to lock each door separately.
Emergency door locking device
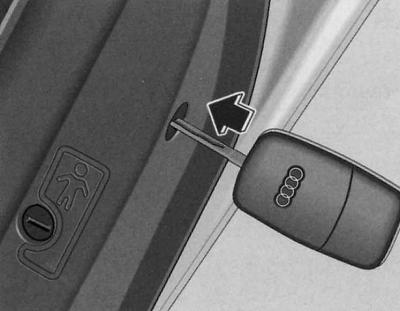
Emergency door locking
For this purpose, in doors without a locking cylinder at the end (visible only when the door is open) an emergency locking device is installed.
1. Open the door.
2. Remove the cap.
3. Place the key at a 90 degree angle relative to the door trim and move it in the direction of the arrow.
Once the door is closed, it cannot be opened from the outside. When the child locking system is switched off, the door can be opened from the inside by pulling the door handle twice. When the child locking system is switched on, in addition to pulling the handle twice, the door must be opened from the outside.
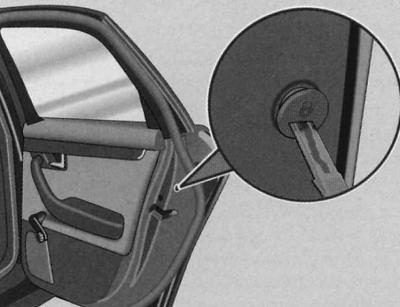
Locking children from the rear doors
The child locking device prevents the rear doors from being opened from the inside.
The rear doors are equipped with a child locking device. The device is used with the car key.
Turning on the device
1. Turn the key in the direction of the arrow (IN).
Disabling the device
1. Turn the key in the direction of the arrow (A).
When the system is on, the inside door handle does not work. The door can only be opened from the outside.
Remote control of locks
The radio control lock system allows you to unlock and lock your car remotely.
Functions of the radio remote control system:
- Unlocking and locking the car
- Unlocking the trunk
Unlocking and locking of the vehicle is confirmed by flashing of all direction indicator lights. In addition, when the switches are in the door contact position, the interior lighting is automatically switched on or off.
The transmitter with the power supply is built into the handle of the radio key. The receiver is located in the car. The maximum range is determined by various factors. As the power supply discharges, the range decreases.
An integral component of the radio key is a folding key bit, designed for mechanical unlocking and locking of the car, as well as starting the engine.
When replacing a lost key, as well as after repair/replacement of the receiver, the remote radio control requires initialization. Only then can it be used.
Warning: When the ignition is turned on, the radio remote control device is automatically turned off.
A temporary negative impact on the performance of the device may be caused by the overlap of transmitters operating in the same operating frequency band and located near the vehicle (for example, mobile phones, television stations).
Unlocking and locking the car
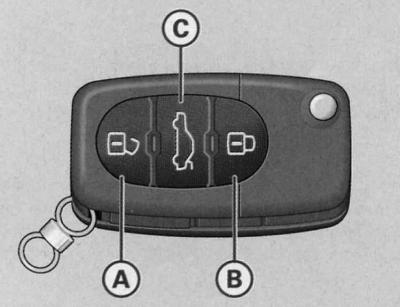
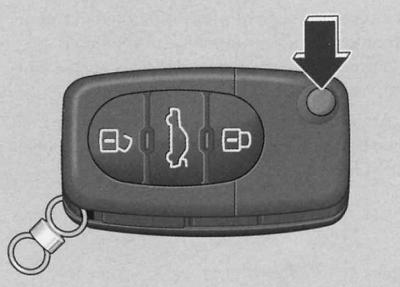
Location of radio key buttons
Unlocking the car 
1. Press the button for about 1 second (A).
Locking the car 
1. Press the button for about 1 second (B).
Opening the trunk 
1. Press and hold the button for at least 1 second (C).
Unlocking of the vehicle is confirmed by the direction indicator lights flashing twice. Within approximately 60 seconds after unlocking the vehicle with the button (A) open the doors or the trunk, as the car will automatically lock after this time. This function prevents the car from being unlocked unintentionally and for a long time.
On cars with a locking system with a single control and an additional level of protection when you press the button once (A) only the driver's door and the fuel filler cap are unlocked, and when pressed twice, the entire vehicle is unlocked.
When the doors and trunk are locked correctly, the direction indicators flash once.
In addition, when the vehicle is unlocked, the key-controlled memory* for the seat and mirror positions is activated. The programmed position of the driver's seat and outside mirrors is automatically recalled.
When the vehicle is unlocked or locked and the switches are in the door contact position, the interior lighting is automatically switched on or off.
Warning: Use the remote control only when the doors and trunk are closed.
Using the remote control requires mandatory visual contact with the vehicle.
Do not press the lock button
Synchronization
Synchronization of the radio key is necessary if the car cannot be unlocked/locked with the radio key.
1. If the vehicle is locked, open it with the mechanical key from the driver's door.
2. Press the button
3. Insert the key into the ignition switch and turn on the ignition.
4. Turn off the ignition and remove the key.
5. Press the unlock button
Security alarm
The security alarm is triggered when the car is broken into.
The security alarm is designed to prevent attempts to break into and steal a car. In the event of unauthorized entry into the car, the system begins to give sound and light alarm signals.
Turning on the device
The security alarm is automatically activated when the car is locked with the key inserted into the driver's door lock or by remote radio control. The system enters guard mode approximately 30 seconds after the car is locked.
Turning off the device
When unlocking the car, the alarm is only deactivated by using the radio remote control. The car is automatically locked if it is not opened within 60 seconds after the radio signal is sent.
When the vehicle is unlocked with the key from the driver's door, all other doors, the trunk and the fuel filler flap remain locked.
To turn off the security alarm, within 15 seconds of opening the car from the driver's door, insert the key into the ignition switch and turn on the ignition. If you do not turn on the ignition within 15 seconds, then the alarm will sound.
When does the security alarm go off?
When the vehicle is locked, the system monitors the following potential attack targets:
- underhood space (hood)
- trunk
- doors
- horizontal position of the car
- ignition
- radio system (only original Audi radio system)
- car interior.
The security alarm is triggered when any of the named objects is entered.
When the trunk is unlocked and opened with the key, the security alarm is also triggered.
How do you turn off the security alarm?
The alarm system is switched off when the car is unlocked by the remote control or the ignition is turned on with the key. The alarm system is also switched off at the end of its operating cycle.
Direction indicator lights
The system confirms its readiness for operation, as well as the fact that the doors, hood and trunk are closed properly, by flashing the direction indicator lights when the car is locked.
If there is no light signal, check and, if necessary, close the doors, hood and trunk correctly. If you do this with the system already on, it will confirm the correct closing by flashing the turn signal lights.
LED
After the car is locked, the LED in the driver's door flashes quickly and then slowly for about 30 seconds. This indicates that the alarm system is armed, including cabin control. A constant glow of the LED for approximately 30 seconds instead of a flashing code indicates a malfunction of the security alarm.
Warning: Before leaving the vehicle, ensure that all windows, doors and sunroof* are closed. This ensures that the alarm system is fully operational.
When the vehicle is unlocked with the key from the driver's door, the single control lock system is fully operational only after the ignition is turned on.
The security alarm is triggered immediately when one of the battery terminals is disconnected (provided that it is in guard mode).
Interior control system 
When the interior control system registers movements in the vehicle, the alarm is activated.
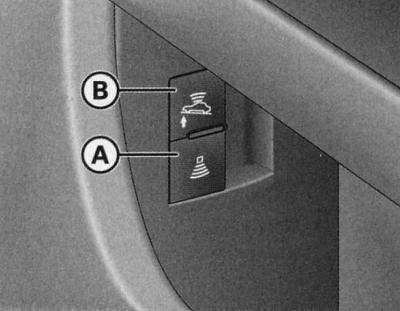
Interior control system buttons
Disable the interior monitoring system if there is a risk of triggering the alarm due to, for example, animals or moving objects in the vehicle. Disable the built-in towing control function if there is a risk of triggering the alarm due to transportation (for example, by rail or sea transport) or towing the vehicle.
Disabling the cabin control system
1. Pull the button located on the side of the driver's door recess (a) with symbol
2. Lock the car.
Disabling the towing attempt control system
1. Pull the button located on the side of the driver's door recess (b) with symbol
2. Lock the car.
After shutdown cabin control systems in the button
After shutdown towing control systems in the button
Electric windows
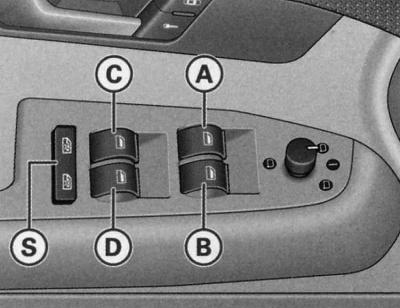
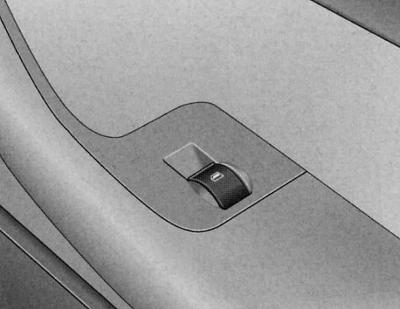
Driver's door fragment: controls
Front window switches
- (A) — driver's door window switch
- (B) — front passenger door window switch
Rear window switches*
- (C) — rear left door window lift switch
- (D) — rear right door window lift switch
- (S) - interlock switch
Driver's door controls
The driver can operate all electric windows of the car.
There are two positions window lift switches:
Lowering the windows
1. Press the switch to the first position, and hold it until the glass reaches the desired position.
2. Press the switch briefly to the second position. The glass goes down automatically.
Raising the windows
1. Pull the switch to the first position and hold it until the glass reaches the desired position.
2. Pull the switch briefly to the second position. The glass rises automatically.
Lockout switch
Lockout switch (s) you can de-energize the rear door window lifters. On the rear door side, the window lifters can only be used with the switch recessed. When the rear door window lifters are de-energized, the symbol lights up in the locking switch
Warning: The power windows operate for about 10 minutes after the ignition is switched off. However, they are immediately switched off when one of the front doors is opened.
Controls in the front passenger door and rear doors
These doors only contain the switch for the corresponding window lifter.
Switch in the front passenger door
There are two provisions window lift switches:
Lowering the windows
1. Press the switch to the first position, and hold it until the glass reaches the desired position.
2. Press the switch briefly to the second position. The glass goes down automatically.
Raising the windows
1. Pull the switch to the first position, and hold it until the glass reaches the desired position.
2. Pull the switch briefly to the second position. The glass rises automatically.
Warning: The power windows operate for about 10 minutes after the ignition is switched off. However, they are immediately switched off when one of the front doors is opened.
Opening and closing windows with a single lock
When you unlock or lock your vehicle, you can also open or close the windows.
Lowering the windows with a key
1. Turn and hold the key inserted into the driver's door lock in the unlock position - all windows open.
Lowering the windows with a remote radio control system
1. Press and hold the unlock button
Raising the windows with a key
1. Keep the key inserted into the driver's door lock in the lock position until all windows are closed.
Raising the windows with a remote radio control system
1. Press and hold the lock button
The process of lowering or raising the windows can be interrupted by releasing the key or the locking button of the remote radio control of the locks.
Functional disorders
Disabling automatic window raising and lowering
The automatic window raising and lowering function is disabled after disconnecting and then reconnecting the battery. To restore the automatic function, the following is required:
By continuously pressing the window lift switch, bring the glass to the uppermost position.
Release the switch and press it again, holding it for about one second with the window closed. The automatic system is now back in working order.
Lift and slide roof panel
The sliding and lifting roof panel is controlled by a rotary switch. The switch can be set to several fixed positions to slide the panel back/forward. The switch only works when the ignition is on. The panel can only be raised when the switch is in the position (ABOUT).
The sliding/tilting roof panel can be opened and closed for ten minutes after the ignition is switched off. However, the sliding/tilting roof panel rotary switch is immediately deactivated when one of the front doors is opened.
Move/lift
The comfortable roof position is characterized by less wind noise compared to a fully open roof.
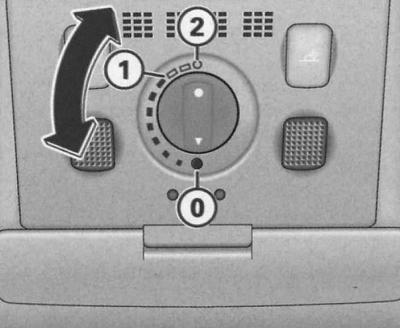
Ceiling detail: rotary switch for sliding and lifting roof panel
Comfortable position
1. Turn the switch to the position (1). The switch is noticeably fixed. This roof position is characterized by less wind noise.
Complete retraction
1. Turn the switch to the position (2). Increased wind noise is possible in this position.
Rise
1. Turn the switch to its original position (0).
2. To fully raise the roof panel, press and release the switch while it is in the home position.
3. To set the panel to an intermediate position, press and hold the switch until the panel reaches a position that is comfortable for you.
When the roof panel is pulled back, the sunshade opens automatically. When the roof panel is closed, the sunshade can also be closed manually.
It is recommended to close the sunshade when the car is parked in the sun. When the car is parked or in case of sudden rain (with the sun blind closed) don't forget to close the sliding roof panel.
More details about comfortable closing.
Closing
Closing the sliding panel
1. To close the roof panel, turn the switch to the position (0).
Closing the lifting panel
1. Pull and hold the switch until the lift panel lowers to a position that is comfortable for you.
2. By briefly pulling the switch, the roof panel closes automatically. By briefly pulling the switch again, the panel can be stopped in any position.
Protective closure
The sliding roof panel has overload protection. If it cannot be closed in normal mode, it can be closed by continuously pulling the rotary switch. The switch must be in the position (0).
Comfortable locking
The open sliding and lifting roof panel can also be closed from the outside.
1. Keep the key inserted into the driver's door lock in the lock position or press the lock button on the radio remote control until the sliding/tilting roof panel closes.
Lift and slide roof panel with solar battery
The solar battery elements supply power to the air conditioner in fan mode.
The roof panel control is as described above.
The interior trim is rigidly connected to the solar roof panel and therefore cannot be moved separately.
Emergency closing
In an emergency, the sliding roof panel can be closed manually.
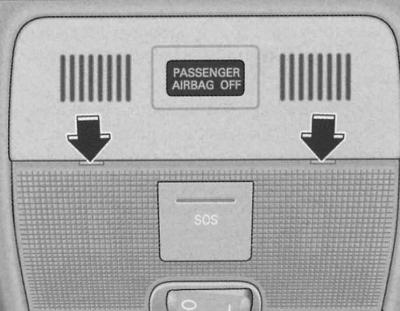
Ceiling fragment: screwdriver installation locations
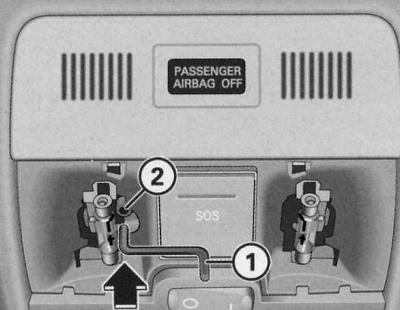
Ceiling fragment: crank handle for emergency closing
1. Carefully insert the flat side of the screwdriver provided in the tool kit into the locations shown.
2. Pry and separate the glass of the lampshade downwards.
3. Take the crank handle located on the inside of the fuse cover, see Chapter On-board electrical equipment.
4. Insert the crank handle (1) until it stops in the internal hexagon (2), holding it at the same time.
5. Close the roof panel by turning the crank handle.
6. After this, install the lampshade glass in place. First, insert the plastic protrusions into the sockets, and then press the glass upwards.
7. Fix the problem.
[The original article is located on the online resource Audimanual.ru]