
Table of contents: Electrically adjustable front seats ↓ Backrest tilt adjustment ↓ Driver's seat position memory ↓ Programming of positions ↓ Reproduction of provisions ↓ Programming the radio key ↓ Front seat headrests ↓ Rear outboard seat headrests ↓ Rear seat center headrest ↓ Armrest ↓ Adjusting the armrest position ↓ Opening the storage compartment ↓ Loading the trunk ↓ Rigging eyes ↓ Load-bearing net/laying net ↓ Protective coating bath ↓ Opening the hatch cover ↓ Protective cover for folding rear… ↓ Side niche ↓ Increasing the size of the trunk ↓ Storage shelf ↓ Through loading hatch with cover ↓ Roof rack ↓ Attachment points ↓ Installation ↓ Roof load ↓ Front cup holder ↓ Cup holders in the front dividing… ↓ Cup holders in the rear dividing… ↓ Front ashtray ↓ Rear ashtray ↓ Cigarette lighter ↓ Socket ↓ List of niches ↓ Glove box ↓ Refrigerator in the glove box ↓ Pencil case ↓ Niche for storing a folder with car… ↓ Niche in door trim ↓ Hangers (clothes hooks) ↓ Niche for audio cassettes ↓ Front seat storage compartments ↓
The seat can be adjusted in many ways.
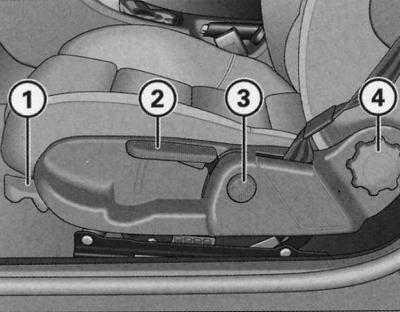
Driver's seat adjusters
- 1—Longitudinal adjustment of seat position
- 2—Seat height adjustment
- 3—Adjusting the lumbar support output*
- 4—Backrest tilt adjustment
Some of the controls shown are only included with certain models or are optional.
Longitudinal adjustment of the seat
1. Pull the handle (1) upwards and at the same time move the seat to the desired position.
2. Release the handle (2) and move the seat until the lock clicks into place.
Seat height adjustment
Raising the seat
1. Pull the handle (2) upward.
Lowering the seat
1. Press the handle (2) down.
Backrest tilt adjustment
1. Unload the seat back (do not lean on the back).
2. Adjust the backrest tilt by turning the flywheel (4).
Seat position regulators (sports seat)
The seat can be adjusted in many ways.
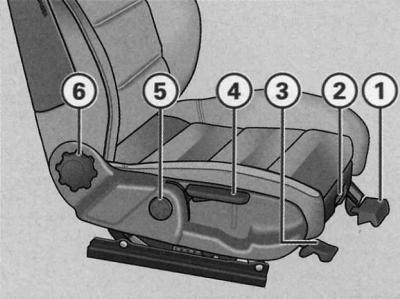
Front passenger seat adjusters
- 1—Longitudinal adjustment of seat position
- 2—Extending the seat cushion
- 3—Seat tilt adjustment
- 4—Seat height adjustment
- 5—Adjusting the lumbar support*
- 6—Backrest tilt adjustment
Some of the controls shown are only included with certain models or are optional.
Longitudinal adjustment of the seat
1. Pull the handle (1) upwards and at the same time move the seat to the desired position.
2. Release the handle (1) and move the seat until the lock clicks into place.
Seat cushion
Pulling out the pillow
1. Lift the key (2).
2. Move the seat forward and adjust the cushion to the desired position.
Sliding the pillow
1. Lift the key (2).
2. Move the seat back and adjust the cushion to the desired position.
Seat tilt adjustment
1. Pull the handle (3) up and change the position of the seat, unloading and loading it with your own weight.
Seat height adjustment
Raising the seat
1. Pull the handle (4) upwards (pump).
Lowering the seat
1. Press the handle (4) down (pump).
Backrest tilt adjustment
1. Unload the seat back (do not lean on the back).
2. Adjust the backrest tilt by turning the flywheel (6).
Electrically adjustable front seats
The control principle of the regulators corresponds to the design and function of the seat.
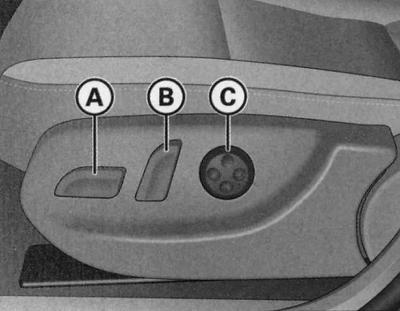
Front seat: position adjusters
- A—Adjusting the seat position
- B—Backrest tilt adjustment
- C—Adjusting the lumbar support*
Front seat: regulator
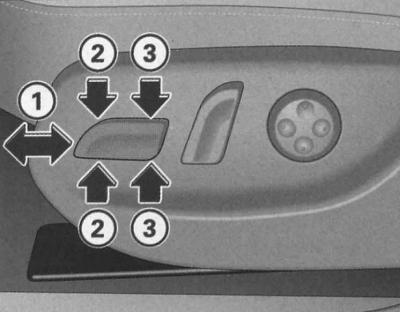
The seat adjustment controls correspond to the seat design in their location, design and functionality. The seat position is adjusted according to this logic by pressing the switches.
Seat forward/backward movement
1. Press the switch (A) forward or backward (1).
Raise/lower seat
1. Pull/press the switch (A) up or down.
Raising/lowering the front part of the cushion
1. Press the switch (A) up or down (2).
Raising/lowering the rear part of the cushion
1. Press the switch (A) up or down (3).
Backrest tilt adjustment
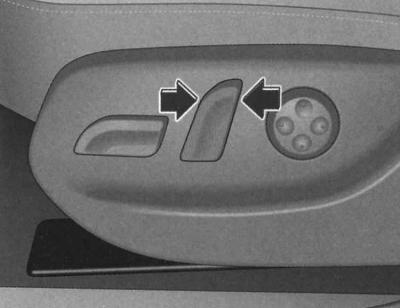
Front seat: backrest tilt adjuster
1. To raise or lower the backrest, press the switch forward or backward in the directions indicated by the arrows.
Lumbar support output
1. The lumbar support outlet provides support for the lumbar spine along its entire natural contour.
Adjusting the convexity
1. To extend the upholstery, press the front side of the large-format button (WITH).
2. To remove the upholstery, press the back of the button (WITH).
Height adjustment
1. To move the upholstery upwards, press the top side of the button (WITH).
2. To move the upholstery down, press the bottom side of the button (WITH).
The lumbar support ensures that the lumbar spine is supported along its natural contour, with a comfortable fit even on long journeys.
Driver's seat position memory
The memory buttons located in the driver's door can be used to program and recall four different seat and exterior mirror positions*.
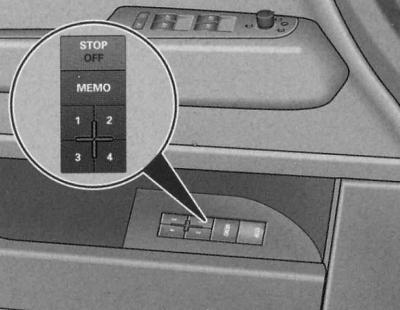
Driver's door: memory device
Storage keys
Memory buttons 1, 2, 3 and 4 can be used to program and recall up to four different seat and exterior mirror positions*.
STOP key
The seat position memory is switched off by pressing the STOP button. The OFF sign next to the STOP button lights up (visible only when the light is on).
All entered positions are saved in the memory. The position of the seat and exterior mirrors* can only be adjusted in the usual way - using the electric drive. It is recommended to switch off the memory device by pressing the STOP button if the driver uses the car occasionally and therefore does not need to program the seat position for him.
Warning: Programmed positions can also be played back using the radio remote control, see below.
Programming of positions
When programming and playing all functions, the key must be pressed (depressed) STOP.
1. Adjust the driver's seat position, see above.
2. Adjust the position of both outside mirrors, see. Lighting and visibility.
3. Press and hold the key MEMO. Additionally, press and hold one of the memory device keys for at least 1 second.
4. Release the keys. This position is now entered into memory and corresponds to the number of the key selected during entry.
Each time you reprogram the same key, the previous data is reset. When programming, it is recommended to start with key 1, leaving one of the remaining keys for other drivers.
When locking the car with a radio key (remote radio control) the last position of the seat and mirrors is entered into the memory. This position of the seat and mirrors is automatically reproduced by the remote control the next time the car is unlocked. The position of the outside mirrors is reproduced immediately after unlocking, and the position of the driver's seat after opening the driver's door.
However, this does not reset the data of the memory device of the previously undertaken distribution by keys 1-4. At any time, it is possible to reproduce the entered positions by the corresponding keys.
Reproduction of provisions
The programmed positions can be reproduced both by the memory keys and by the radio remote control (radio key).
Playback with storage keys
1. With the driver's door open, press the corresponding memory key once.
2. With the driver's door closed, press and hold the appropriate memory button until the seat and outside mirrors reach the programmed position.
Playback by remote control
1. Unlock the car with the radio remote control and within the next 10 minutes, open the driver's door.
If the driver's door remains closed for 10 minutes after unlocking the vehicle using the remote control, the seat position is reproduced using the memory keys.
Programming the radio key
To reproduce the entered positions by the remote radio control, it is necessary to program the radio key to the memory device key.
Programming a radio key to a memory device key
1. Use the corresponding key of the memory device to which the given key should correspond to reproduce the programmed positions.
2. Press and hold this key and within 10 seconds additionally press the radio key unlock button.
3. After about 2 seconds, release the key.
Cancelling programming of a radio key to a memory device key
1. Press and hold the key MEMO and within 10 seconds additionally press the radio key release button.
2. After about 2 seconds, release the key MEMO.
When reprogramming, the previous data is automatically reset.
It is recommended to program so that key 1 corresponds to one and key 2 to the other factory radio key. If necessary, two other radio keys can be purchased through an Audi contract partner and programmed to keys 3 and 4.
Front seat headrests
Correctly installed head restraints, combined with a fastened seat belt, provide effective protection.
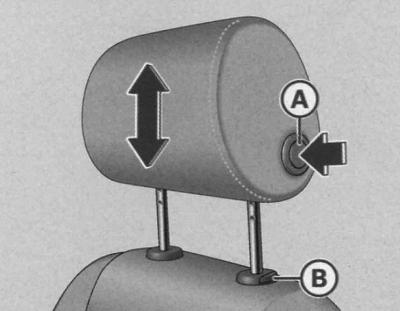
Front seat: headrest
Raising the headrest
1. Grasp the sides of the headrest with both hands.
2. Adjust the position of the headrest so that the top edge of the headrest is at least at or above eye level.
Lowering the headrest
1. Grasp the sides of the headrest with both hands.
2. Press button (A) and adjust the position of the headrest so that the top edge of the headrest is at least at or above eye level.
Tilt adjustment
1. Grasp the sides of the headrest with both hands and push it forward or backward.
Removal headrests
1. Pull the headrest up as far as it will go.
2. Press button (B) and remove the headrest.
Installing headrests
1. Insert and push the headrest rods into the guides until they lock into place.
Headrests are height and tilt adjustable. They should be installed according to height. Correctly installed headrests in combination with seat belts provide effective protection.
The optimal protective effect is achieved when the upper edge of the headrest is at least at or above eye level.
Rear outboard seat headrests
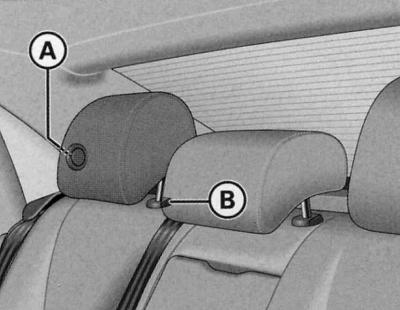
Rear outboard seat headrest
Raising the headrest
1. Grasp the sides of the headrest with both hands.
2. Adjust the position of the headrest so that the top edge of the headrest is at least at or above eye level.
Lowering the headrest
1. Grasp the sides of the headrest with both hands.
2. Press button (A) and adjust the position of the headrest so that the top edge of the headrest is at least at or above eye level.
Removal headrests
1. Pull the headrest up as far as it will go.
2. Press the button (B) and at the same time remove the headrest.
Installing headrests
1. Insert and push the headrest rods into the guides until they click into place.
Rear seat center headrest
Raising the headrest
1. Grasp the sides of the headrest with both hands.
2. Adjust the position of the headrest so that the top edge of the headrest is at least at or above eye level.
Lowering the headrest
1. Grasp the sides of the headrest with both hands.
2. Press button (B) and adjust the position of the headrest so that the top edge of the headrest is at least at or above eye level.
Removal headrests
1. Pull the headrest up as far as it will go.
2. Press the button (B) and simultaneously remove the headrest.
Installing headrests
1. Insert and push the headrest rods into the guides until they click into place.
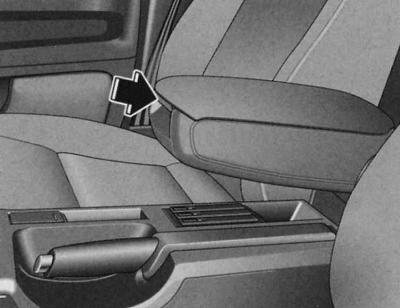
Armrest
The multi-stage adjustable armrest contains a storage compartment.

Front dividing armrest
Adjusting the armrest position
1. To adjust the tilt, move the armrest all the way down.
2. Raise the armrest, passing through the fixed positions until you reach the desired one.
Opening the storage compartment
1. Press the release button.
Remember that when the armrest is lowered all the way, the mobility of the forearm is limited. Therefore, when driving around the city, do not lower the armrest.
Loading the trunk
Baggage items must be properly and securely stored.
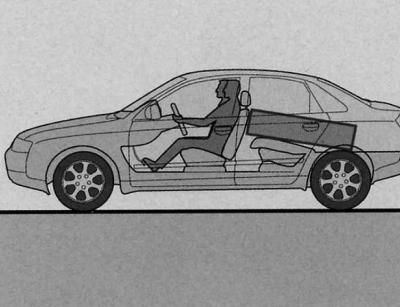
Place heavy objects as far forward as possible
In the interests of maintaining good vehicle dynamics, remember the following: 1. Distribute the load as evenly as possible.
2. Place heavy objects as far forward as possible.
3. Using a load-retaining net* or non-elastic tension straps, secure the luggage items to the rigging eyes.
Warning: Tire pressure must be adjusted to the vehicle load; see tire pressure sticker on door pillar, see Specifications.
Rigging eyes
There are four rigging eyes in the trunk for securing luggage items.
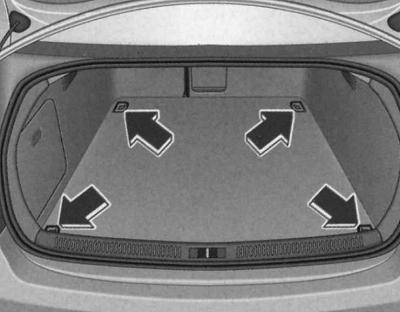
Location of luggage rack rigging eyes
1. Secure the load using rigging eyes.
2. Take safety precautions, see. Security systems.
The mesh prevents light loads from shifting.
1. First, thread the front hooks through the rigging eyes.
2. Then thread the rear hooks through the rigging eyes.
Load-bearing net/laying net
The net prevents light loads from shifting in the trunk and can also be used as a stowage net.
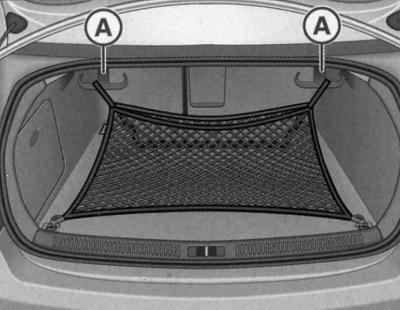
Load-bearing net suspended by hooks
Load-bearing net
1. Secure the net to the four rigging eyes.
Laying mesh
1. Thread the hooks of the stowage net through the rigging eyes located in the bottom of the rear of the trunk.
2. Using the plate, push down the fastening hooks (A) located at the top of the luggage rack, pull the net up and secure the loops of the load-retaining net to the hooks.
Hooks can also be used for hanging bags, packages, etc.
If the hooks are not used, they return to their original position automatically.
Protective coating bath
When transporting contaminated items, a protective covering-bath should be used.
Laying out the protective covering-bath

The protective covering in the trunk is straightened out
1. Open the trunk lid.
2. Pull the key (A).
3. Straighten the folded cover (C).
Opening the hatch cover
1. Open the trunk lid.
2. Pull the key (B).
Protective cover for folding rear seat back
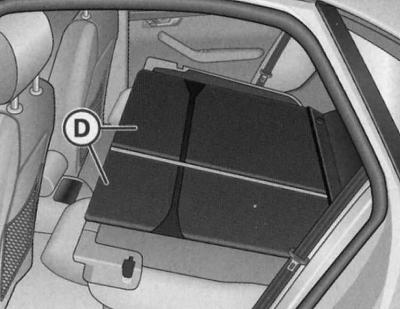
Protective cover for folded rear seat backrest
1. Fold the rear seatback forward, see below.
2. Place the cover (D) on the folded rear seatback.
The boot protective cover is a foldable synthetic cover that can be used to cover the entire boot, including the shock absorber struts, if necessary. The rear seat back protective cover can also be used separately, without the boot protective cover. The back cover consists of two parts and can be folded in a ratio of 1/3 and 2/3.
Warning: Only store the protective bath cover when dry.
Side niche
The left side compartment of the luggage compartment contains a compact disc player (CDROM) for the navigation system*.
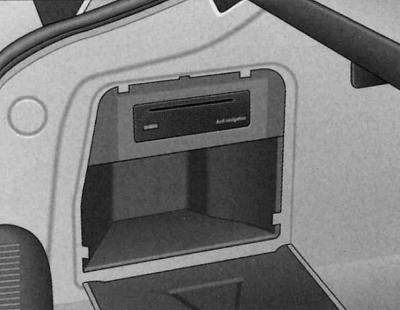
Trunk: CD player for navigation system under side trim cover
To open, pull the handle forward.
The CD-ROM player for the navigation system is located in the boot recess. For a description of how to use the player, see the relevant operating instructions.
Increasing the size of the trunk
To increase the size of the luggage compartment, both components of the backrest can be folded forward together or separately.
Folding the backrest
Backrest release handle
1. Press the release handle (A) in the direction of the arrow.
2. Fold the backrest forward.
Returning the backrest to its original position
1. Move the backrest back until it is securely fixed. When the backrest is correctly fixed, the red pin mark (b) should not be visible.
Locking the backrest
1. Turn the lock inserted into the release handle to the right.
Unlocking the backrest
Locking the backrest
1. Turn the key inserted into the lock of the release handle to the left.
Correctly fixed rear seat back (normal position) can be locked and unlocked only with the main or emergency key (the lock is in the release handle). This prevents unwanted entry into the trunk from inside the vehicle.
Warning: When returning the seatback to its original position, make sure that the seat belts of the outer seats are in the belt guide groove. Otherwise, the belts may get caught in the seatback buckle, which may cause damage to them.
Storage shelf
The storage shelf behind the rear seat can be used for light items of clothing.
Warning: Remember that objects rubbing against the rear window may damage its electrical heating system.
Warning: To ensure normal air exchange, do not cover the exhaust slots located at the junction of the rear window and the storage shelf with things.
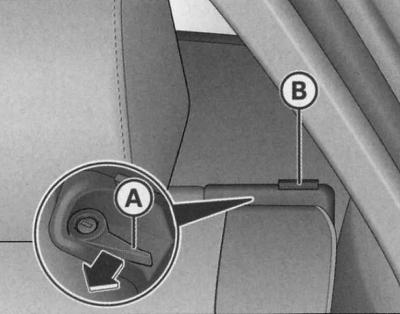
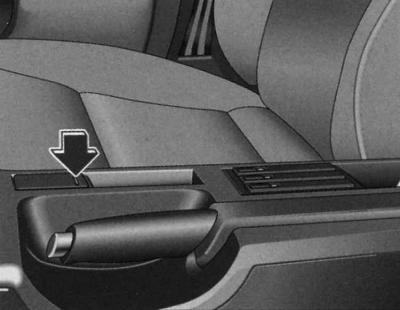
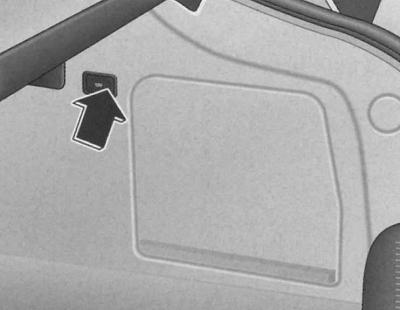
Through loading hatch with cover
Using the through loading hatch with an adjacent cover, you can transport long items in the cabin (for example, skis), without fearing for their safety, cleanliness and serviceability.
Loading
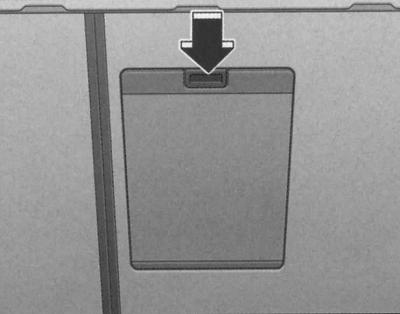
Detail of the rear side of the rear seat: loading hatch cover
1. Open the trunk.
2. In the trunk, press the boot lid release button (arrow on the illustration) and move the lid down.
3. Move the rear armrest divider forward.
4. In the passenger compartment, press down the loading door release button and release the door.
5. Remove and straighten the cover.
6. Insert skis or other similar items through the luggage compartment into the cover located in the passenger compartment.
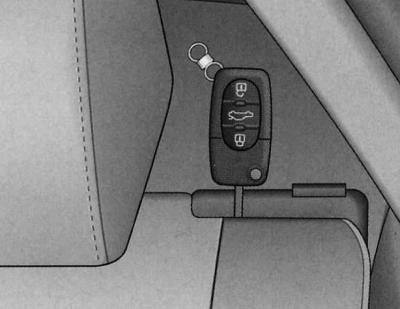
Fastening
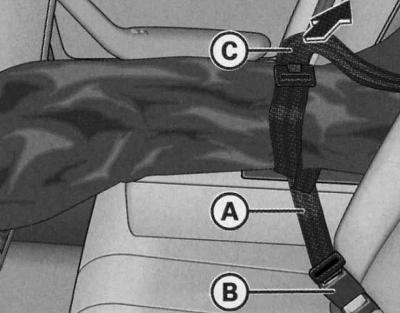
Fastening the cover with a belt in the lock of the central rear seat
1. Insert the cover strap (A) into the center seat belt buckle (B).
2. Pull the belt tightly by its free end (C).
Putting the cover back in place
1. Close the loading hatch in the trunk.
2. Carefully fold the cover and tuck it into place.
3. Close the lid in the cabin.
Warning: Do not fold the wet cover after using it.
Roof rack
The car's gutters are made in the roof to take away rainwater. Therefore, do not use regular roof racks designed for installation on the car's roof.
If other roof rack mounting systems are used or if the rack is not installed according to the instructions, any damage that occurs as a result of this will not be covered by warranty repairs.
Attachment points
Attach the roof rack only to the marked locations.
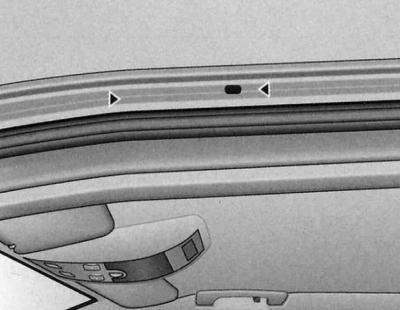
Luggage rack support bracket mounting points
Installation
When installing the support brackets, make sure that they fit precisely between the marking arrows in the roof sealing lip. The markings are only visible when the doors are open.
Roof load
The load on the roof must be securely fastened. When transporting cargo, the dynamic properties of the car change.
The permissible load on the roof of your car is 75 kg. The roof load is determined by the sum of the weight of the fastening system and the load.
When using mounting systems with a lower load capacity, the permissible roof load cannot be fully utilized. The roof rack may only be loaded up to the limit specified in the installation instructions.
Warning: Remove the roof rack immediately after use. Fuel consumption increases at high speed due to increased aerodynamic drag.
Front cup holder
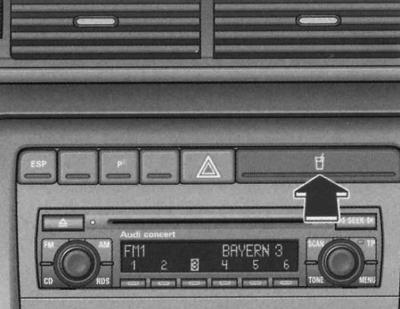
Cup holder
1. To open, press the cup holder cover with the symbol
2. To return the cup holder to its original position, push it all the way back until it locks into place.
Cup holders in the front dividing armrest
Front dividing armrest

Cup holders in the armrest
Opening the armrest
1. Press the button on the armrest.
The front armrest divider can accommodate up to two beverage bottles.
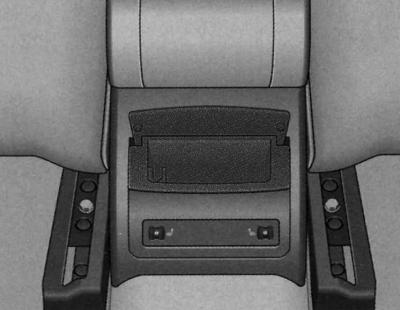
Cup holders in the rear dividing armrest
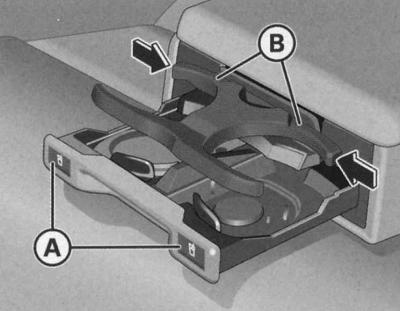
Cup holders in the rear dividing armrest
Opening the cup holders
1. To open, press the symbol (A).
Installing the holder
To install the corresponding holder (B), release it by pressing in the direction of the arrow and at the same time adjust the position.
So adjust the position of the holder so that it fits snugly against the drink.
The dividing armrest can accommodate up to two bottles of drink.
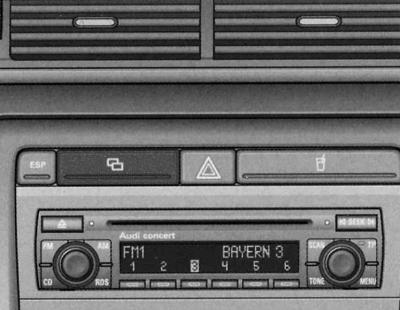
Front ashtray
Center console: open ashtray
Opening the ashtray
1. Press the front ashtray bar (A).
Extracting the insert
1. Grasp the insert (B) by the side recesses and pull it upwards.
Installing the insert
1. Install the insert into the socket by pressing.
Rear ashtray
Opening the ashtray
1. Open the lid.
Extracting the insert
1. Grasp the case by the open cover and pull it upwards.
Installing the insert
1. Open the insert cover and press the insert into the socket until it stops.
Cigarette lighter
The 12-volt socket located in the cigarette lighter socket can be used to connect additional electrical appliances.
Cigarette lighter for center console
Using the cigarette lighter
1. To open the cigarette lighter cover, press the marked area.
2. The cigarette lighter is turned on by pressing the socket.
3. Wait until the cartridge is ejected.
4. After this, immediately remove the cigarette lighter from the socket.
5. Light a cigarette from the hot heating coil of the cigarette lighter.
6. Install the cigarette lighter into the socket.
Use as a socket
1. To open the cigarette lighter cover, press the marked area.
2. Remove the cigarette lighter.
3. Insert the electrical appliance plug into the cigarette lighter socket.
The regular 12-volt socket located in the cigarette lighter socket can be used to connect additional electrical appliances with a power consumption of no more than 100 watts.
Warning: Use only suitable plugs to avoid damaging the sockets.
Warning: Remember that when the engine is not running and electrical consumers are on, the battery is discharged.
Socket
The 12-volt socket can be used to connect additional electrical appliances.
Fragment of the side trim of the trunk: 12-volt socket
1. To access the socket, press the cover.
2. Insert the plug of the electrical appliance into the socket.
The socket is designed for electrical appliances with a power consumption of no more than 100 watts.
Warning: Use only suitable plugs to avoid damaging the sockets.
Warning: Remember that when the engine is not running and electrical consumers are on, the battery is discharged.
List of niches
There are many niches in various places of the car.
Your car has the following niches:
- First aid kit (In emergency cases)
- Warning triangle (In emergency cases)
- Glove box (glove compartment cooling, CD changer)
- Center console pencil case
- Niche for storing a folder with car documents
- Door niches
- Clothes hooks (hangers)
- Niche for storing audio cassettes
- Storage shelf (Seats and niches)
- Side trim niche of the trunk (Seats and niches)
Some of the niches listed are included in the kit only for certain modifications or are installed to order.
Glove box
The storage box can be locked, and when the lid is open, the lighting in the box is turned on.
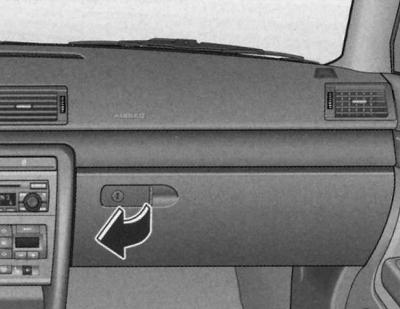
Opening the glove compartment
1. Pull the handle located on the lid in the direction of the arrow and open the lid downwards.
Closing the glove compartment
1. Close the lid until it locks into place.
The glove compartment lighting comes on when the lid is opened and the headlights/parking lights are on.
The lid of the glove compartment has fasteners for attaching writing instruments.
CD changer *
The radio system's CD changer is located in the glove compartment. A description is provided in the corresponding operating manual.
Refrigerator in the glove box
The cooling effect of the refrigerator is achieved only in the cooling mode of the air conditioner.
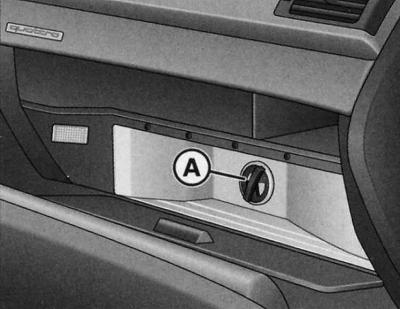
Storage box with open refrigerator
1. Open the glove compartment.
2. Open the refrigerator.
3. Cooling is switched on/off by the rotary switch (A).
The cooling effect of the refrigerator is achieved only when the air conditioner is turned on in the cooling mode. When the air conditioner is operating in the heating mode, it is recommended to turn off the refrigerator.
Warning: The "anti-slip mat" located in the refrigerator can be removed and used for cleaning.
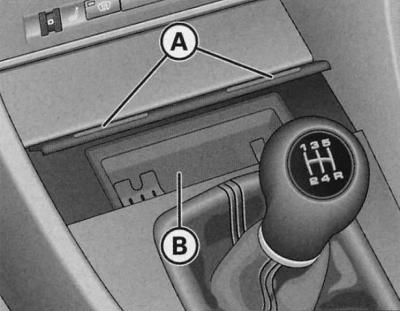
Pencil case
Center console pencil case
1. Press the lid to open
2. To close, push the case all the way back until it locks into place.
There is another compartment in the center console next to the handbrake. On cars with a navigation system*, this compartment contains the control panel for the system.
Niche for storing a folder with car documents

Always keep the vehicle document folder in the designated niche.
Niche in door trim
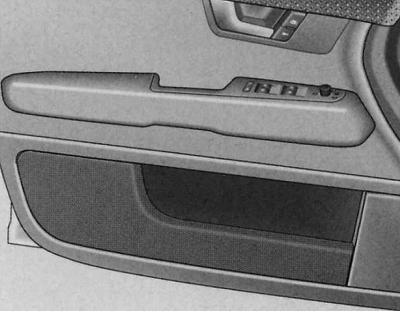
There are niches in the interior door trim.
Hangers (clothes hooks)
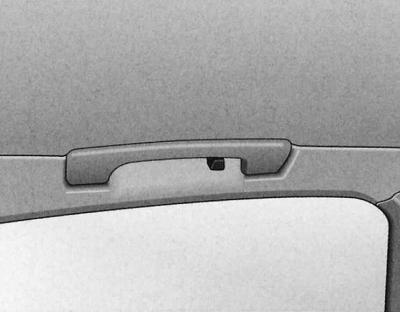
There is a coat hook above each of the rear doors.
Niche for audio cassettes
Audio cassettes can be stored (without cases) in pull-out compartments that can be stored in a niche designed for them.
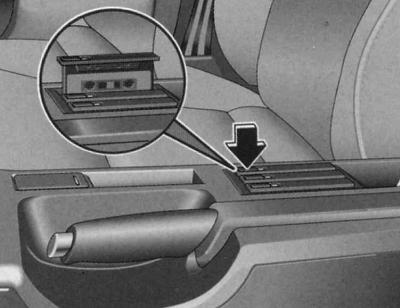
Center console cassette recess
1. To open the compartment, press the button.
2. Place the cassette in the compartment with the open side facing up.
3. To close, push the compartment all the way back until it locks into place.
When a cassette is in the compartment, a red mark appears on the left side of the compartment.
Locking the reels prevents the tape from unwinding spontaneously and thus becoming deformed.
Front seat storage compartments
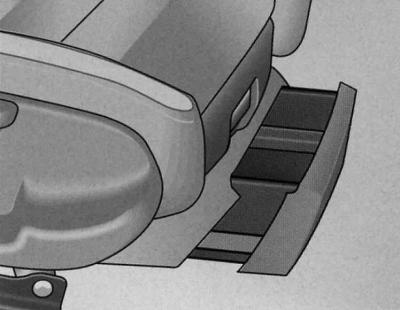
There is a pull-out storage compartment at the end of each front seat.
Opening
1. Lift the drawer handle and pull it out.
Closing
1. Insert the drawer completely until it locks into place.
Warning: The maximum load capacity of the drawer is 1 kg.