
Table of contents: Correct position of the front seats ↓ Mechanical adjustment of front seats ↓ Backrest tilt adjustment ↓ Seat height adjustment ↓ Electrically adjustable front seats ↓ Backrest tilt ↓ Lumbar support output (ergomatic) ↓
Correct position of the front seats
The correct position of the front seats is determined by the physical characteristics of the driver and front passenger.
There are many options for the position of the front seats and therefore their compliance with the physical characteristics of the driver and front passenger. The correct position of the seat is important for:
- fast and reliable use of controls;
- relaxed, non-tiring posture;
- achieving the maximum protective effect of seat belts and airbag systems.
Attention
- When driving, your feet should always be in the footwell – never on the dashboard or seat cushions! This especially applies to passengers. In the event of emergency braking or an accident, you are at increased risk of injury.
- It is important for the driver and front passenger to maintain a minimum distance of 25 cm from the steering wheel/dashboard. Otherwise, the airbag system will not be able to perform its protective function - life-threatening! In addition, the front seats and headrests must always be installed according to height.
Correct position of the driver's seat
Correct seat position is important for a safe and fatigue-free ride.
We recommend the following option for adjusting the driver's seat position:
- Adjust the longitudinal position of the driver's seat so that with slightly bent legs you can fully depress the pedals.
- Adjust the angle of the backrest so that the surface of the backrest is completely adjacent to the back and it is possible to reach the highest point of the steering wheel with slightly bent arms.
- Move the headrests up or down so that the top edge of the headrest is at least at or above eye level.
Attention
- Install the driver's seat so that the minimum distance between the steering wheel and the sternum is 25 cm. Otherwise, the airbag system will not be able to perform its protective function - risk of injury!
- There must be no objects in the footwell, as they may get under the pedals in case of emergency braking. In this case, you will not be able to brake, depress the clutch or press the accelerator pedal!
Correct position of the front passenger seat
Move the front passenger seat as far back as possible.
We recommend the following option for adjusting the position of the front passenger seat:
- Move the front passenger seat as far back as possible.
- Adjust the angle of the backrest so that the backrest is straight (vertical) position and its surface was completely adjacent to the back.
- Move the headrests up or down so that the top edge of the headrest is at least at or above eye level.
- Comfortably position your feet in the footwell.
Mechanical adjustment of front seats
Longitudinal position
Car with manual seats
The seat can be moved forward and backward.
- Pull the handle up A and at the same time move the seat to the desired position.
- Release handle A and move the seat until the lock clicks into place.
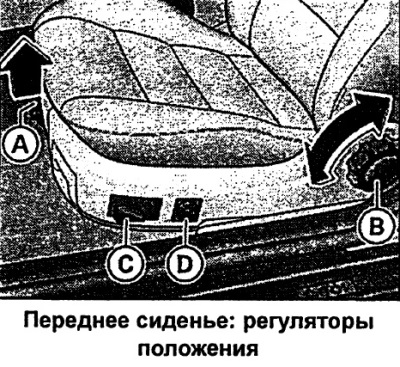
Some of the controls shown are included in the kit only for certain modifications or are installed to order.
Governing bodies
- A - longitudinal adjustment of the seat position
- B - backrest tilt adjustment
- C - seat height adjustment
- D — adjustment of lumbar support output (ergomatic)
Caution: For safety reasons, do not adjust the longitudinal position of the driver's seat while driving - risk of injury!
Backrest tilt adjustment
Car with manual seats
- Unload the seat back (do not lean on the back).
- Adjust the backrest tilt by turning handwheel B.
Caution: To avoid damaging the protective effect of the seat belts and airbag system, do not move the backrests of the front seats too far back while driving - risk of injury!
Seat height adjustment
Car with manual seats
It is possible to individually adjust the seat height.
Raising the seat
- Pull handle C.
Lowering the seat
- Press handle C down.
Attention: For safety reasons, the driver's seat height must not be adjusted while driving!
Electrically adjustable front seats
Car with electric seats
Adjusting the seat position

Seat forward/backward movement
- Press switch A forward or backward 1.
Raise/lower seat
- Press the entire surface of switch A up or down 2 and 3.
Raising/lowering the front part of the cushion
- Press switch A up or down 2.
Raising/lowering the rear part of the cushion
- Press switch A up or down 3.
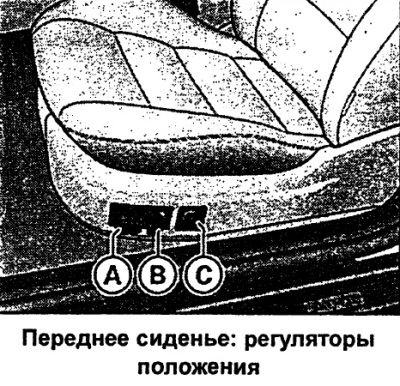
Governing bodies
- A - seat position adjustment
- B - backrest tilt adjustment
- C - adjustment of lumbar support output (ergomatic)
Attention
- The electric drive of the front seats also works when the ignition is switched off after the key is removed from the ignition. Therefore, never leave children unattended in the car - risk of injury!
- For safety reasons, the driver's seat position must not be adjusted while driving!
Backrest tilt
Car with electric seats
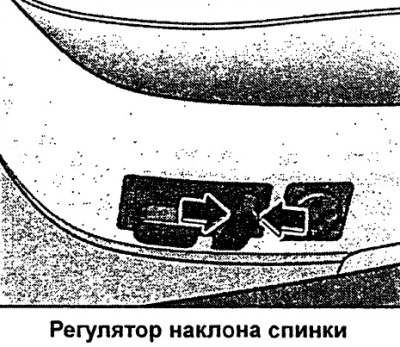
- To raise or lower the backrest, press the switch forward or backward in the directions indicated by the arrows.
Caution: To avoid compromising the protective effect of the seat belts and airbag system, do not move the front seat backs too far back while driving - risk of injury!
Lumbar support output (ergomatic)
The lumbar support outlet provides support for the lumbar spine along its entire natural contour.
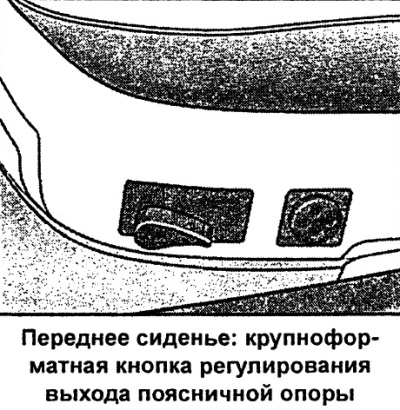
Adjusting the convexity
- To extend the upholstery, press the front side of the large-format button.
- To remove the upholstery, press the back of the large-format button.
Height adjustment
- To move the upholstery upwards, press the top side of the large-format button.
- To move the upholstery downwards, press the bottom side of the large-format button.
The lumbar support provides exceptionally effective support for the lumbar spine along its entire natural contour, with a seating position that is not tiring even on long journeys.
(The original text of the material can be found on the website: AudiManual.ru)