
Table of contents: Every time before starting to move ↓ What influences traffic safety? ↓ Correct driver position on the seat ↓ Correct position of the front… ↓ Correct position of rear seat… ↓ Correct position of headrests ↓ Pedal area ↓ Driver's side floor mats ↓ Proper placement of luggage ↓ Rigging eyes ↓ Seat belts ↓ Adjusting the height of the belt… ↓ Adjusting the middle rear seat belt ↓ Seat belt tensioners ↓ Description of airbags ↓ Front airbags ↓ Side airbags ↓ Head pillows (SIDE GUARD) ↓ Disabling airbags ↓ Child seats ↓ Classification of child seats ↓ Child seats group 0/0+ ↓ Child seats group 1 ↓ Child seats group 2 ↓ Child seats group 3 ↓ Fastening a child seat ↓ Child seat attachment using the… ↓
In the event of an accident, the safety system can reduce the risk of injury. The safety system consists of the following components:
- improved three-point seat belts on all seats,
- seat belt tension limiters on all seats,
- seat belt tensioners on the side seats,
- height-adjustable front seat belts,
- front airbags,
- side airbags in the backrests of the front and rear seats*,
- head airbags*, ISOFIX sockets* for attaching ISOFIX child seats located on the rear side seats,
- height-adjustable headrests,
- adjustable steering column.
Every time before starting to move
- Make sure that the vehicle's lighting and flashing lights are in good working order.
- Check the air pressure in your tires.
- Make sure that there is clear and good external visibility through the glass windows.
- Secure your luggage items securely, see. Seats and niches.
- Make sure that no objects can get into the pedal area.
Adjust the position of the mirrors, the position of the front seat and the headrest according to your height.
Instruct passengers on the need to install height-appropriate head restraints.
To protect children, use an appropriate child seat and properly apply and fasten the seat belt.
Sit in the correct position in the seat. Also instruct your passengers on the need to sit in the correct position in the seat, see. Seats and niches.
Apply and fasten your seat belt correctly. Also instruct your passengers on the need to fasten their seat belts correctly.
What influences traffic safety?
The following should be remembered:
- Do not be distracted or let others distract you from monitoring the traffic situation, such as your passengers or telephone conversations.
- Never drive if you have impaired driving ability (for example, as a result of taking medications, alcohol, drugs).
- Always maintain a speed that is appropriate for the road surface, traffic conditions and weather conditions.
- On long trips regularly (at the latest every two hours) take breaks.
- If possible, avoid driving when you are tired or in a hurry.
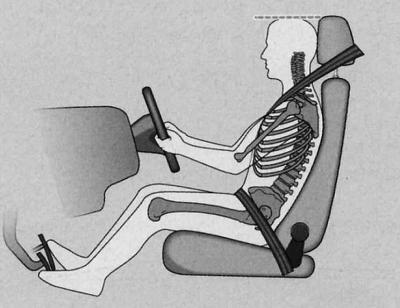
Correct driver position on the seat
The correct position of the driver in the seat is important for safe and fatigue-free driving.
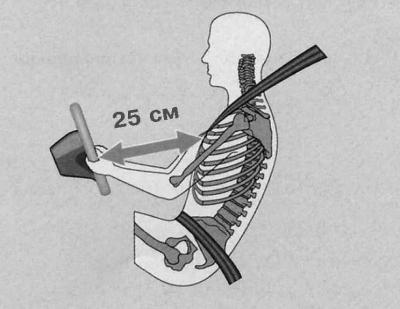
Minimum distance of the driver from the steering wheel
Correctly installed driver's headrest
For your safety and to reduce the risk of injury in an accident, we recommend the following adjustment option for the driver's seat:
- So adjust the position of the steering wheel so that the distance between the steering wheel and your chest is at least 25 cm.
- So adjust the longitudinal position of the driver's seat so that with slightly bent legs you can fully depress the accelerator, brake and clutch pedals.
- Make sure you can reach the highest point of the steering wheel.
- So adjust the position of the headrest so that the top edge of the headrest and the top of your head are in line.
- So adjust the backrest tilt so that the backrest surface is completely in contact with your back.
- Place and fasten your seat belt correctly.
- Both feet should be in the footwell to ensure you have control of the vehicle at all times.
Adjusting the driver's seat position, see. Seats and niches.
Correct position of the front passenger on the seat
The minimum distance between the front passenger and the instrument panel should be 25 cm. This will ensure maximum protective effect in the event of airbag deployment.
The following adjustment of the front passenger seat position is recommended:
- Move the front passenger seat as far back as possible.
- So adjust the backrest tilt so that the backrest surface is completely in contact with your back.
- So adjust the position of the headrest so that the top edge of the headrest and the top of your head are in line.
- Both feet should be in the footwell in front of the front passenger seat.
- Place and fasten your seat belt correctly.
In exceptional cases, you can turn off the front passenger airbag.
Correct position of rear seat passengers
Rear seat passengers should sit up straight, keep their feet in the footwell and be properly belted.
To reduce the risk of injury in the event of sudden braking or an accident, rear seat passengers should remember the following:
- So adjust the position of the headrest so that the top edge of the headrest and the top of your head are in line.
- Both feet must be in the footwell in front of the rear seat.
- Place and fasten your seat belt correctly.
- When transporting children, use appropriate child seat belt systems and tensioners.
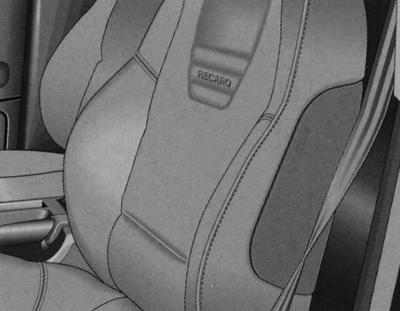
Correct position of headrests
Correctly installed head restraints are an important component of the driver and passenger protection concept and can reduce the risk of injury in most accident situations.

Correctly installed headrest (front view)
Correctly installed headrest (side view)
To achieve the optimum protective effect, the position of the head restraints must be correctly adjusted.
So adjust the position of the headrest so that the top edge of the headrest and the top of your head are in line.
Adjusting the position of the head restraints, see. Seats and niches.
Pedal area
The use of all pedals must never be obstructed by objects or foot mats.
- Make sure that you can always press the accelerator, brake and clutch pedals without obstruction.
- Make sure the pedals return to their original position without any problems.
Only foot mats that do not extend into the pedal area and that can be securely fixed in the footwell are permitted for use.
If one of the brake system circuits fails, the brake pedal must be pressed with greater force than usual to stop the car.
Driver's side floor mats
Only foot mats that do not extend into the pedal area and that can be securely fixed in the footwell are permitted for use.
Make sure that the foot mats are securely fastened and that they do not interfere with the operation of the pedals while riding.
Only foot mats that do not extend into the pedal area and that can be securely fixed to prevent them from slipping are permitted for use.*
Proper placement of luggage
All items of luggage must be securely placed in the trunk.
Unsecured objects moving in the trunk may, as a result of changing the center of gravity, negatively affect the dynamic properties of the vehicle or driving safety.
- Distribute the load in the trunk evenly, see. Seats and niches.
- Place heavy objects as far forward as possible in the luggage compartment.
- Use the load-retaining net* to secure heavy objects to the rigging eyes located in the trunk.
Warning: Air exchange in the car helps reduce fogging of the windows. Used air is removed through the ventilation slots located under the rear window. Make sure that the ventilation slots are not covered with any objects.
Luggage securing straps that fit the rigging eyes are available from retailers.
Rigging eyes
Unsecured cargo poses a danger to the driver and all passengers.
The trunk has rigging eyes for securing luggage, see. Seats and niches.
To securely fasten the load, use the rigging eyes, see "Loading the trunk" in the section Seats and niches.
In the event of a collision or accident, even small and light objects can receive so much energy that they can cause extremely serious injuries. The amount of "energy" depends very much on the speed of the car and the mass of the object. However, the more significant factor is the speed of the car.
Example: there is an unsecured object weighing 4.5 kg in a car. In the event of a frontal collision at a car speed of 50 km/h, this object develops forces corresponding to its mass twenty times. This means an increase in mass to approximately 90 kg. You can imagine the whole picture of the traumatic consequences if this "projectile" flying through the cabin hits someone.
Seat belts
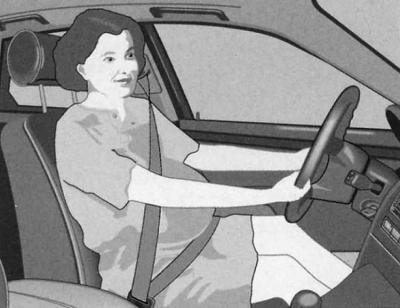
Fastening with three-point seat belts
Fasten your seat belt and only then start moving!

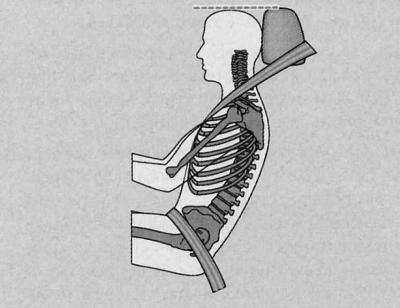
Position of head restraint and seat belt
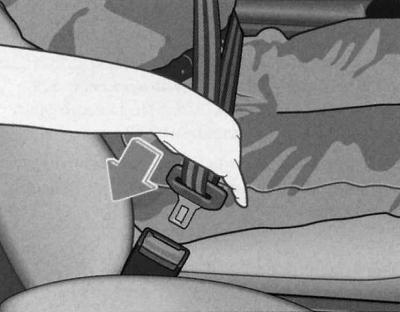
Driver's seat: belt lock and buckle
1. Install the front seat and head restraint correctly and only then fasten the belt, see "Seats and compartments" in the section Seats and niches.
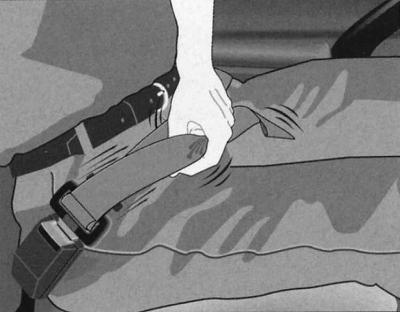
2. Take hold of the belt buckle, smoothly pull the tape out, and place it over the chest and waist.
3. Insert the clasp into the slot of the corresponding lock until you hear a click.
4. Be sure to pull the belt and make sure the lock is locked.
Each three-point belt is equipped with an automatic belt retraction mechanism. The automatic belt retraction mechanism provides complete freedom of movement when it is tensioned smoothly. However, it locks the belt when braking sharply. The automatic mechanism also locks the belts when accelerating the car, when driving on mountain roads and on turns.
Position of the three-point seat belt straps
The position of the belt straps is of great importance for the protective effect of seat belts.
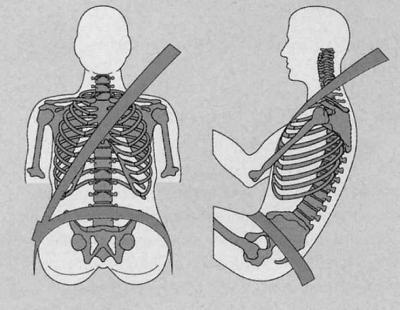
Position of the diagonal and lap belt straps
Possibility of adjusting the position of the seat belt according to height:
- Belt height adjustment
- Front seat height adjustment
Fastening of three-point seat belts by pregnant women and position of belt straps
The best protection for an unborn child is the constant and correct use of a seat belt by a pregnant woman.
Position of the belt straps of a pregnant woman
Pregnant women should also always wear seat belts.
1. Install the front seat and head restraint correctly and only then fasten the belt, see "Seats and compartments" in the section Seats and niches.
2. Take hold of the belt buckle, smoothly pull the tape, place it over the chest and waist. The waist tape of the belt should be positioned as low as possible towards the hips, so as not to cause pressure on the lower abdomen.
3. Insert the clasp into the slot of the corresponding lock until you hear a click.
4. Be sure to pull the belt and make sure the lock is locked.
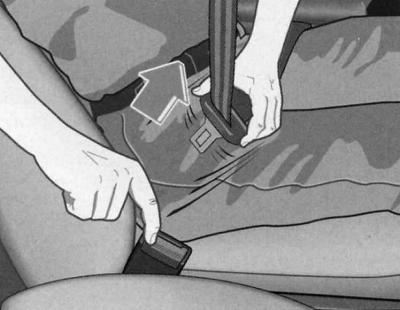
Adjusting the height of the belt fastening
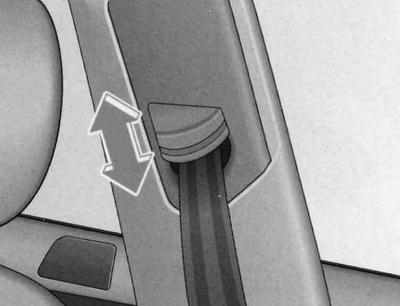
Belt height adjustment mechanism - slider with reversible buckle
1. Move the slider with the reverse buckle up or down so that the diagonal strap is approximately at the level of the middle of the shoulder, but in no case does it go around the neck.
2. After adjustment, pull the belt to make sure the buckle is securely fastened.
Warning: You can also use the seat height adjustment feature to adjust the front seat belts.
Adjusting the middle rear seat belt
The middle rear seat is equipped with a lap seat belt.
Belt extension
To lengthen the belt, hold the clasp at a right angle to the strap and pull the strap to the desired length.
This process is facilitated by squeezing the clasp and buckle in the longitudinal direction.
Shortening the belt
To shorten, simply pull the free end of the belt. The excess belt is removed by moving the plastic slider.
When the belt is properly fastened, the red button is located on the outside of the belt buckle.
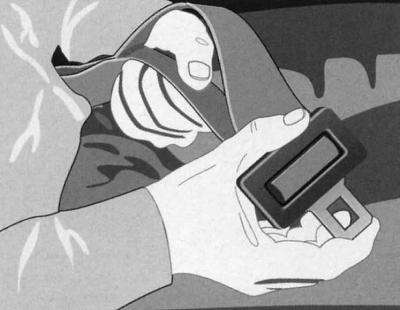
Unfastening seat belts
The belt is released by pressing the red button on the lock.
Press the red button of the lock. The clasp is pushed out of the socket by the action of the spring.
To make the automatic belt retraction system easier to operate, pull the buckle back with your hand.
Long-term locking of seat belts
For securing a child seat, a permanent locking of the three-point belts is possible.
For securing a child seat to be installed on the front passenger seat or rear seats, a permanent three-point belt lock is possible, see below "Securing a child seat". This belt lock ensures that the child seat is firmly secured in the vehicle.
Seat belt tensioners
Operating principle
In the event of a dangerous frontal or side collision, the straps of the fastened three-point seat belts are automatically tightened.
The safety of the fastened driver and passengers is increased, in addition to the airbags, by belt tensioners located on the automatic retractor mechanisms of the three-point seat belts.
The system is triggered in case of dangerous frontal collisions caused by sensors. In this case, the attached three-point seat belts are automatically tightened, see "Important instructions for seat belt Tensioners" below.
In more severe collisions, additional airbags are deployed. The seat belt tensioners do not deploy in rear collisions or rollovers.
Important instructions regarding seat belt tensioners
Warning: The belt tensioners do not work in light frontal, side and rear collisions, in the event of a car rollover, or in accidents without significant forces from the front.
When the belt tensioners are triggered, smoke is released. Smoke does not indicate a vehicle fire.
When disposing of a vehicle or individual system components, be sure to take precautions.
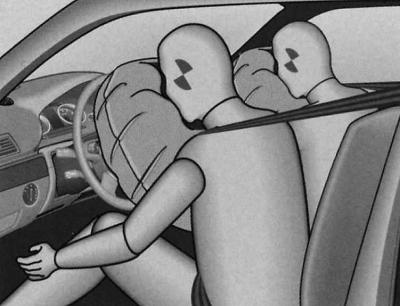
Description of airbags
General Instructions for Airbags
The airbag is part of the overall concept of passive safety.
In the event of a serious frontal collision, the front airbag system, together with the three-point seat belts, provides additional protection for the head and chest area of the driver and front passenger.
In severe side impacts, side and head airbags reduce the risk of injury to passengers in the impact zone
Seat belts, in addition to their traditional protective function, must, in the event of an accident, hold the driver and front passenger in such a position that the airbags can inflate properly and provide additional protection.
The safety systems operate only when the ignition is on. The readiness of the airbag function is controlled electronically and is displayed using the "airbag" control lamp.
The main components of the cushion system are
Electronic control device (control unit and sensors) both front airbags, side and head airbags, warning light in the instrument panel.
The following indicates a system malfunction:
When the ignition is turned on, the indicator lamp does not light, the indicator lamp does not go out after about 3 seconds after the ignition is turned on, after the ignition is turned on, the indicator lamp goes out and lights up again, the indicator lamp lights up or flashes while driving.
Under what conditions do airbags deploy?
Airbags deploy in the event of a serious collision.
The driver and front passenger airbags deploy in the event of a severe frontal collision.
In severe side impacts, the side airbags deploy together with the head airbag on the corresponding side of the vehicle.
In extreme emergency situations, both front and side airbags may deploy together with the corresponding head airbag.
Airbags do not deploy in minor frontal and side collisions, rear-end collisions, or rollovers. In such situations, occupants are traditionally protected by wearing seat belts.
Pillow deployment factors
There are no uniform criteria for triggering airbags in each specific situation. This is explained by the extremely different specifics of accidents. For example, such factors as the properties of the object of collision with the car play an important role (hard, soft), collision angle, vehicle speed, etc.
The decisive condition for the deployment of the airbags in the event of a collision is the deceleration value. The vehicle sensors together with the control unit determine the severity of the accident and thus contribute to the targeted and timely deployment of the seat belt stowage and tensioning system. The airbags are not deployed in a collision when the vehicle deceleration values are lower than the programmed values of the control unit, although the accident may result in quite severe deformation of the vehicle.
Warning: Smoke will be produced when the airbag inflates. This is normal and does not indicate a vehicle fire.
Front airbags
Description of front airbags
Airbags are not a replacement for seat belts!
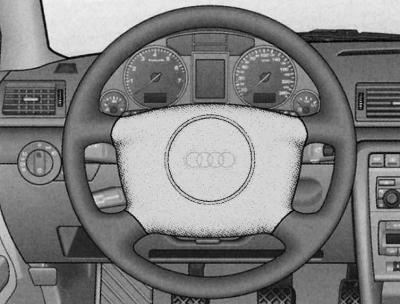
The driver's front airbag is located in the steering wheel trim panel. The front passenger's front airbag is located above the storage compartment on the right side of the instrument panel. The location of the airbags is indicated by the inscription "airbag".
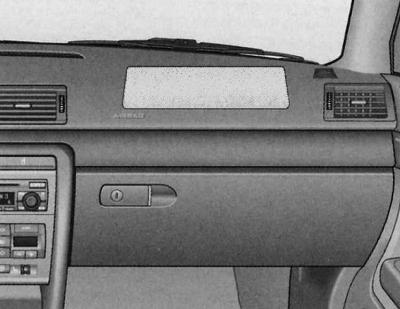
The front passenger airbag is located above the storage compartment on the right side of the instrument panel. The location of the airbags is indicated by the inscription "airbag".
In the event of a serious frontal collision, the front airbag system, together with the three-point seat belts, provides additional protection for the head and chest area of the driver and front passenger.
Front airbag function
Fully inflated airbags reduce the risk of head and upper torso injuries.
The driver and front passenger airbags deploy in the event of a severe frontal collision.
In extreme emergency situations, front, head and side airbags may deploy.
When the system is activated, the airbags are filled with working gas and deploy in front of the driver and front passenger.
The airbags inflate in hundredths of a second and at high speed to provide additional protection in an accident. When a fully inflated airbag contacts the driver and front passenger, forward movement is dampened and the risk of injury to the head and upper body is reduced.
The specially designed design of the inflatable cushion provides for a controlled release of the working gas under the influence of the driver or passenger in order to soften the reception of the head and body. As a result, the cushion is deflated after its activation.
Side airbags
Description of side airbags
In a side collision, the side airbag together with the head airbag system (airbag) increases the level of protection for occupants.
The side airbags are located in the upholstery of the front and side* rear seats. The location of the airbags is indicated by the inscription "airbag".
In the event of a serious side impact, the side airbag system, together with the three-point seat belts, provides additional protection for the entire upper body (chest, abdomen and pelvis) driver and passengers.
In severe side collisions, side airbags reduce the risk of injury from the door side.
When the side airbags are deployed, the head airbags on the corresponding side are always deployed to increase the level of protection for passengers (SIDE GUARD)*.
Side airbag function
Fully inflated side airbags reduce the risk of injury to the upper torso.
In the event of a dangerous side collision, the side airbag on the corresponding side of the vehicle deploys.
In extreme emergency situations, front, head and side airbags may deploy.
When the system is activated, the air cushions are filled with working gas.
The airbags inflate in hundredths of a second and at high speed to provide additional protection in an accident. When the airbag inflates, fine dust is formed. This is normal and does not indicate a car fire.
Contact with a fully inflated airbag dampens the movement of passengers and reduces the risk of injury to the entire upper body (chest, abdomen and pelvis) from the door side.
Important Instructions for the Side Airbag System
Proper handling of the airbag system significantly reduces the risk of injury!
Warning: When the front passenger airbag is deactivated, the front passenger side airbag is also deactivated. The rear side airbags may also be deactivated.
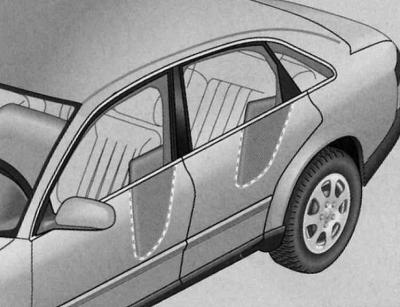
Head pillows (SIDE GUARD)
Description of head airbags
In side collisions, the head airbag, together with the side airbag system, increases the level of protection for passengers.

The head airbags are located on both sides of the passenger compartment above the doors. The location is indicated by the inscription "airbag".
In the event of a severe side impact, the head airbag system, together with the three-point belts and side airbags, provides additional protection for the head and neck area of the driver and passengers, see below "Important instructions about the head airbag system".
Together with other structural components (for example, seat crossbars, stable structure of the car) SIDE GUARD is a consistent improvement in occupant protection in side impacts.
Function of head airbags
In side impact collisions, fully inflated airbags reduce the risk of injury to the head and neck area.

In the event of a severe side impact, the head airbag deploys together with the corresponding side airbag on the impact side.
When triggered, the cushion is filled with working gas and covers all side windows and door pillars. Thus, the system is effective protection for both front and rear passengers.
The impact of the head on interior components or objects located outside the vehicle is dampened by contact with the inflated head cushion. In addition, due to the reduced load on the head area and the shortened head movement, the load on the neck is reduced.
Also, in the event of a tangential collision, the deployed head airbag covers the front door pillars and thus provides additional protection.
In extreme emergency situations, both front and side airbags may deploy along with the head airbags.
The airbags inflate in hundredths of a second and at high speed to provide additional protection in an accident. Smoke is produced when the airbag inflates. This is normal and does not indicate a vehicle fire.
Important Instructions for the Head Airbag System
Proper handling of the airbag system significantly reduces the risk of injury!
Disabling airbags
Return the deactivated airbags to working mode as soon as possible so that they can perform their protective function.
Disabling airbags is only provided in certain cases, for example:
- If it is necessary, in exceptional cases, to install a child seat on the front passenger seat, in which the child is positioned with his or her back to the direction of travel,
- If, despite the driver's seat being correctly positioned, the minimum distance (25 cm) between the centre of the steering wheel and the sternum is not maintained,
- In case of necessity of installation of special devices in the steering wheel area for physical disabilities, when installing other seats (for example, orthopedic seats without side airbags).
Airbag control
Every time after the ignition is turned on, the "airbag" indicator light comes on for a few seconds.
Disabling the front passenger airbag when installing a child seat
Deactivate the front passenger airbag if it is necessary, in exceptional cases, to install a child seat on the front passenger seat in which the child is positioned with his or her back to the direction of travel.
However, it is recommended to install the child seat only in the rear seat so that the front passenger airbag remains in working mode.
Warning: When the front passenger airbag is deactivated, the front passenger side airbag is also deactivated. All other airbags in the vehicle remain operational.
Front passenger airbag switch
The front passenger airbag can be disabled using the key switch.
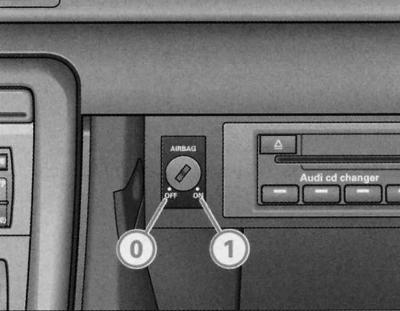
The front passenger airbag deactivation switch is located in the glove compartment.
1. To deactivate the front passenger airbag, turn the vehicle key to position (O).
2. The airbag is turned on by turning the key to position (1).

The constant lighting of the warning light reminds you that the front passenger airbag has been switched off by the lock switch "PASSENGER AIRBAG". Also observe the indication of the "AIRBAG" indicator lamp in the instrument panel, see. Controls and instruments.
Warning: When the front passenger airbag is deactivated, the front passenger side airbag is also deactivated. All other airbags in the vehicle remain operational.
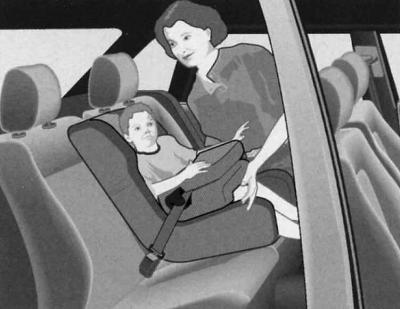
Child seats
Classification of child seats
Only child seats that are officially approved for use and suitable for the specific child may be used.
The standard ECE-R 44.3 adopted by the United Nations Economic Commission for Europe applies to child seats.
Child seats are divided into 5 groups:
| Group | Weight |
| 0 | 0-10 kg |
| 0+ | up to 13 kg |
| 1 | 9-18 kg |
| 2 | 15-25 kg |
| 3 | 22-36 kg |
Children taller than 1.50 m can use the car's seat belts without booster cushions.
Child seats tested according to ECE-R 44.3 are provided with a confirmation mark (a large "E" in a circle with a control number below). The label with the mark is firmly attached to the seat.
Child seats group 0/0+
The right child seat combined with a properly fastened seat belt can protect your child!

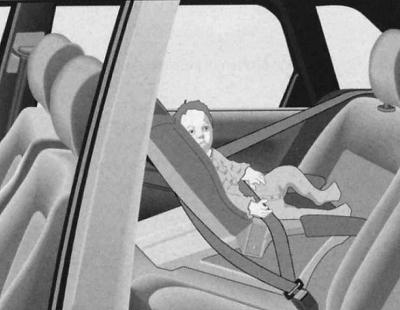
For babies up to approximately 9 months and weighing up to 10 kg, and up to 18 months and weighing up to 13 kg, child seats that can be converted to a lying position when needed are best suited.
When installing and using child seats, please observe the legal provisions as well as the instructions of the manufacturer of the specific system, see "Important instructions for the safe use of child seats".
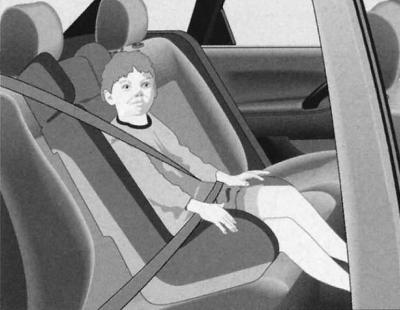
Child seats group 1
The right child seat combined with a properly fastened seat belt can protect your child!
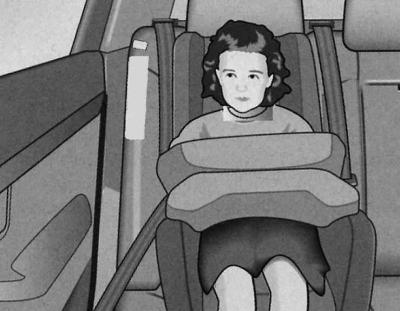
For infants and small children up to about 4 years of age and weighing between 9 and 18 kg, rear-facing child seats or child seats with a locking table are most suitable.
When installing and using child seats, please observe the legal provisions as well as the instructions of the manufacturer of the specific system, see "Important instructions for the safe use of child seats".
Child seats group 2
The right child seat combined with a properly fastened seat belt can protect your child!
For children up to approximately 7 years of age and weighing between 15 and 25 kg, the most suitable combination is a child seat with diagonal-lap belts.
When installing and using child seats, please observe the legal provisions as well as the instructions of the manufacturer of the specific system, see "Important instructions for the safe use of child seats".
Child seats group 3
The right child seat combined with a properly fastened seat belt can protect your child!
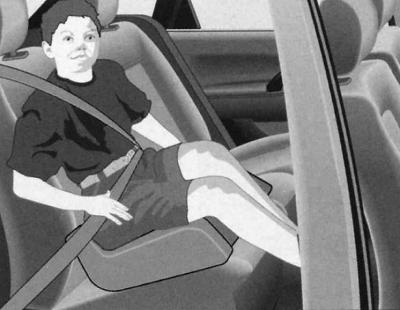
For children aged approximately 7 years and above, up to 150 cm tall and weighing between 22 and 36 kg, child seats are most suitable (undercushions) in combination with diagonal lap seat belts.
When installing and using child seats, please observe the legal provisions as well as the instructions of the manufacturer of the specific system, see "Important instructions for the safe use of child seats".
Fastening a child seat
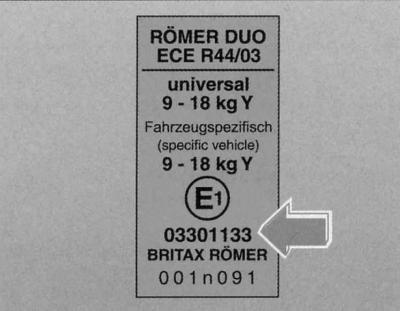
The permit number is on the tag. The tag is attached to the child seat.
In addition, you will also find information about the application and weight class there.
Child seat mounting options
The child seat can be installed in the rear seats and in the front passenger seat.
To securely attach a child seat to the rear seats and the front passenger seat, you have the following options:
Child seats of groups 0-3 can be secured with a standard three-point seat belt.
Child seats of groups 0.0+ and 1 with the "ISOFIX" system can be secured using the "ISOFIX" fixing eyes* without using a seat belt.
Recommended list of child seat belt stowage and tensioning systems
| Weight group | "Hukepack" designation | Audi Genuine Accessories Catalog Number | Manufacturer | Type | Permit number |
| 0 (up to 10 kg.) | G0 | 00a.019.900 | Britax Romer | Baby-safe | E1 033 01063 |
| 1 (9-18 kg.) | G1/G1 I SOFIX duo plus | 00A.019.901/00A.019909.A | Britax Romer/ Britax Romer | prince Duo Plus | E1 033 01058/E1033 01133 |
| 2 (15-25 kg.) | G2/G3 | 00A.019.903/00A.019.904 | Britax Romer/ Britax Romer | Vario/zoom | E1 033 01120/E1 033 01061 |
| 3 (22-36 kg.) | G3 | 00A.019.904 | Britax Romer | zoom | E1 033 01061 |
Suitability of child seats for installation in certain seating positions according to EU Directive 77/541
Cars with a lap belt in the center rear seat
| Weight group | Front passenger seat | Side rear seats | Center rear seat |
| 0, 0+ | u*+ | u++ | O |
| 1 | u*+ | u++ | L1 |
| 2 | u* | u | L2 |
| 3 | u* | u | O |
- u — universal suitability
- * - move the back of the front passenger seat as far forward as possible/adjust it to the child seat, and raise the height-adjustable front passenger seat all the way up
- + - the front passenger seat can be equipped with locking lugs* "ISOFIX"
- ++ - side rear seats can be equipped with locking lugs* "ISOFIX"
- L¹ - suitable for G1 seat belt stowage and tensioning systems (see table above).
- L2 - Suitable for G2 seat belt stowage and tensioning systems (see table above).
- O - a seating position that is not suitable for children of this age group
Cars with a three-point belt in the center rear seat
| Weight group | Front passenger seat | Side rear seats | Center rear seat |
| 0, 0+ | u*+ | u++ | u |
| 1 | u*+ | u++ | u |
| 2 | u* | u | u |
| 3 | u* | u | u |
Child seat lock
When installing a child seat of group 0, 0+ and 1, it is always mandatory to lock the child seat!
To secure the child seat, a permanent locking of the automatic three-point belt is required. This belt locking ensures that the child seat is firmly positioned in the vehicle.
The child seat is locked by completely removing and then slowly retracting the diagonal belt strap.
1. Secure the child seat with the three-point harness according to the child seat manufacturer's instructions. Insert the belt buckle into the buckle of the appropriate seat until it is heard to lock.
2. Remove the diagonal belt strip completely.
3. Release the belt tape and ensure that it fits snugly against the child seat. A characteristic clicking sound indicates that the lock has been achieved.
4. The tape should not come out back. Try to pull the belt sharply with your hand. It should not move.
Unlocking the child seat
The child seat lock is released automatically as soon as the belt is fully retracted.
1. Press the red button in the belt buckle. This will push the buckle out of the buckle under the force of the spring.
2. To facilitate automatic belt retraction, pull the belt tape back with your hand and allow it to retract completely.
Child seat attachment using the "ISOFIX" system
Child seats with the ISOFIX system can be quickly, easily and securely attached to the rear seat as well as to the front passenger seat*.
When installing or removing a child seat, always follow the child seat manufacturer's instructions.
Install the receiving sockets 0 in the fixing eyes (c) (between the back and the seat cushion).
Insert and push the locking levers into the installed receiving sockets until they lock (2x). Check that both locks are correctly locked by trying to move the seat. It should not move.
Detailed installation instructions are included with the child seat.
Child seats with the ISOFIX fastening system can be purchased at Audi service stations.
It is possible to install the ISOFIX child seat fastening system.
Material republished from the website: AudiManual