
Table of contents: Standard instrument panel design ↓ Driver information system with trip… ↓ Radio indication ↓ Outdoor temperature indication ↓ Fuel range ↓ Door and trunk open warning ↓ Malfunction monitoring system ↓ Driver's instructions ↓ Handbrake applied warning ↓ Cars with manual transmission ↓ Cars with automatic transmission ↓ Red symbols ↓ Brake system failure ↓ Cooling system malfunction ↓ Low engine oil pressure ↓ Yellow symbols ↓ Vehicles with dynamic headlight… ↓ Speed alarm ↓ Warning Level 1: Function ↓ Warning Level 1: Programming ↓ Warning Level 2: Function ↓ Warning Level 2: Programming ↓ Trip computer ↓ Storage device ↓ Reset button ↓ Use ↓ Fuel range ↓ Travel time ↓ Average fuel consumption ↓ Average speed of movement ↓ Current fuel consumption ↓ Menu indication (models with… ↓ Selecting and entering menu commands ↓ Types of indication ↓ Calling the auxiliary menu ↓ The setup process (part 1) ↓ The setup process (part 2) ↓ Functional example (part 1) ↓ Functional example (part 2) ↓ Functional example (part 3) ↓
The Driver Information System (FIS) is the vehicle's information hub.
"FIS" is the information center of your car. This system easily and quickly informs you about the current technical condition of the car. For example, you can find out the mileage until the next technical service for the purpose of performing repair and preventive work and much more. In addition, if the car is equipped accordingly, the driver can receive data from the radio system, telephone, telematics and navigation system.
On vehicles with Audi navigation* or Audi telematics*, the information on the display is multi-coloured and has a higher resolution.
The driver information system display is shown on the display located in the centre of the instrument panel.
Dashboard display:
- radio indication;
- outside temperature indication;
- fuel range.
Warning: On vehicles with automatic transmission, information is displayed on the display only after the driving range is engaged.
Standard instrument panel design
Information on the current operating condition of the vehicle is displayed on a display located in the center of the dashboard.
- Radio indication
- Outdoor temperature indication
- Fuel range
- Door and trunk open warning— Driver Information System (FIS)
- Positions of the selector lever of the 5-speed automatic transmission — Automatic transmission (AT)
- Multitronic selector lever positions — Automatic transmission (AT)
- Speed alarm
- Malfunction monitoring system
- Driver's instructions
- Handbrake applied warning
- Service due date indication - Controls and instruments
Driver information system with trip computer
- Radio indication
- Outdoor temperature indication
- Warning about open door and trunk
- Positions of the selector lever of the 5-speed automatic transmission — Automatic transmission (AT)
- Multitronic selector lever positions — Automatic transmission (AT)
- Speed alarm
- Malfunction monitoring system
- Driver's instructions
- Handbrake applied warning
- Service due date indication - Controls and instruments
- Lamp function failure
- Trip computer
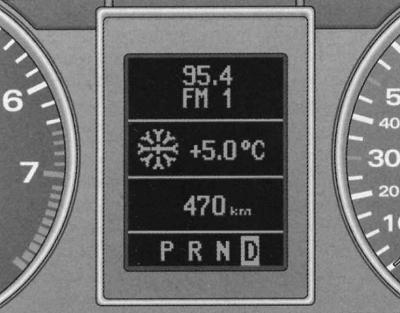
Radio indication
If, after checking by the fault monitoring system, there is no indication of faults of the 2nd priority level and the radio is on (depending on the radio configuration), after the "OK" indicator goes out, the name of the radio station or radio frequency with additional information appears on the display.
This indication is additional information for the radio display.
Outdoor temperature indication
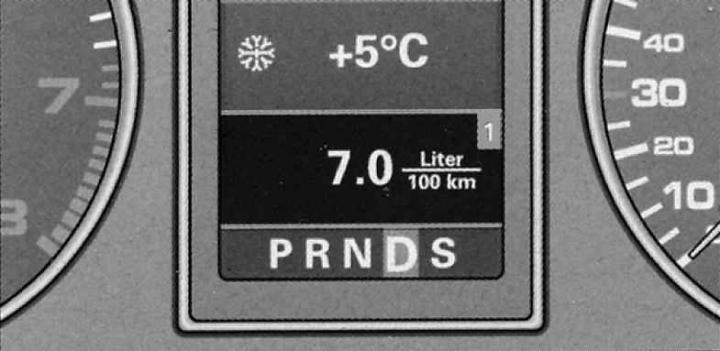
The outside temperature display is shown when the ignition is on. On cars with automatic transmission, the display appears only after the driving mode is engaged.
At temperatures between +5°C and -5°C, a snowflake appears to the left of the temperature display. The snowflake symbol warns the driver of the need for extra caution due to the risk of ice. When the vehicle is stationary or driving at very low speeds, the display may be slightly higher than the actual temperature due to the heat emitted by the engine.
On vehicles with air conditioning, when the display switches to Fahrenheit (°F) the outside temperature display automatically changes accordingly, Heater, ventilation and air conditioning.
Warning:When displaying navigation system data (accompaniment to the goal) the outside temperature indication appears on the second line of the radio display panel.
Fuel range
This indication helps with planning.
The display shows the fuel range in km.
This indication shows how many kilometers your car can still travel on the actual remaining fuel in this driving mode. The fuel range is determined by discrete values, counted in 10 km increments.
The calculation of the power reserve is based on the fuel consumption over the last 30 km of the journey. With more economical subsequent movement, the power reserve increases.
Door and trunk open warning
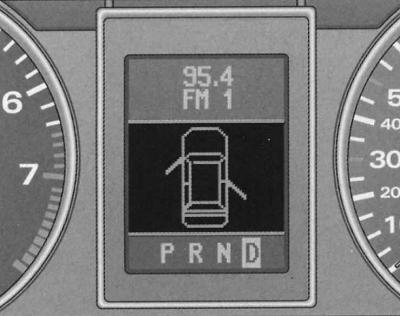
Display: Door and trunk open warning
The pictogram is displayed if at least one door, bonnet or trunk is not closed when the ignition is on. The pictogram also indicates which door or doors are not closed, the driver's door and the right rear door are shown as examples.
The hood or trunk shown on the display icon flashes if they are not closed. Once all doors, the hood and trunk are completely closed, the icon goes out.
The door and trunk open warning pictogram can be switched off on vehicles with a driver information system and trip computer* by briefly pressing the trip computer control keys. However, the pictogram will reappear immediately after changing the position of the doors, bonnet or trunk.
Malfunction monitoring system
Display: Malfunction Monitoring System
When the ignition is on and while driving, the automatic fault monitoring system continuously monitors certain functions and the technical condition of the vehicle systems.
The system notifies of any malfunctions or the need for urgent repair and maintenance work with an audible signal, accompanied by red and yellow light symbols on the instrument panel display, depending on the level of priority.
Red symbols indicate dangers, and the yellow ones are signal symbols. In addition, in certain situations, in addition to the red symbols, driver instructions appear.
Driver's instructions
In addition to the indicator lights and symbols, the instrument panel display also provides instructions to the driver.
When a lamp function malfunction message appears after checking the lamp function, when driving with the handbrake applied, and also before switching on the driving mode of vehicles with automatic transmission, the corresponding driver instruction indication is displayed on the display.
In addition, when any first priority symbol flashes on the display, the driver can display the corresponding instructions.
Output to the display of instructions to the driver
For example, the display shows a symbol indicating a malfunction of the engine oil pressure function
Motor abstellen, Ölstand prüfen (turn off the engine, check the oil level)
This display indication goes out after about 5 seconds. By briefly pressing the "CHECK" button, the instruction can be displayed again.
Warning:Instructions "Handbremse angesolen" (tighten the handbrake) and "Beim Einlegen einer Fahrstufe im stand fussbremse betatigen" (when selecting the stationary vehicle driving mode, press the brake pedal) cannot be displayed again. These instructions go out after the vehicle is released from the handbrake or the driving mode is turned on.
Handbrake applied warning
1. Release the handbrake on the vehicle.
When driving carelessly with the handbrake applied, a buzzer sounds (sound signal) and the following instructions appear on the display:
Handbremse angesolen (the handbrake is tightened).
This warning appears when driving for more than 3 seconds at a speed greater than 5 km/h.
Cars with manual transmission
Control functions: manual gearbox
When the ignition is switched on, the fault monitoring system automatically checks the functions. If the functions checked by the fault monitoring system are OK, the "OK" indicator lights up for a few seconds.
The presence of faults is indicated by the corresponding indication instead of the "OK" indication. At the same time, a warning signal sounds.
If there is no "OK" indication, or if there is a malfunction, the vehicle's malfunction monitoring system itself must be checked.
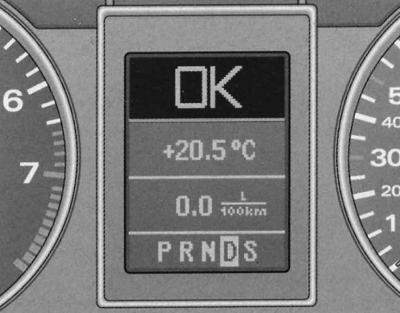
Cars with automatic transmission
Function Control: Automatic Transmission
When the ignition is turned on, the fault monitoring system automatically checks the functions.
When the selector lever is in position "P" or "N" an instruction appears on the display
Beim Einlegen einer Fahrstufe im Stand Fussbremse betatigen (when the stationary vehicle driving mode is engaged, press the brake pedal).
If you now turn on the driving mode ("R", "D" etc.), then the instruction goes out and automatic control of functions is carried out. If the controlled functions are in order, then the indication "OK" is displayed for a few seconds.
If there is a fault, approximately 15 seconds after starting the engine, the above instruction to the driver is replaced by the indication of the corresponding fault symbol. At the same time, a warning signal sounds.
If there is no "OK" indication, or if there is a malfunction, the vehicle's malfunction monitoring system itself must be checked.
Red symbols
The red symbol signals danger.
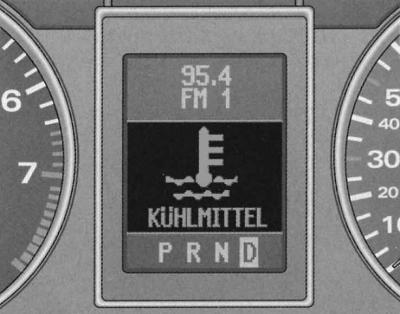
Display: Coolant level drop
1. Stop.
2. Turn off the engine.
Check the faulty function. If necessary, seek qualified assistance.
BREMSE — Brake system malfunction
KUHLMITTEL — Drop in coolant level or overheating of the cooling system
OLDRUCK - Engine oil pressure drop
Red symbols indicate a malfunction of the first priority level (danger).
When a red symbol appears, three consecutive symbols are dealt
- warning sound signals. The symbol continues to flash until the fault is corrected. If several first-priority malfunctions occur at once, the symbols appear sequentially, with each display lasting 2 seconds.
Brake system failure
Correct the brake system problem as soon as possible.
Flashing symbol on display
- Fahrzeug anhalten Bremsfl. und Hudr.-Öl prüfen
- Vorsicht! Storung Bremse (ABS) Service aufsuchen
1. Stop.
2. Check the brake fluid level, see Chapter Routine care and maintenance.
When ABS fails, the ABS control lamp
Cooling system malfunction
Repair the cooling system immediately.
The reason for the symbol blinking
- Motor abstellen und Kuhlmittel prufen (turn off the engine and check the coolant level)
1. Stop.
2. Turn off the engine.
3. Check the coolant level, see Chapter Routine care and maintenance.
4. If necessary, top up the coolant, see Chapter Routine care and maintenance.
5. Continue driving only after the symbol goes out.
6. If necessary, seek qualified assistance.
If the coolant level is normal, then the cause of overheating may be a failure of the cooling system fan.
If the low battery indicator lamp also lights up, see. Controls and instruments, then the reason may be a broken ribbed belt.
Warning: Do not continue driving if the symbol indicates a fault in the cooling system - there is a risk of engine damage.
Low engine oil pressure
Correct the problem immediately.
Flashing symbol on display
- Motor abstellen Ölstand prüfen (turn off the engine, check the oil level)
1. Stop.
2. Turn off the engine.
3. Check the engine oil level, see Chapter Routine care and maintenance.
4. If necessary, seek qualified assistance.
Engine oil level drops below normal
Top up engine oil if the level drops below the norm, see Chapter Routine care and maintenance.
Normal engine oil level
You cannot continue moving if the symbol
Warning: The oil pressure warning light is not an indicator of the oil level in the lubrication system. Therefore, check the oil level regularly, preferably when refuelling.
Yellow symbols
Yellow symbols are warning symbols.
Standard models
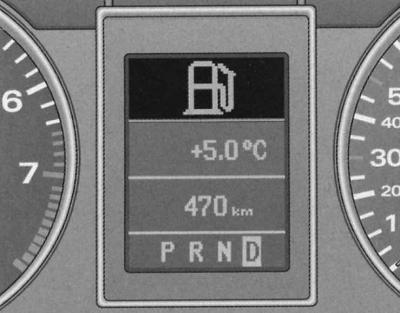
Display: Fuel reserve
Yellow symbols indicate a malfunction of the second priority level (warning).
When a yellow symbol appears, one warning signal is emitted. Check the corresponding function. When several second-priority malfunctions occur at once, the symbols appear sequentially, each lasting 2 seconds.
Models with FIS, trip computer
Yellow symbols indicate a malfunction of the second priority level (warning).
When a yellow symbol appears, one warning signal is emitted. Check the corresponding function. When several second-priority malfunctions occur at once, the symbols appear sequentially, each lasting 2 seconds.
Reserve fuel supply
If this symbol
Check the engine oil level
When the symbol appears
Engine oil sensor malfunction
When the symbol appears
Brake lining wear
When the symbol appears
Speed alarm
The appearance of the symbol
Vehicles with dynamic headlight leveling device
Malfunction of the headlight range adjustment device
The appearance of the symbol
Windscreen washer fluid level drop
The appearance of the symbol
Speed alarm
The appearance of the symbol
Battery voltage deviation from normal
When the symbol appears
- v-belt
- voltage regulator
- battery status
Also remember about the low battery indicator light, see. Controls and instruments.
Lamp function failure
The lamp function monitoring system monitors the condition of the vehicle's lamps.
In case of malfunction or failure of the lamp, the indication is displayed for the first five seconds together with the symbol
- Blinker hinten links (rear left turn signal)
After 5 seconds, this additional indication goes out. To call up the indication again, briefly press the "CHECK" button.
Possible reasons for lamp malfunction:
- defective incandescent lamp, see Chapter On-board electrical equipment.
- fuse blown, see Chapter On-board electrical equipment.
- defects in electrical wiring connections.
Replace/repair electrical connections and bulbs.
Speed alarm
The speed alarm allows you to set a speed limit that should not be exceeded.
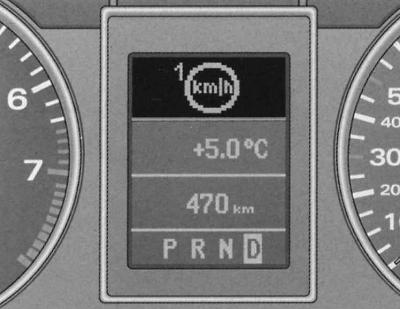
Display: Speed alarm
The speed alarm warns the driver that a preset speed has been exceeded. As soon as the actual speed exceeds the entered value by approximately 10 km/h, a warning signal sounds. At the same time, a warning symbol appears on the display.
The speed alarm allows you to program two warning levels*, functioning independently of each other and performing not entirely identical tasks.
Warning: Even if you have a speed limit alarm, always use your speedometer to monitor the maximum speed permitted by law.
Warning Level 1: Function
The value of warning level 1 can be changed while driving.
Warning level 1 enables the speed limit to be set while driving. The entered speed value is stored in memory until the ignition is switched off, unless the speed has been changed or the entered limit has been cancelled beforehand.
Signal symbol
The symbol also goes out if the speed increases by approximately 40 km/h above the entered value for at least 10 seconds. However, this does not reset the memory of the entered speed limit.
Warning Level 1: Programming
Warning level 1 is programmed with the CHESK button.
Fragment of the dashboard: the SNEAK button
Programming the speed limit
1. The car must move at a set speed, which must not be exceeded.
2. Press and release the HOLD button.
Cancellation of the imposed speed limit
1. The speed of the car must be more than 5 km/h.
2. Press and hold the HEAR button for more than 1 second.
Successful entry into the memory is confirmed by a short-term lighting of the signal symbol on the display
Warning Level 2: Function
The value of warning level 2 can only be changed when the ignition is switched off.
Warning level 2 enables programming and cancellation of the maximum speed limit only when the ignition is switched off. Programming this warning is recommended when a general reminder to the driver to maintain a certain maximum speed is required. For example, when driving in a country with a speed limit, the maximum speed when driving with winter tires. Warning level 2 signal symbol
Warning Level 2: Programming
Warning level 2 is programmed and cancelled by switches installed in the windscreen wiper handle.
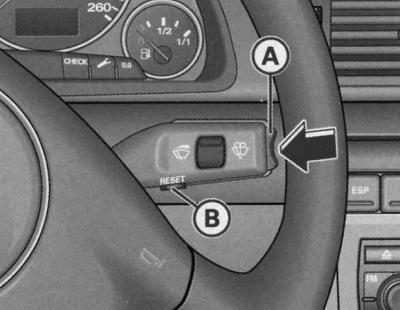
Windscreen wiper handle: function switch
Programming the maximum speed
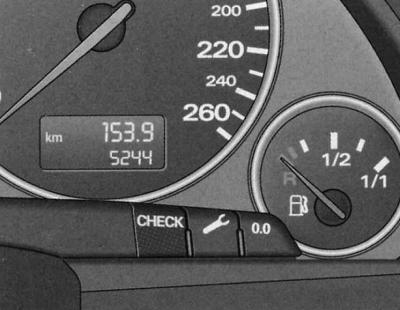
1. Turn off the ignition.
2. Press and release the CHECK button on the instrument panel. The trip meter and digital clock lights up.
3. Press and hold the CHEEK button for at least 2 seconds. The display shows the entered maximum speed threshold or the crossed-out warning level 2 symbol if the maximum speed has not been pre-programmed.
4. To change the speed, press the top or bottom side of the wiper blade mounted in the handle (A) function switch. This occurs step-by-step (one stage 10 km/h) increase or decrease values.
Cancellation of the imposed speed limit
1. Turn off the ignition.
2. Press and release the CHECK button on the instrument panel. The trip meter and digital clock lights up.
3. Press and hold the CHECK button for at least 2 seconds. The entered maximum speed threshold value appears on the display.
4. Press the reset button located in the wiper handle (IN), until the crossed-out warning level 2 symbol appears on the display.
A few seconds after the programming or cancellation process, the illumination of the odometer and digital clock turns off.
Trip computer
The trip computer analyzes and displays the values of current and average fuel consumption, average speed, fuel range and travel time.
Trip computer indication: current fuel consumption
The trip computer analyzes and displays the following information on the FIS display:
- Fuel reserve on the move
- Travel time
- Average fuel consumption
- Average speed
- Current fuel consumption
Information (fuel range, travel time, average fuel consumption, average speed and current fuel consumption) is displayed on the FIS display in the above sequence. All indicators (fuel range, travel time, average fuel consumption, average speed and current fuel consumption) are indicated in metric units, and in certain export versions in the English system of units.
Storage device
The trip computer is equipped with two automatically operating storage devices.

Trip computer: memory cell 1
The number of the memory device that is switched on is displayed on the screen as a negative display digit. When the digit 1 appears on the screen, the data of the one-time memory device (memory 1) is displayed. When the digit 2 appears on the screen, the data of the general memory device (memory 2) is displayed.
One-time storage device
The one-time memory device stores information from the moment the ignition is turned on until the moment it is turned off. When the vehicle resumes moving within 2 hours after the ignition is turned off, new information is added to the already entered information. When the movement is interrupted, more than 2 hours the data on the storage device is automatically erased.
General storage device
Automatic erasure of data from the memory of a shared storage device is not possible. This is how it differs from a one-time storage device. Thanks to this, you can set the time interval for analyzing information or data yourself.
Reset button
The button for selecting and displaying various parameters is installed in the windshield wiper control handle.
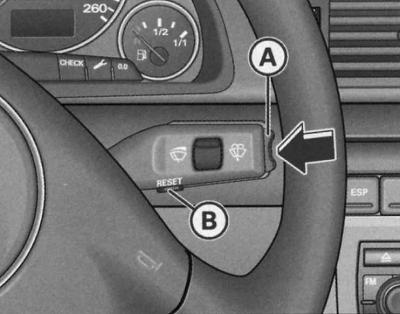
Windscreen wiper handle: trip computer controls
- A - Function switch
- B - Reset button
By successively pressing the "Reset" button briefly, the following indication is selected:
- one-time storage device (memory cell 1)
- shared storage device (memory cell 2)
- navigation/telematics*
- display off
Warning: To select these types of indications, just press and immediately release the "Reset" button. When pressing and holding the button for one second (for example, the value of the current fuel consumption) the value of this indication will be set to zero.
The malfunction monitoring system fault indication also appears when the display is switched off.
Use
The trip computer is controlled by two switches installed in the windshield wiper control handle.
Selecting functions
1. Press the top or bottom side of the function switch (A). The 5 functions of the trip computer are displayed sequentially.
Erasing information
1. Perform a function selection.
2. Press and hold the reset button for at least one second (B).
The reset button can be used to set the following zero values:
- travel time
- average fuel consumption
- average speed of movement
The trip computer only works when the ignition is on. When the ignition is on, the last function at the time the ignition was turned off is displayed. By briefly pressing the function switch (A) or reset buttons (B) you can also turn off the indication of the need to take a break from driving.
Warning: When the battery terminals are disconnected, all stored values are erased.
Fuel range
This indication helps with planning.
The display shows the range in kilometers. This display shows how many kilometers the car can travel on the actual remaining fuel in the current driving mode. The range by fuel is determined by discrete values, counted in 10 km steps.
The calculation of the power reserve is based on the fuel consumption over the last 30 km of the journey. With more economical subsequent movement, the power reserve increases.
Travel time
Travel time indicator reminds you to take a break from driving.
The display shows the travel time counted from the moment of the last reset of the memory data of the storage device. If you want to start counting the travel time from a certain moment, clear the memory by pressing the "Reset" button (B).
One-time storage device
If the interruption in movement lasts more than two hours, the travel time indication is automatically reset.
General storage device
The travel time value is saved when the ignition is off. As you continue driving, the subsequent travel time is added to it.
A reminder to take a break from movement
Two hours after the start of the journey, regardless of the programmed function, the system automatically switches to the travel time display. A flashing 2:00 display reminds the driver to take a break from driving.
By briefly pressing the top or bottom side of the function switch or the "Reset" button, this indication can be turned off.
If you continue driving or if the break is less than 10 minutes, then every two hours after that the reminder about the need to stop for a rest will be repeated with the travel time indication of 4:00, 6:00, etc. If the break lasts more than 10 minutes with the ignition off, the travel time countdown data is reset.
Average fuel consumption
This indication helps when planning your movement.
The display shows the average fuel consumption in liters per 100 km, calculated since the last memory reset. Using this display, you can select the driving mode that corresponds to the optimal fuel consumption. If you want to determine the average fuel consumption again, you must reset the memory by pressing the "Reset" button. When driving the first 30 m after resetting, the display shows a zero value.
One-time storage device
If the break in movement lasts more than 2 hours, the average fuel consumption data is automatically reset.
General storage device
When the ignition is switched off, the average fuel consumption value is stored in memory. When driving further, the subsequent consumption data is taken into account.
Average speed of movement
This indication helps when planning your movement.
The display shows the average speed in km/h calculated since the last memory data reset. If you want to determine the average speed again, you must reset the memory data by pressing the "Reset" button.
One-time storage device
If the break in movement lasts more than 2 hours, the average speed data is automatically reset.
General storage device
When the ignition is switched off, the average speed value is stored in memory. When driving again, new data is also taken into account.
Current fuel consumption
Indication of current fuel consumption helps to save fuel.
The display shows the current fuel consumption value, measured in l/100 km. Using this display, you can select the driving mode that corresponds to the optimal fuel consumption.
Consumption is calculated for each 30-meter section of the route. When the car is stopped, the last calculated value is displayed.
If the instantaneous fuel consumption determination function is called after starting the engine, then its average value is displayed on the display for the first 30-40 meters of the route.
Menu indication (models with independent heating)
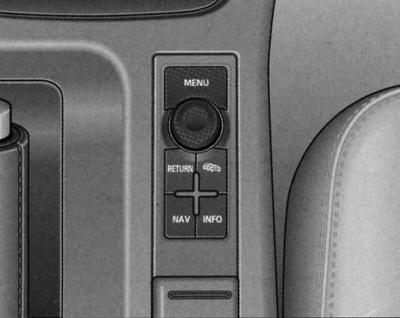
Center console: menu control key
Through the appropriate commands menu Your vehicle has the option of setting up, switching on and controlling (e.g. independent heater/fan*) individual functions. In addition, you can display the required information on the FIS display using the menu. The device only works when the ignition is on. It is controlled using the "Menu" button on the central console. The start menu informs you about the different display types. The following display types are possible:
- Einstellen — (setup, installation)
- Abfragen — (request)
- Menu aus — (menu shutdown)
- Help - (help)
Selecting and entering menu commands
The "Menu" button and the rotary/push button on the centre console can be used to display the menu, read data and make settings.

Center console: rotary/push button function
Functions of the Menu key and rotary/push button.
Calling the menu
1. Press the "Menu" key.
Selection and configuration
1. Rotate the rotary/push button.
Enter and confirm
1. Press the rotary/push button.
By turning the rotary/push button you can select the menu/change the setting parameters. The selected parameters are highlighted in red.
Pressing the rotary/push button confirms the selected command/enters the set parameters into the system.
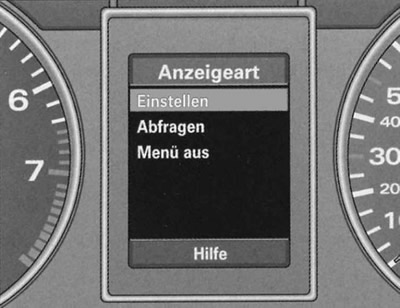
Types of indication
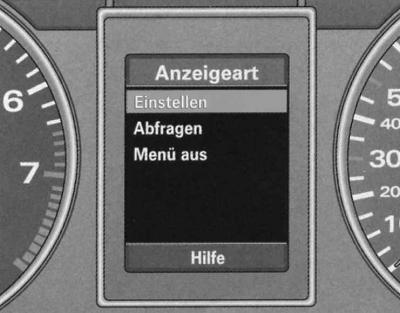
Start menu
The FIS initial menu allows you to select 4 types of indication.
The following functions correspond to the four types of indication of the initial menu:
- Einstellen (setup, installation)
- Standheizung/-luftung* (autonomous heater/fan)
- Uhr (hours)
- Computer
- Tempoalarm (Geschwindigkeitswarnung) (speed alarm)
- Abfragen (request)
- Service (maintenance), see Section Controls and instruments.
- Menu aus (menu shutdown)
- The display shows the usual indication, as in cars without a menu indication.
- Hilfe (help)
- This function will help you to correctly select and enter the necessary commands.
Calling the auxiliary menu
FIS has a help function.
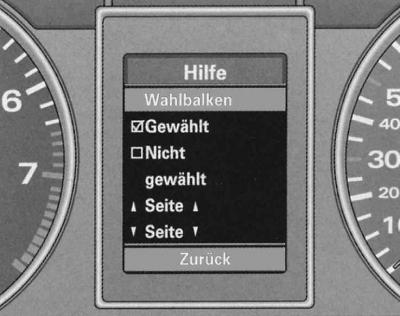
Hilfe Menu (help)
The help function is called as follows:
1. Press the "Menu" key. The initial menu appears.
2. Turn the rotary/push button to select the Hilfe (help) function.
3. Confirm the selection by pressing the rotary/push button.
4. To exit the auxiliary menu, press the rotary/push button again.
The Hilfe menu (help) is for informational purposes only. Configuration in this menu is not possible.
Meaning of display symbols:
| symbol | selected function red background (function disabled) |
| the team has been selected | |
| team not selected | |
| previous page | |
| next page |
The setup process (part 1)
The settings are made via menu commands.
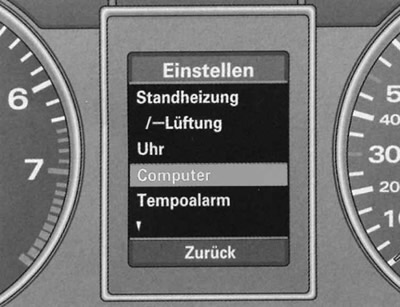
Display: Install menu, Computer selected
The setup process is as follows:
1. Press the "Menu" key. The initial menu appears.
2. Turn the rotary/push button to select the Setup line.
3. Confirm the selection by pressing the rotary/push button. A menu list appears.
4. Turn the rotary/push button to select the current line (red background).
5. Confirm the selection by pressing the rotary/push button.
6. To correctly position the command selection arrow, you may need to use symbols
When selecting and confirming the Computer menu by pressing the rotary/push button, two levels of the Computer menu appear (Computer 1 and Computer 2). You must again select and confirm the corresponding level with the rotary/push button.
The setup process (part 2)
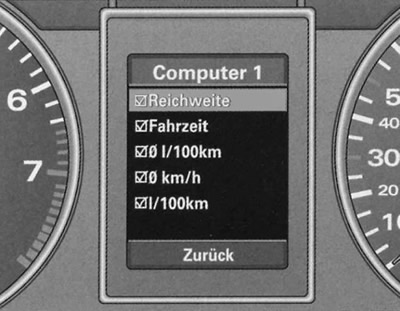
Computer 1 menu, Reichweite line selected (fuel range)
Continue the setup process as follows:
1. Turn the rotary/push button to select the current line (red background).
2. The selected function is enabled by checking the box ("yes") and disabled by unchecking the box ("no").
3. To return to a higher menu level, set the command selection arrow to Zuruck (back) and press the rotary/push button.
Some settings require the input of numerical values, such as setting the date. This is also done by turning the rotary/push button.
Functional example (part 1)
The example provided shows the complete setup process carried out through menu commands.
Start menu, line Einstellen selected
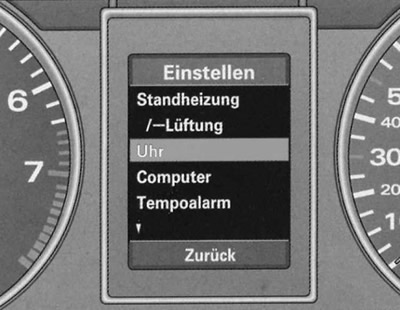
Open menu, line selected
If you want, for example, to set a calendar date, then you need to:
1. Press the "Menu" key. The initial menu appears.
2. Turn the rotary/push button to set the selection line to Einstellen (setting).
3. Confirm the selection by pressing the rotary/push button. The submenu list Einstellen (settings) appears.
4. Turn the rotary/push button to set the selection line to Uhr (hours).
5. Confirm the selection by pressing the rotary/push button. The Uhr (hour) setting menu appears.
Continued, see "Functional example (part 2)".
Functional example (part 2)
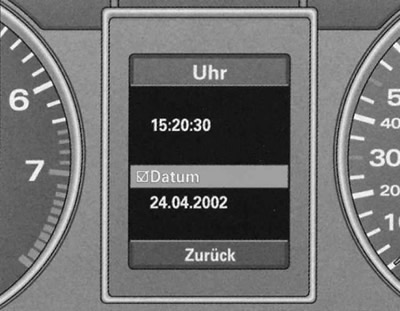
Menu Uhr, line Datum selected
Continue the date setting process as follows:
1. Turn the rotary/push button to set the selection line to Datum.
2. If there is an empty square before the Datum line, press the rotary/push button. A check mark should now appear in the square. The last date set is displayed.
3. Turn the rotary/push button to turn on the date display function and press the rotary/push button. The date display starts flashing.
4. Turn the rotary/push button left or right to set the correct day value. Press the rotary/push button. The month display now flashes.
5. In the same way, set the month and year if necessary.
Functional example (part 3)
To exit the date setting menu, do the following:
1. Turn the rotary/push button to set the selection line to Zurück (back).
2. Press the rotary/push button. The menu appears again Einstellen (setting up).
3. Press the rotary/push button again. The initial menu appears again.
(The full version is posted on the resource: audimanual.ru)