
Table of contents: Current care ↓ Engine compartment hood ↓ Unlocking the hood ↓ Opening the hood ↓ Carrying out work in the underhood… ↓ View under the hood of a 4-cylinder… ↓ View under the hood of a 6-cylinder… ↓ View under the hood of a 4-cylinder… ↓ View under the hood of a 6-cylinder… ↓ Closing the hood ↓
This Chapter has been compiled to help the amateur mechanic maintain his vehicle in a state of maximum performance, economy, safety and reliability. Later in the Chapter you will find a complete schedule of routine vehicle maintenance procedures, as well as Sections devoted to the description of the maintenance of its individual systems. The Sections include descriptions of visual checks, adjustments, component replacement and other useful tips. The location of individual components will be determined by the illustrations with views of the engine compartment and the underbody of the vehicle. By servicing the vehicle in accordance with the mileage and time schedule and following the detailed notes below, you will receive a clear maintenance program that can ensure a long and reliable service of your vehicle. Remember that this plan is exhaustive, and the implementation of individual points and neglect of others will not give the expected result.
Current care
As you service your vehicle, you'll soon discover that you can - and should - combine many procedures because of the similarities in the steps involved. For example, if the vehicle is raised off the ground to lubricate the chassis, you should inspect the exhaust system, suspension, steering system, and fuel system while you're underneath the vehicle. If the wheels are off for other work, it's a good idea to check the brakes. Finally, suppose you have to borrow or rent a torque wrench. Even if you only need it to tighten the spark plugs, you might as well check the torque on as many critical nuts and bolts as you have time for.
The first step in carrying out a vehicle maintenance program is self-preparation. Carefully study the materials of all Sections related to the upcoming procedures, then prepare all the necessary materials, equipment and tools. If you are afraid of encountering problems when performing some specific work, consult a specialist or a person who has already carried out this work.
Warning: During each service, the service station additionally reads data from the fault memory of the electronic control units of the engine, ABS, airbag and anti-theft system using a device for interrogating the fault memory. For this purpose, it is recommended to contact the service station at certain intervals. It should be borne in mind that some faults, such as failed sensors of the engine control system, do not lead to a noticeable decrease in the characteristics of the car. The control units have an emergency operation mode or operate on averaged parameter values entered into the memory, which cannot be detected by the driver. The fault memory is interrogated through the diagnostic connector. Maintenance is carried out in accordance with a certain period and mileage of the car.
Engine compartment hood
There is a risk of injury when the hood is open and the engine is running.
After the engine is turned off, the radiator fan blades may rotate for approximately 30 seconds.
The engine is equipped with an electronic ignition system. Due to the high voltage of the ignition system, it is very dangerous to touch the ignition system components (ignition coil, ignition distributor, high tension wire, spark plug tips, test connector):
- With the engine running,
- When starting the engine,
- When the key in the ignition switch is in position 2 and the engine crankshaft is turned by hand.
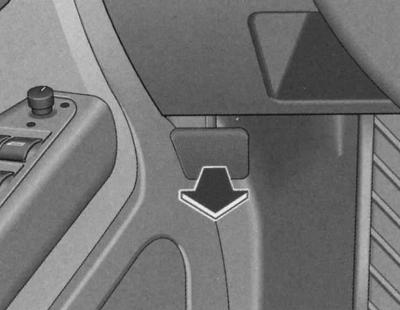
Unlocking the hood
The hood release handle is located inside the vehicle.
1. Pull the handle located under the instrument panel in the direction of the arrow. The hood will be pushed out of the lock by the force of the spring. At the same time, the release tab will move out through the radiator grille.
Opening the hood
Before opening the bonnet, make sure the wiper blades are on the windscreen. Otherwise, they may damage the paintwork.
1. Raise the hood slightly.
2. Pull the release tab in the direction of the arrow. This will release the hood from the catch hook holding it.
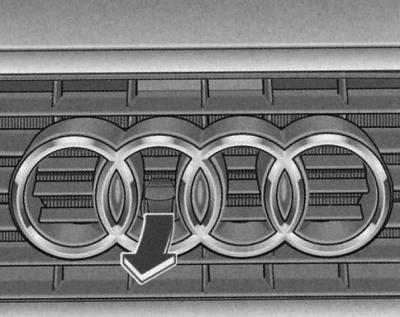
3. Open the hood. The open hood is held in the upper position by a gas-filled strut.
Carrying out work in the underhood space
When carrying out any kind of work in the underhood space, special care is required! Views under the hood are shown in the illustrations.
View under the hood of a 4-cylinder petrol engine
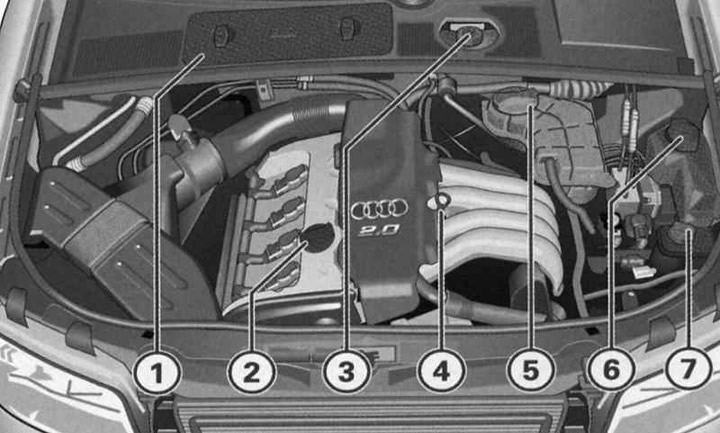
- 1 - Battery (under the lid)
- 2 — Engine oil filler hole
- 3 — Brake fluid reservoir
- 4 - Engine oil dipstick (orange)
- 5 — Cooling system expansion tank
- 6 — Windscreen washer reservoir
- 7 — Power steering fluid reservoir (green lid)
View under the hood of a 6-cylinder petrol engine
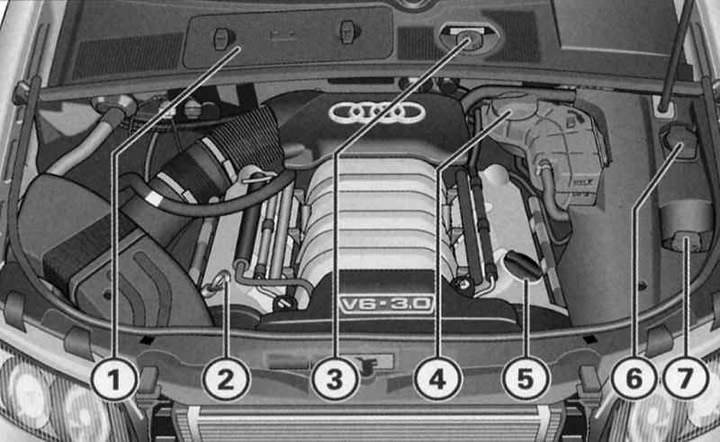
- 1 - Battery (under the lid)
- 2 — Engine oil filler hole
- 3 — Brake fluid reservoir
- 4 - Engine oil dipstick (orange)
- 5 — Cooling system expansion tank
- 6 — Windscreen washer reservoir
- 7 — Power steering fluid reservoir (green lid)
View under the hood of a 4-cylinder diesel engine
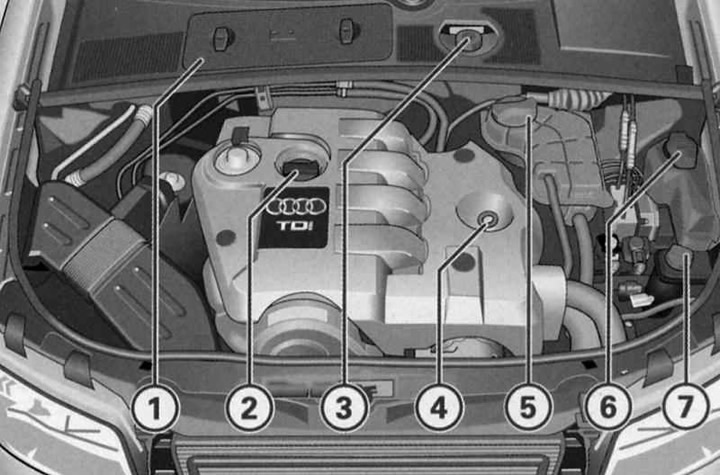
- 1 - Battery (under the lid)
- 2 — Engine oil filler hole
- 3 — Brake fluid reservoir
- 4 - Engine oil dipstick (orange)
- 5 — Cooling system expansion tank
- 6 — Windscreen washer reservoir
- 7 — Power steering fluid reservoir (green lid)
View under the hood of a 6-cylinder diesel engine
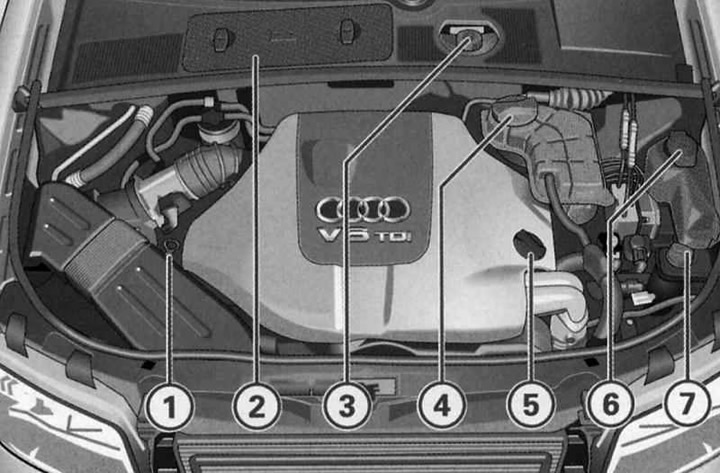
- 1 - Battery (under the lid)
- 2 — Engine oil filler hole
- 3 — Brake fluid reservoir
- 4 - Engine oil dipstick (orange)
- 5 — Cooling system expansion tank
- 6 — Windscreen washer reservoir
- 7 — Power steering fluid reservoir (green lid)
Warning: To avoid serious functional problems, be careful not to mix up operating fluids when topping up different systems!
Warning: Regular inspection of the underbody of the vehicle helps to detect leaks in a timely manner. If stains of oil or other operating fluids are found, have the vehicle checked at a workshop.
Closing the hood
1. Pull the hood down until the force of the gas-filled spring is completely overcome.
2. Close the hood with a light blow until it clicks into place; do not press additionally!
(The original source of the article can be found on the website: AUDImanual)