
Table of contents: Automatic headlights (sensor… ↓ Fog lights ↓ Function of illumination of the road… ↓ The function of illumination of the… ↓ The function of illumination of the… ↓ Instrument lighting ↓ With the ignition on ↓ With the lights on ↓ Adjusting the headlight angle ↓ Regulator positions ↓ Dynamic headlight range control ↓ Emergency light signaling ↓ Turn signal lever switch and the… ↓ Direction indicators ↓ High beam ↓ Light signal ↓ Parking light ↓ Front lamps and glove compartment… ↓ Accompanying lighting ↓ Rear individual lighting lights ↓ Trunk lighting ↓ Heated windshield ↓ Rear window heating ↓ Sun visors ↓ Sun protection curtain ↓ Wiper ↓ Headlight washers ↓ Replacing windshield wiper blades ↓ Rear view mirrors ↓
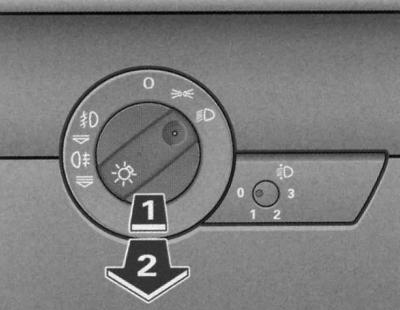
Instrument panel fragment: light switch
Turning on the parking lights
1. Turn the light switch to the position
Switching on low or high beam
1. Turn the light switch to the position
2. Push the high beam switch forward.
Turning off the lights
1. Turn the light switch to the O position.
The low beam lights up only when the ignition is on. When the engine is started and after the ignition is turned off, the lights automatically switch to the parking lights.
In some export versions, in addition to the parking lights, low beam headlights are also illuminated at reduced brightness.
Warning: When the key is removed from the ignition switch with the lights on and the driver's door open, a buzzer sounds.
When using the above-described signaling and lighting devices, please comply with regulatory requirements.
Automatic headlights (sensor controlled)
Depending on the external illumination, the headlights are switched on/off in the "Auto" switch position.
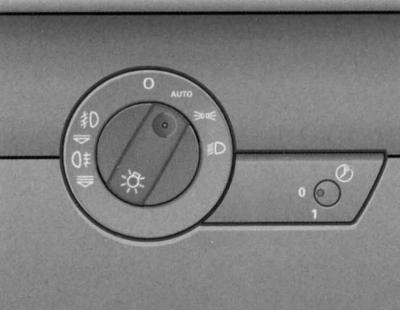
Light switch
- Headlight range control
- Switch for home/car driveway lighting
The sensor-controlled low beam has the same properties as headlights without the high beam function.
Turning on the headlights
1. Turn the light switch to the position AUTO.
Turning off the headlights
Turn the light switch to position O.
In position AUTO the corresponding symbol lights up in the light switch.
When the headlights are switched on automatically, the low beam, parking light, tail lights and license plate light come on.
The light switch can be used to manually turn on the parking lights, headlights, fog lights and rear fog lights.
Light sensors installed in the housing of the interior rearview mirror monitor the external illumination. In the event of a decrease in external illumination, (for example, when driving in a tunnel) below the value set by the manufacturer, the headlights are automatically turned on. When the external illumination subsequently increases, the low beams are automatically turned off.
Warning: If the automatic headlight function is activated, the low beam will turn off after the ignition is switched off, and the parking light will also turn off after the key is removed from the ignition switch.
Do not place stickers on the windshield in front of the sensor to avoid disruption/failure of the automatic headlight and automatic dimming mirror function.
Fog lights 
The light switch also turns on the fog lights.
Turning on the fog lights
1. Turn the light switch
2. First turn the light switch to the position
3. Then pull the light switch to the first detent position (1).
When the fog lights are on, the symbol next to the switch lights up
Rear fog lights 
The light switch also turns on the rear fog lights.
1. Turn the light switch
2. Turn the light switch first
3. Then pull the light switch to the second detent position (2). The rear fog lights come on.
When the rear fog lights are on, the symbols next to the switch light up
The electrical system of vehicles with a factory-fitted towing hitch provides for automatic switching off of the vehicle's rear fog lights when using a trailer.
Warning: To avoid dazzling drivers behind you, use your rear fog lights only in foggy conditions.
Function of illumination of the road to the house/to the car
In the dark, this function automatically illuminates the area around the vehicle.
Enabling the function
1. Press and release the button
2. Turn the button to the position 1.
3. Finally, press the button back to its original position.
Disabling the function
1. Press and release the button
2. Turn the button to the position 0.
3. Finally, press the button back to its original position.
The home/car road illumination function is controlled via light sensors located in the interior rearview mirror housing. The system is ready for operation when the following conditions are met:
- button
 is in position 1;
 - headlights and ignition are off;
- dark lighting conditions, sensors do not identify or only identify low brightness.
The function of illumination of the road to the house (Coming-home)
When the system is switched on and in the dark, the parking lights, rear lights and license plate lights come on immediately after the driver's door is opened.
If any door/trunk is opened, the fog lights remain on for approximately 4 minutes.
To illuminate the road, the fog lights remain on for approximately 30 seconds after the doors and trunk are closed.
You can change the factory-set switching duration if necessary. The maximum switching duration can be 60 seconds.
The function of illumination of the road to the car (Leaving-home)
When unlocking the car with the button
The fog lights are switched off when the driver's door is opened. If the driver's door is not opened, the fog lights are switched off when the vehicle is automatically locked again, see. Unlocking and locking the car. *
Warning: You can leave the home/car driveway light function on all the time. However, the system is controlled via light sensors and therefore only works in dark lighting conditions.
Especially when driving short distances in the dark, with this function constantly on, the load on the battery increases. In order to sufficiently charge the battery, long-distance trips are necessary from time to time.
When the home/car road lighting function is on, the fog lights turn off after the ignition is turned on.
When using the above-described lighting device, please comply with traffic regulations.
Instrument lighting
The brightness of the instruments, displays and centre console lighting can only be adjusted when the lights are on.
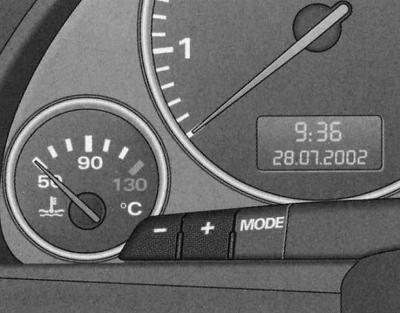
Instrument lighting
1. To increase the brightness, press the "+" button.
2. To decrease the brightness, press the "-" button.
With the ignition on
When the ignition is turned on, you can adjust the brightness of the background of the indicators (arrows) on the instrument panel.
With the lights on
In addition, when the lights are on, you can press the "+" and "-" buttons to adjust the brightness of the instruments, displays and the lighting of the center console.
Adjusting the headlight angle 
When the low beam is on, the range of the headlights can be adjusted to the actual load of the vehicle.
1. Unlock the button
2. To adjust the light cone, turn the button to the required position.
3. Finally, to avoid inadvertent displacement of the light cone, press the button back to its original position.
Regulator positions
The marked positions of the regulator approximately correspond to the following vehicle loading options:
- (0) - there is a driver and a front passenger in the car, the trunk is empty
- (1) - all seats are occupied, the trunk is empty
- (2) - all seats are occupied, the trunk is loaded
- (3) - the driver's seat is occupied, the trunk is loaded
Warning: To avoid blinding oncoming drivers, be sure to adjust the headlight angle according to the vehicle load!
Dynamic headlight range control
When the ignition is turned on and while the car is moving with xenon lights, the headlight angle is automatically adjusted in accordance with the load and driving mode (for example, when accelerating, braking).
A malfunction is indicated by a warning symbol in the vehicle's malfunction monitoring system*, see. Driver Information System (FIS).
Emergency light signaling
Hazard warning lights should draw the attention of other road users to your vehicle in dangerous situations.
Center console: Hazard warning light switch
To turn the hazard warning lights on or off, press the switch
When the hazard warning lights are on, all the direction indicators flash simultaneously. In addition, the indicator lamp in the switch flashes
In the event of an accident with airbag deployment, the hazard warning lights are switched on automatically.
Warning: The hazard warning lights are switched on, for example, in the following situations: if there is a traffic jam ahead and you are at the end,
- in case of malfunction or emergency,
- in case of towing or being towed.
Turn signal lever switch  and the high beam switch
The turn signal lever and high beam switch also operate the parking lights and the headlights.
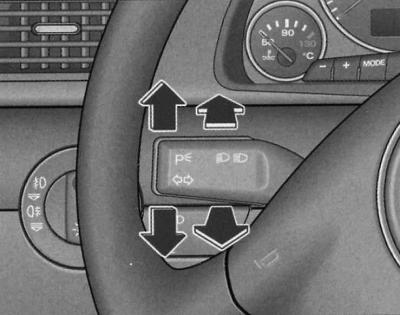
Turn signal lever and high beam switch
Functions of the turn signal and high beam switch lever:
Direction indicators 
1. To turn on the right turn signals, press the lever all the way up, and to turn on the left turn signals, press the lever all the way down.
2. Press the lever up or down to the point of resistance and hold it. When you hold the lever, the corresponding turn signals operate, for example when changing lanes.
3. When the lever is pressed to the point of resistance and then released, a three-time short flashing signal is given.
High beam 
1. To turn on the high beam, press the lever forward.
2. To turn off the high beam, move the lever back to its original position.
Light signal 
1. To turn on the light signal, pull the lever towards the steering wheel.
Parking light 
1. Turn off the ignition.
2. To turn on the right parking lights, move the lever up, and to turn on the left parking lights, move the lever down.
Warning: The direction indicators only work when the ignition is switched on. When the direction indicators are switched on, the corresponding indicator lamp in the instrument panel also flashes or, see. Controls and instruments.
Warning: After exiting the turn, the indicators turn off automatically.
Warning: The high beam can only be switched on when the low beam is on. In this case, the indicator lamp in the instrument panel lights up.
Warning: The light comes on when the lever is pulled and held, and when the lights are off. The high beam indicator light in the instrument panel comes on.
Warning: When the parking lights are on, the headlights and taillights on the corresponding side of the vehicle are on at reduced brightness. The parking lights only come on when the ignition is off.
Warning: Only use high beam or flashing lights if this will not cause dazzle to other road users.
Front lamps and glove compartment light
The lighting in the front part of the passenger compartment also includes individual lighting for the driver and front passenger.
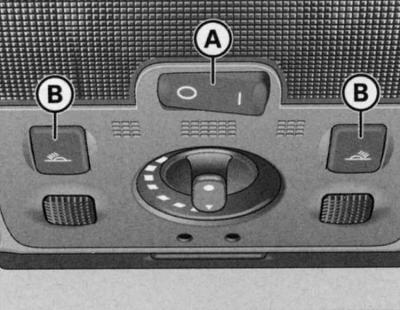
Ceiling detail: lighting in the front part of the cabin
Positions of the front ceiling light key switch (A):
Triggered by door switches
1. Set the switch (A) to the middle position.
Turning on the lampshade
1. Set the switch (A) to position I.
Turning off the lampshade
1. Set the switch (A) to position ABOUT.
Front individual lighting lights 
1. To turn on the right or left individual lighting lamp, press the corresponding switch (B).
Glove compartment lighting
The lighting of the glove compartment on the front passenger side is automatically switched on when the compartment is opened and the headlights or parking lights are on. The lighting is switched off when the compartment is closed.
If the light is in the door switch position, it turns on when the vehicle is unlocked or the doors are opened. The light also turns on when the key is removed from the ignition. The light goes out approximately 30 seconds after the doors are closed. When the ignition is turned on or the vehicle is locked, the light turns off.
To prevent the battery from discharging, the interior lighting automatically switches off if the door is left open for more than 10 minutes.
The brightness of the lights when turned on and off is automatically adjusted by a dimmer.
Accompanying lighting
Ambient lighting highlights important controls.
When the ignition is turned on, the lighting in the door handles is automatically switched on.
When the parking lights or headlights are switched on, the lighting above the windshield is also switched on. The light falls on the center console from above.
The accompanying lighting cannot be switched off manually.
Rear individual lighting lights
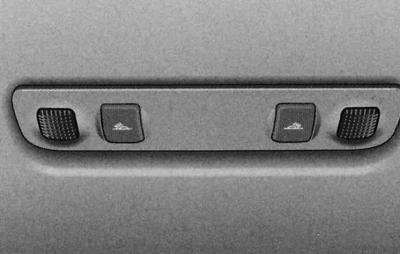
Ceiling fragment: rear individual lighting lights
Individual lighting lights are switched on and off using keys
Trunk lighting
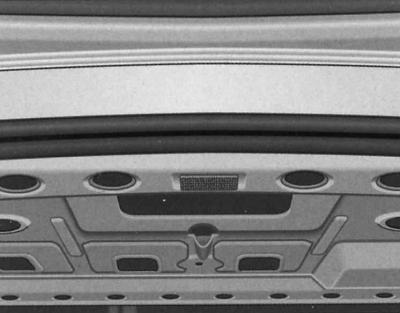
Detail of the trunk lid: trunk lighting
The light is located at the top of the trunk lid. Another light is installed on the inside of the rear wall.
The lighting turns on automatically when the trunk lid is opened. The lighting turns off automatically if the trunk remains open for more than 10 minutes.
Heated windshield 
Heated windshield frees the glass from moisture.
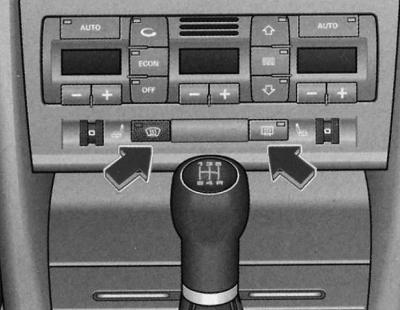
Windshield and rear window heating switch
To turn the heated windshield on or off, press the button
The windshield heating is only possible when the engine is running. When the heating is on, the control lamp in the switch lights up. In the automatic air conditioner mode auto of a car with a cold engine and at an outside temperature below +5°C, the windshield heating is turned on automatically. The duration of heating depends on the outside temperature and is a maximum of 6 minutes. In this case, the air conditioner must operate in the heating performance mode. In the specified mode
In the set ECON mode, the heated windshield is switched off.
Warning: The heated windshield will automatically switch off if the windshield is cracked by foreign objects (for example, being hit with a stone). The air conditioner is turned off to prevent the crack from getting bigger. Replace the glass.
Rear window heating 
The rear window heating keeps the rear window free of moisture.
To turn the rear window heating on or off, press the button
The heating works only when the ignition is on. While it is on, the control lamp in its switch lights up.
At outside temperatures above 0°C, the rear window heating switches off automatically after approximately 10 minutes.
When the rear window heating is switched on, the surface of the mirrors is heated* depending on the outside temperature.
Warning: Switch off the heated rear window once visibility through it has been restored. Reducing electrical power consumption helps reduce fuel consumption, see. Features of operation and auxiliary systems.
Sun visors
Sun visors help improve driving safety.
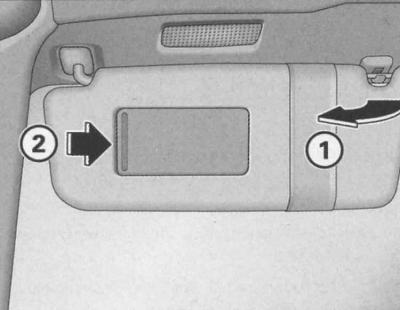
Sun visor
The sun visors (1) for the driver and front passenger can be released from their clips and folded away towards the doors.
Sun visors are equipped with a cosmetic mirror with a cover. Mirror illumination* (lantern in the ceiling) turns on automatically when the cover (2) is moved and turns off when it is returned to its original position. In addition, the lighting also turns off when the sun visor is closed.
Sun protection curtain
The rear door windows and the rear window are equipped with a sunshade.
Sun protection curtain (rear doors)
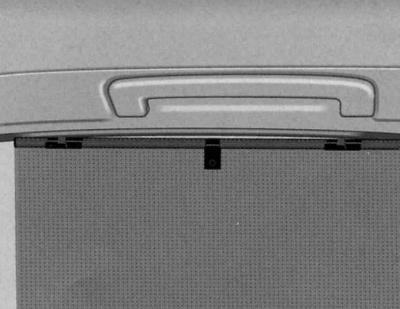
Rear door sunshade raised
1. Pull out the curtain and secure it to the hooks on the top of the door frame.
Sun protection curtain (rear window)
Rear window electric blind button
1. To lower or raise the rear window power sunshade, press the rear window power sunshade button.
Having reached the extreme upper or lower position, the curtain automatically switches off. During the movement of the curtain up or down, you can change its direction of movement by pressing the key. If you turn off the ignition while the curtain is raising or lowering, it will not stop immediately, but only after reaching the extreme position.
Warning: If the curtain is switched on repeatedly without proper pauses, the overload protection provided in its drive is triggered. In this case, subsequent switching on is possible only after a certain period of time has passed.
Since the curtain material loses its elasticity in the cold, its drive is switched off at a temperature in the cabin of -5°C. In this case, the curtain switch can only be used after this threshold value is exceeded.
Wiper 
The windshield wiper handle turns on the windshield wiper, as well as the automatic windshield wiper and washer mode.
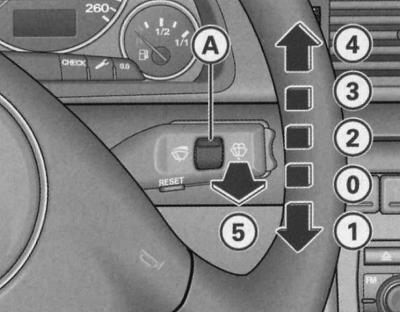
Windscreen wiper control handle positions
Short-term mode
1. To briefly switch on the windshield wiper, press the handle down to position (1).
Interval mode 
1. Move the handle up to the locked position (2).
2. The regulator (A) changes the duration of the wiper activation intervals.
Slow mode
1. Move the handle up to the locked position (3).
Fast track mode
1. Move the handle up to the locked position (4).
Automatic operation of windshield wiper and windshield washer
1. Pull the handle to position (5).
2. Release the handle. The windshield washer turns off and the wipers continue to operate for approximately 4 seconds.
Shutdown
1. Set the handle to the original position (0).
The windscreen wiper and washer system operates only when the ignition is on.
A few seconds after the windscreen wiper is switched off, the blades automatically operate again.
The duration of the intervals also depends on the speed of the vehicle.
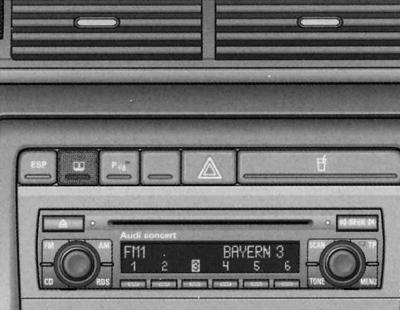
The windshield washer jets are heated when the ignition is on.
To clean the windshield with the lights on, you only need to pull the windshield wiper handle briefly. Otherwise, if you pull the handle longer, the headlight washer* will also be activated, which will result in the windshield washer fluid in the reservoir being wasted.
Warning: In frosty weather, before turning on the windshield wiper for the first time, check that the brushes are not frozen! Otherwise, you can damage not only the brushes, but also the windshield wiper motor!
Warning: Before long journeys, make sure the windscreen washer reservoir is filled, see Chapter Routine care and maintenance.
Headlight washers
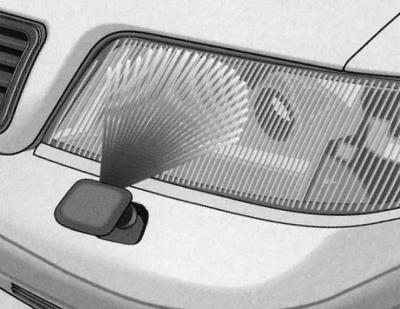
Operating position of the headlight washer nozzle
With the light on, pull the handle to position (5) (joint operation of the windshield wiper and windshield washer in automatic mode) and hold the handle in this position for more than 1 second.
When operating, the headlight washer jets are pushed outward by the pressure of water.
Regularly, for example when refueling, remove any stubborn dirt from the headlights (insect marks).
To maintain the system's functionality in winter conditions, clear the washer jet sockets of snow and remove ice from there using an aerosol de-icer.
Replacing windshield wiper blades
Reliable operation of windshield wipers is essential for good visibility.
Removal the brush
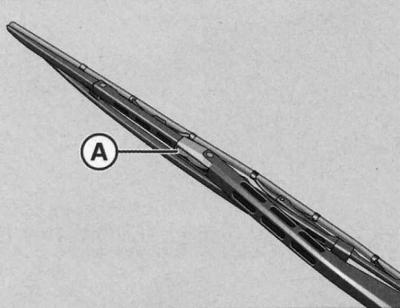
1. Move the wiper arm away from the glass.
2. Press the button (A).
3. Remove the brush.
Installing the driver's brush
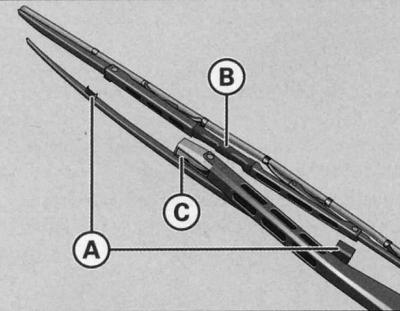
Brush mount
1. Position the wiper blade in holders (A) and (B).
2. To fix the brush on the lever, press the button (C).
3. Finally, check that the brush is attached correctly.
Installing the front passenger wiper blade
1. Position the wiper blade in position (B).
2. To fix the brush on the lever, press the button (C).
3. Finally, check that the brush is attached correctly.
Rear view mirrors
Manual dimming interior mirror
Normal position
1. Pull the lever located at the bottom of the mirror forward.
Darkening position
1. Pull the lever located at the bottom of the mirror back.
Auto-dimming interior mirror
The automatic dimming function can be turned on and off as needed.
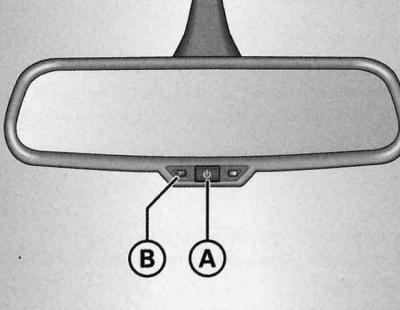
Dimmable interior mirror: indicator lamp and on/off button
Turn off the dimming function
1. Press the key (A). The indicator lamp (B) goes out.
Enabling the dimming function
1. Press the key (A). The indicator lamp (B) lights up.
Dimming function
The automatic dimming function is activated each time the ignition is turned on. A green indicator lamp lights up in the mirror housing.
When the dimming function is on, the interior mirror automatically dims depending on the amount of light falling on it. Also, when the function is on, the mirror does not dim in the following cases:
- when the interior lighting is turned on;
- when reverse gear is engaged.
Automatic headlight sensors*
When the light switch is in the AUTO position, the low beam is automatically switched on and off depending on the external light level using sensors installed in the mirror housing.
Warning: If the interior rearview mirror dimming function is turned off, the automatic dimming function of the exterior mirrors is also turned off.
The automatic dimming function of the mirrors can only be guaranteed when the rear window sunblind* is retracted and when the light falling on the interior mirror is not obstructed.
Do not place stickers on the windshield in front of the sensor to avoid disruption/failure of the automatic headlight and automatic dimming mirror function.
Exterior mirrors
The position of the outside mirrors is electrically adjustable.
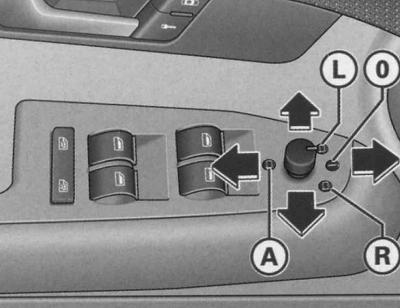
Armrest fragment: multi-position switch
Installation of exterior mirrors
1. Rotate the multi-position switch (button) to switch to the left outside mirror (position (L)) or the right outside mirror (position (R))
2. Press the button in the directions indicated by the arrows to adjust the reflective surface of the outside mirrors to provide sufficient rear visibility.
Folding both mirrors*
1. Turn the button to position (A).
It is recommended to fold* the exterior mirrors, for example, to save them when parking or in tight spaces.
Heated mirrors*
The reflective surface of the outside mirrors is heated when the ignition is on, depending on the outside temperature.
Automatic tilting of the front passenger mirror towards the road surface*
When the electric drive is switched to the front passenger side mirror (position (R)) and reverse gear is engaged, the reflective surface of the mirror is slightly tilted downwards. This ensures visibility of the curbstone when parking.
The mirror returns to its original position after disengaging reverse gear and moving the vehicle forward at a speed of more than 15 km/h or when switching the electric drive to the driver's mirror (L) or switching to neutral position (D).
Memory device for the position of the outside mirrors*
When programming the driver's seat position in vehicles with a driver's seat memory, the specified position of the exterior mirrors is also automatically programmed, see. Seats and niches.
Warning: Convex and spherical* mirrors increase the field of view. However, they reduce the image of objects. Therefore, such mirrors are only conditionally suitable for assessing the distance to vehicles moving behind.
When the mirror is displaced as a result of external forces (for example, a blow during maneuvering) perform full electrical folding of the mirrors. Never set the mirrors to their original position by hand, as this may adversely affect their operation.
Warning: If the electric drive fails, grasp the edge of the mirror with your hand and set it by pressing on the edge of the reflective surface.
Automatically dimming exterior mirrors
The exterior mirrors dim automatically together with the interior mirror. When the ignition is on, the mirrors dim automatically depending on the amount of light falling on them (for example, the light from behind the headlights).
When the interior lighting or reverse gear is turned on, the mirrors return to their original position (no darkening).
Warning: When the interior rearview mirror dimming function is activated, the automatic dimming function of the exterior mirrors is also deactivated.
The automatic dimming function of the mirror can only be guaranteed when the rear window sunblind* is retracted and when the light falling on the interior mirror is not obstructed.