
Table of contents: Turning the light on and off ↓ Fog lights ↓ Rear fog light ↓ Instrument lighting ↓ Adjusting the headlight angle ↓ Dynamic headlight leveling… ↓ Emergency light signaling ↓ Lever switch for direction… ↓
Turning the light on and off
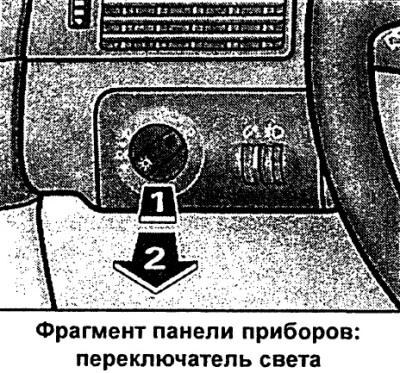
Turning on the parking lights
- Turn the light switch to the position.
Switching on low or high beam
- Turn the light switch to the position.
- Press the high beam switch forward.
Turning off the lights
- Turn the light switch to the position.
The low beam lights up only when the ignition is on. When starting the engine and after turning off the ignition, the lights automatically switch to the parking lights.
On right-hand drive vehicles, the switch locations are partly different from left-hand drive vehicles. However, the symbols on the switches correspond to those on a left-hand drive vehicle.
In some export versions, in addition to the parking lights, low beam headlights are also illuminated at reduced brightness.
Note
- After removing the key from the ignition switch with the lights on and the driver's door open, a buzzer will sound.
- When using the above-described signaling and lighting devices, comply with regulatory requirements.
Fog lights
The light switch also turns on the fog lights.
Turning on the fog lights
- Turn the light switch without touching the symbol.
- First turn the light switch to position.
- Then pull the light switch to the first detent position 1.
When the fog lights are on, the symbol next to the switch lights up.
Rear fog light
The light switch also turns on the rear fog light.
- Turn the light switch f without moving it to the symbol.
- First turn the light switch to position. Then pull the light switch out to the second fixed position 2. The rear fog light turns on.
When the rear fog light is on, the symbols next to the switch light up.
The headlight is mounted on the left side of the trunk lid.
The electrical system of vehicles with a factory-fitted towing hitch provides for automatic switching off of the vehicle's rear fog light when using a trailer.
Caution: To avoid blinding drivers behind you, turn on the rear fog light only when visibility is poor (for example, in Germany when visibility is less than 50m).
Instrument lighting
It is possible to adjust the brightness of the instruments, displays and lighting of the central console.
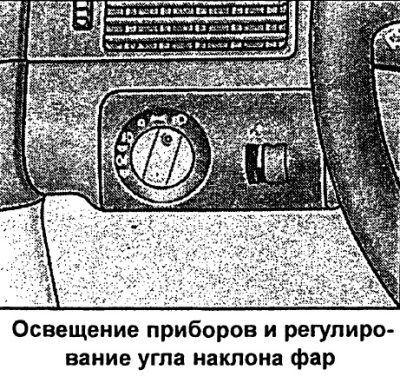
The brightness of the instrument background is adjusted using the left knurled handle.
A phototransistor mounted in the instrument cluster controls the illumination of the instrument cluster needles. In addition, when the light is on, the lighting of the center console and instruments is automatically adjusted (arrows and scales) according to the brightness of the surrounding background. In addition, the brightness of the lighting can also be adjusted by the driver, as follows:
With the ignition on
When the ignition is turned on, the brightness of the instrument cluster display indicators can be adjusted by turning the knurled handle.
With the lights on
In addition, when the lights are on, you can turn the knurled knob to adjust the brightness of the instruments, displays and the lighting of the centre console.
Adjusting the headlight angle
When the low beam is on, the range of the headlights can be adjusted to the actual load of the vehicle.
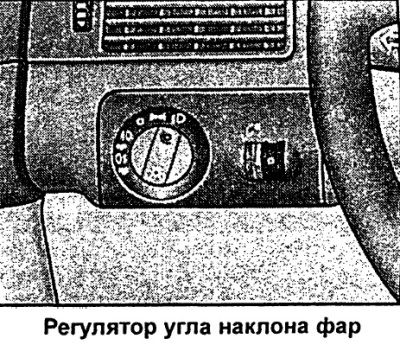
Set the right knurled go handle to one of the following positions:
Regulator positions
The marked positions of the regulator approximately correspond to the following vehicle loading options:
0 - there is a driver and a front passenger in the car, the trunk is empty;
1 - all seats are occupied, trunk is empty;
2 - all seats are occupied, the trunk is loaded;
3 - the driver's seat is occupied, the trunk is loaded.
Caution. To avoid blinding oncoming drivers, it is necessary to adjust the headlight angle accordingly, especially when the vehicle is heavily loaded!
Dynamic headlight leveling adjustment for xenon vehicles
When the ignition is turned on and while the car is moving with xenon lights, the headlight angle is automatically adjusted in accordance with the load and driving mode (for example, when accelerating, braking).
A malfunction is indicated by a signal symbol in the vehicle's malfunction monitoring system.
Emergency light signaling
Hazard warning lights should draw the attention of other road users to your vehicle in dangerous situations.
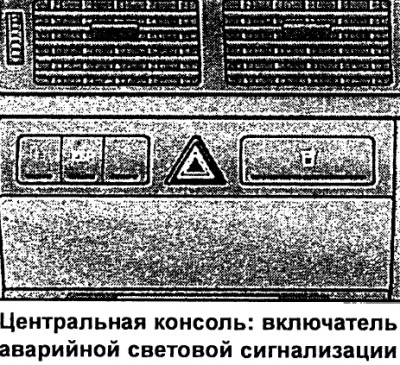
To turn the hazard warning lights on or off, press the switch.
When the hazard warning lights are switched on, all direction indicator lights flash simultaneously. In addition, the indicator light in the switch flashes and the direction indicator arrows in the instrument cluster flash. The alarm also operates when the ignition is switched off.
In the event of an accident with airbag deployment, the hazard warning lights are switched on automatically.
Note: The hazard warning lights are switched on, for example, in the following situations:
- if there is a traffic jam ahead and you are at the end,
- in case of malfunction or emergency,
- in case of towing or being towed.
Lever switch for direction indicators and high beam switch
The turn signal lever and high beam switch also operate the parking lights and the headlights.

Functions of the turn signal and high beam switch lever:
Direction indicators
- To turn on the right turn signals, press the lever all the way up, and to turn on the left turn signals, press the lever all the way down.
- When the lever is pressed up or down to the point of resistance and then released, only a short flashing signal is emitted, for example when changing lanes.
High beam
- To turn on the high beam, press the lever forward.
- To turn off the high beam, move the lever back to its original position.
Light signal
- To turn on the light signal, pull the lever towards the steering wheel.
Parking light
- Turn off the ignition.
- To turn on the right parking lights, move the lever up, and to turn on the left parking lights, move the lever down.
Notes on the function
- The direction indicators only work when the ignition is switched on. When the direction indicators are switched on, the corresponding indicator lamp in the instrument cluster also flashes.
- After exiting the turn, the indicators turn off automatically.
- The high beam can only be switched on when the low beam is on. In this case, the indicator lamp in the instrument cluster lights up.
- The light signal lights up when the lever is pulled and held - also when the lights are off. At the same time, the high beam indicator light comes on in the instrument cluster.
- When the parking lights are on, the headlights and taillights of the corresponding side of the vehicle are lit at reduced brightness. The parking lights are lit only when the ignition is off.
[Text provided by the online resource AUDIMANUAL.ru]