Repair Chevrolet Repair Toyota Repair Honda Repair AvtoVAZ Repair Mercedes-Benz Repair BMW Repair Opel
Home  |  Contacts  |  Sitemap  |    
English Русский
Български
Беларускі
Український
Српски
Hrvatski
Română
Polski
Slovenský
Magyar
AudiManual.ru


  • AUDI 80
  • AUDI 100
  • AUDI A3
  • AUDI A4
  • AUDI A6
  • AUDI A8
  • AUDI Q
  • OTHER
  • ARTICLES
C5 Allroad (1999-2005) C5 (1997-2004) C4 (1994-1997)

Lift and slide roof panel (Audi A6 C5)

  • Home
  • Audi A6
  • C5 (1997-2004)
  • General information
  • User manual
  • Lift and slide roof panel
            0
Table of contents: Move/lift ↓ Closing ↓ Lift and slide roof panel with solar… ↓
Lift and slide roof panel


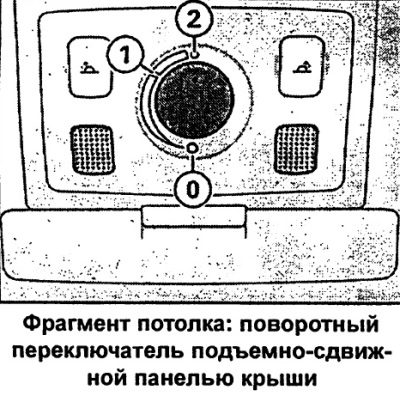
The sliding/lifting roof panel is controlled by a rotary switch. The switch can be set to several fixed positions to slide/retract the panel. The switch only works when the ignition is on. The panel can only be raised when the switch is in position 1.

The sliding/tilting roof panel can be opened and closed for ten minutes after the ignition is switched off.

However, the rotary switch is immediately disengaged after opening one of the front doors.

Move/lift


Comfortable position
  • Turn the switch to position 1 until you feel resistance and the switch locks.

Complete retraction
  • Turn the switch to position 2.

Rise
  • To fully raise the roof panel, press and release the switch when it is in the initial position 0. By pressing the switch longer, the panel can be set to any position.

The comfortable roof position is characterized by less wind noise compared to a fully open roof.

When the roof panel is pulled back, the sunshade opens automatically. When the roof panel is closed, the sunshade can also be closed manually.


It is recommended to close the sunshade when the car is parked in the sun. When the car is parked or in case of sudden rain (with the sun blind closed) don't forget to close the sliding roof panel.

Closing


Closing the sliding panel
  • To close the roof panel, turn the switch to position 0.

Closing the lifting panel
  • Pull the switch and hold it until the lift panel reaches the desired position.
  • By briefly pulling the switch, the roof panel closes automatically. By briefly pressing the switch again, the panel can be stopped in any position.

Protective closure

The sliding roof panel has overload protection. If it cannot be closed in normal mode, it can be closed by continuously pulling the rotary switch. The switch must be in position 0.

Attention. Inattentive or uncontrolled closing of the lift-and-slide panel is fraught with traumatic consequences! Therefore, when leaving the car, always remove the ignition key from the lock.


Comfortable locking

The open sliding and lifting roof panel can also be closed from the outside.
  • Keep the key inserted into the driver's door lock in the lock position or press the lock button on the radio remote control until the sliding/tilting roof panel closes.

Lift and slide roof panel with solar battery


The solar battery elements supply power to the air conditioner in fan mode.

The roof panel control is as described above.

The interior trim is rigidly connected to the solar roof panel and therefore cannot be moved separately.

Emergency closing

In an emergency, the sliding roof panel can be closed mechanically.


In an emergency, the sliding roof panel can be closed mechanically.


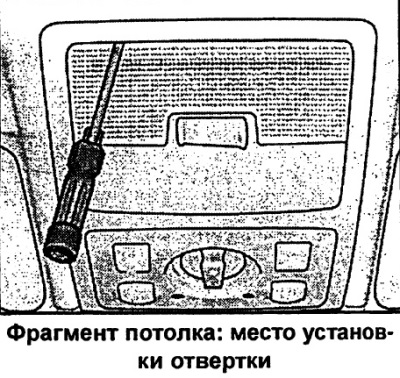
To access the servomotor of the sliding roof panel, remove the lamp (glass and body) as follows:
  • Carefully insert the flat side of the included screwdriver into the back of the lamp shade.
  • Carefully pry and separate the lampshade glass downwards with a screwdriver.
  • Place the screwdriver with the flat side also at the back side into the gap between the lamp housing and the frame.
  • Carefully separate the housing.
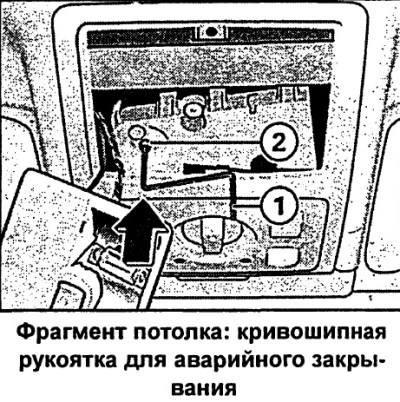
  • Take the crank handle located on the inside of the fuse cover.
  • Insert crank handle 1 until it stops in internal hexagon 2, holding it in place.
  • Close the roof panel by turning the crank handle.
  • After this, first install the lamp housing in place, and then the glass.
  • Troubleshooting at Audi facility.

Troubleshooting at Audi facility.
The article was checked by auto expert Alexey Ivanov
This article is available at russian, bulgarian, belarusian, ukrainian, serbian, croatian, romanian, polish, slovak, hungarian

Share information:
Previous articles
Audi A6 C5: User manual
Next articles

Electric windows
Control lamps
Instruments and control lamps
Controls and instruments
Light and visibility
Interior lighting
Visibility
Windscreen wiper


Similar articles on other Audi car models:
Roof rack Audi 80 B3 (1986-1991, petrol)
Replacing the roof panel of the car body Audi 100 C3 (1982-1990, petrol)
Lift and slide roof panel Audi A3 Type 8L (1996-2003)
Removal and installation the sliding roof panel trim Audi A4 B6 (2000-2006)
Roof mounted interior rear view mirror Audi A8 D2 (1994-2002)
Panoramic roof panel Audi Q5 Type 8R (2008-2017)
Removal and installation a lift-and-slide sunroof Audi A2 (1999-2005)
Link to this page in different formats


Visitor comments

No comments yet


How much will 40 + 41 =


A6(C5 AR, 1999-2005) 
  • General information
  • User manual
  • Maintenance
  • Troubleshooting
  • Power unit
  • V6 petrol engines
  • V8 petrol engines
  • Diesel engines
  • Cooling and heating system
  • Injection system (gasoline)
  • Fuel system (diesel)
  • Supply system
  • Exhaust system
  • Ignition system
  • Transmission
  • Clutch
  • Mechanical gearbox
  • Automatic gearbox
  • Chassis
  • Brake system
  • Car suspension
  • Steering
  • Body
  • Body elements
  • Doors, locks and windows
  • Electrical equipment
  • Equipment and devices
  • Power devices
  • Electrical circuits
  • Schemes (petrol engine 2.7 l)
  • Schemes (petrol engine 4.2 l)
  • Schemes (diesel engine 2.5 l)
 
A6(C5, 1997-2004) 
  • General information
  • User manual
  • Maintenance
  • Power unit
  • Engine repair
  • Cooling system
  • Fuel system
  • Engine management
  • Fuel system (diesel)
  • Exhaust system
  • Transmission
  • Clutch
  • Car gearbox
  • Chassis
  • Front suspension
  • Rear suspension
  • Steering
  • Wheels and tires
  • Brake system
  • Body
  • Exterior
  • Interior
  • Electrical equipment
  • Air conditioner
  • Equipment and devices
  • Electrical circuits
 
A6(C4, 1994-1997) 
  • General information
  • User manual
  • Maintenance (gasoline)
  • Maintenance (Diesel)
  • Gasoline engines
  • 4 cylinder engines
  • 5 cylinder engines
  • 6 cylinder engines
  • Diesel engines
  • 4 cylinder engines
  • 5 cylinder engines
  • Engine repair
  • Removal and reassembly
  • Cooling system
  • Single point injection system
  • Multipoint injection system
  • MPI/MPFI injection system
  • Fuel system (diesel)
  • Exhaust system
  • Ignition system
  • Transmission
  • Clutch
  • Manual transmission
  • Automatic transmission
  • Drive shafts
  • Chassis
  • Brake system
  • Front suspension
  • Rear suspension
  • Steering
  • Body
  • Exterior (external elements)
  • Interior (internal elements)
  • Electrical equipment
  • Power devices
  • Lighting and appliances
  • Electrical circuits
 
AudiManual.ru © 2017-2026 · Mobile version · Feedback · Sitemap: EN BG BY UA RS HR RO PL SK HU · Site search · News and articles
80 B2 · 80 B3 petrol · 80 B3 · 80 B4 · 100 C3 diesel · 100 C3 petrol · 100 C3 · 100 C4 petrol · 100 C4 · A3 Type 8L · A4 B5 petrol · A4 B5 · A4 B6 petrol · A4 B6 · A4 B7 · A4 B8 · A6 C4 · A6 C5 · A6 C5 Allroad · A8 D2 · Q5 Type 8R · Q7 Typ 4L · Audi A2 ·
This site uses cookies 🍪. Click the button to accept this fact.