



Table of contents: Air supply nozzles ↓ Governing bodies ↓ Defrosting glass ↓ Quick warming up of the car interior ↓
Air supply nozzles
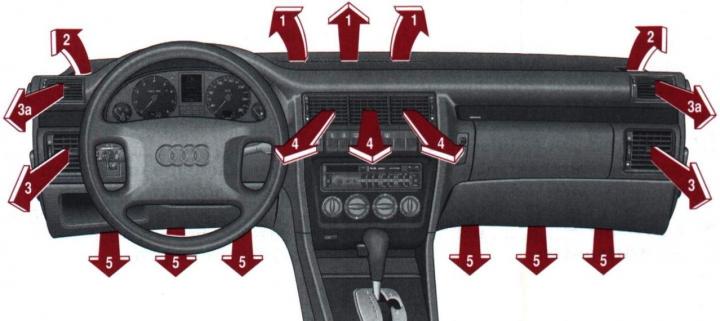
Fig. 1–50. Direction of air flow supplied to the vehicle interior: 1 – to the bottom of the windshield; 2 – to the windshield and side windows; 3, 3a – to the side windows; 4 – to the upper area of the car interior; 5 - to the feet
The nozzles are used to supply heated or cold air to the passenger compartment (Fig. 1–50, 1–51).
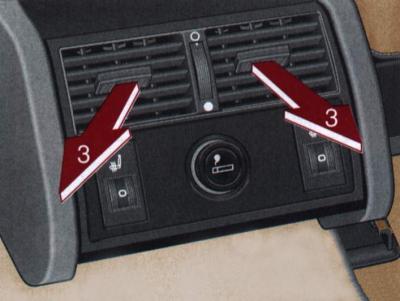
Fig. 1–51. Direction of air flows (3) supplied to the feet of rear passengers
The distribution of the supplied air to the nozzles is regulated by the position of the handle WITH (Fig. 1–52).
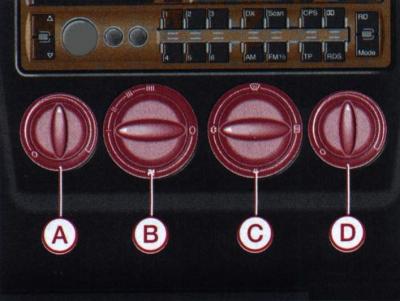
Fig. 1–52. Heater control panel: A – handle for selecting the air temperature for heating the driver; B – fan stage switch; C – handle for distributing air supply to nozzles; D – Front passenger temperature selection knob
The nozzles 1 (Fig. 1–50) keep the lower part of the windshield free of fog.
Nozzles 2 can be opened individually or closed using the valves located on the sides.
Nozzles 3 and 4 can be opened individually or closed using the swivel wheels located on the side.
The direction of the flow coming from the nozzles can be changed in the horizontal and vertical planes.
The direction of flow of the upper nozzles (3a) can only be changed in the horizontal plane.
The nozzles for supplying air to the feet are located under the front seats and are controlled together with nozzles 5.
Governing bodies
A – handle for selecting the air temperature for heating the driver. The temperature increases smoothly when you turn the knob clockwise.
B – fan switch.
In position 0 the fan is off.
C – handle for distributing air supply to nozzles.
 Air supply to the legs is carried out through nozzles 5.
To increase air flow, close ventilation nozzles 3 and 4.
 Air supply to the windshield, side windows and feet is carried out through ventilation nozzles 3, 4 and 5.
 Air supply to the windshield and side windows is carried out through ventilation nozzles 1 and 2.
 Air supply from the instrument panel ventilation grilles is carried out through ventilation grilles 3 and 4 of the instrument panel. Ventilation nozzles 1, 2 and 5 are closed.
D – air temperature selection knob for heating the front passenger.
The temperature increases smoothly when you turn the knob clockwise.
Defrosting glass
- Set the switch handle B to position III.
- Turn switch knobs A and D clockwise until they stop.
- Set the switch handle c to position
 .
.
Removal condensation from windshield and side windows it must be carried out in conditions of high air humidity, such as rain.
- Set the switch handle B to position III or IIII.
- Turn switch knobs A and D clockwise.
- Set the switch handle c to position
 .
. - Close the ventilation grilles 4 of the instrument panel.
Quick warming up of the car interior
- Set the switch handle B to position III.
- Set the switch handle c to position
 .
. - Turn switch knobs A and D clockwise until they stop.
- Open the ventilation grilles 3 of the instrument panel, close the ventilation grilles 4.
Comfortable heating of the car interior. After defrosting the windows and warming up the car interior, use the comfortable heating mode for the car interior.
- Set the switch handle B to position II or III.
- Turn the switch knob A and D clockwise until the desired temperature is obtained.
- Set the switch handle c to position
 .
. - Set the ventilation grilles 3 and 4 of the instrument panel to the desired position.
Ventilation of the car interior. In this mode, fresh air is supplied to the passenger compartment through ventilation grilles 3 and 4.
- Set the switch handle B to position IIII.
- Turn the switch knobs A and D fully counterclockwise.
- Set the switch handle c to position
 .
. - Open ventilation grilles 3 and 4 on the instrument panel.
- In order for the heating and ventilation of the passenger compartment to work reliably, the fresh air intake opening located in front of the windshield must be cleared of ice, snow and leaves.
- Only handles A, C and D can be set to any intermediate position.
- The heating capacity of the heating system depends on the temperature of the coolant in the engine cooling system, so the air in the car's interior heats up most quickly when the engine is warmed up to operating temperature.
- Air is removed from the vehicle interior through the ventilation openings in the rear of the body - these should not be blocked.
The original publication in its entirety is posted on the website AudiManual.ru