



Table of contents: Control devices ↓ Service indicator ↓ Control lamps ↓ Malfunctions of primary importance… ↓ Minor faults (yellow pictograms) ↓ Operation of vehicles with manual… ↓ Operation of cars with automatic… ↓ Indicator ↓ Speeding warning ↓ Memorizing speed ↓ Malfunctions during vehicle operation ↓
Notes: The list of controls and instrumentation depends on the vehicle version or is installed to order.
The on-board navigation system installed by the manufacturer in vehicles comes with a user manual.
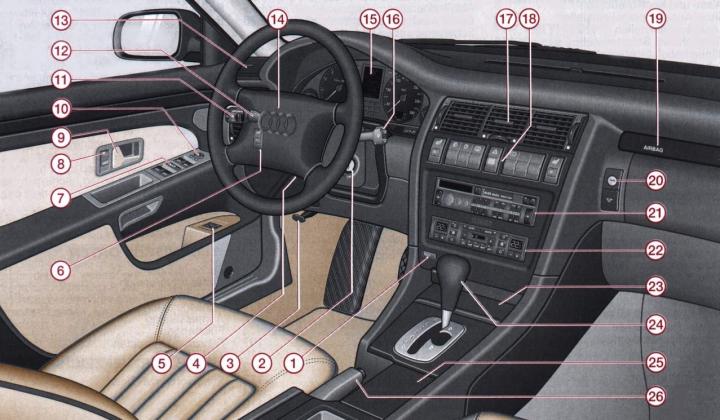
Fig. 1–34. Controls, instruments and equipment: 1 – Traction control system (ASR) switch; 2 – ignition switch; 3 – hood opening handle; 4 – adjustable steering column locking handle; 5 – Driver's seat memory button; 6 – headlight beam corrector; 7 – Electric window lift control switch; 8 – central locking control key; 9 – inner door lock handle; 10 – switch for adjusting the position of the outside mirror; 11 – steering column switch for direction indicators and headlights, cruise control; 12 – headlight switch; 13 – side ventilation nozzle; 14 – Driver airbag; 15 – instrument cluster; 16 – windshield wiper and washer switch, trip computer function switch; 17 – central ventilation nozzles and air conditioning; 18 – Switches for seat heating, fog lights, rear fog lights, rear window defroster, hazard warning lights, head restraint and sunroof movement; 19 – Front passenger airbag; 20 – glove box lock; 21 – radio and CD player; 22 – air conditioning control; 23 – cigarette lighter; 24 – selector lever; 25 – pocket; 26 – parking brake lever
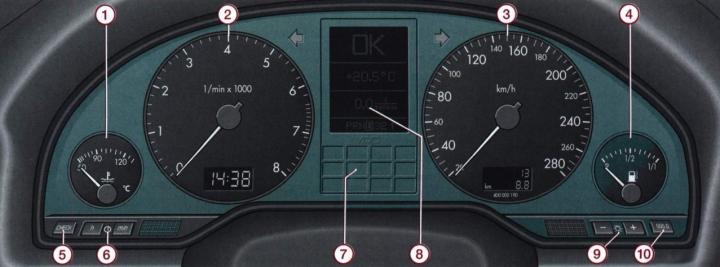
Fig. 1–35. Instrument cluster: 1 – coolant temperature indicator; 2 – tachometer equipped with an electronic clock with digital display; 3 – speedometer with trip meter display field with service indicator; 4 – fuel reserve indicator; 5 – "Check" button; 6 – clock setting button; 7 – control lamps; 8 – digital display of the "Check" system, outside temperature, trip computer and automatic transmission; 9 – buttons for adjusting the intensity of the instrument panel backlight; 10 – odometer reset key for one position (daily mileage counter) Note: The location of the control instruments varies depending on the vehicle model, engine type and transmission type.
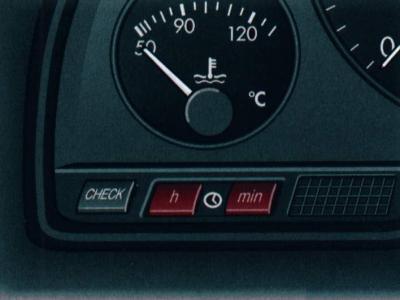
Fig. 1–36. Location of the "Check" buttons and digital clock settings
Control devices
1 – coolant temperature
 . The indicator works when the ignition is on. When the ignition is on, the indicator lamp flashes for a few seconds.
If the arrow is in the left area of the scale, avoid increasing the engine speed and load.
When the vehicle is moving under normal conditions, the arrow should be in the middle zone of the scale.
When the engine is under heavy load and the outside temperature is high, the needle may occasionally be in the right area of the scale. This should not cause alarm until the lamp starts flashing.
If the coolant overheating warning light starts to flash while driving, you should first check what temperature the coolant temperature gauge shows.
If the needle is in the normal operating temperature zone, add coolant to the cooling system as soon as possible.
If the arrow is in the right zone of the scale, the coolant temperature is too high. You need to stop the car, turn off the engine and determine the cause of the increase in coolant temperature.
2 – tachometer and digital clock. The tachometer needle should under no circumstances enter the red zone of the scale.
Shifting up in time saves fuel and reduces engine and transmission noise!
You should shift to a lower gear as late as possible, shortly before the engine starts to jerk.
During the break-in period, avoid running the engine at high crankshaft speed.
3 – speedometer with trip meter indication field (odometer) with service indicator. The upper counter shows the total distance traveled by the car, the lower one shows the daily mileage.
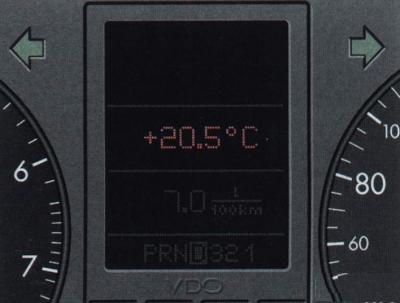
Fig. 1–37. Display of outside temperature
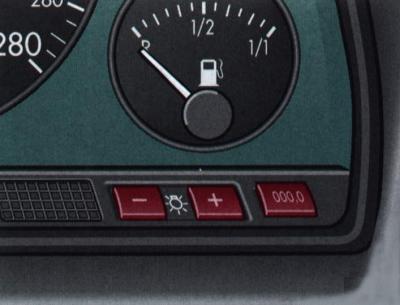
Fig. 1–38. Location of the instrument panel illumination intensity control buttons
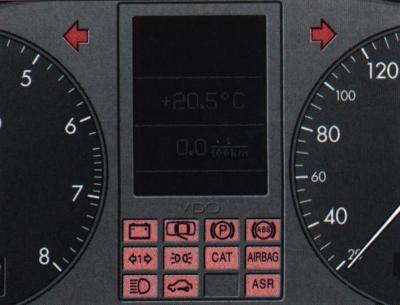
Fig. 1–39. Location of indicator lamps in the instrument cluster
Service indicator
After turning on the ignition, information about the required service appears in the indicator field in flashing mode for a few seconds.
If service is not required, the symbol appears in the display field In0, which goes out when the engine starts.
If it is time for service, a message will appear on the display field for 60 seconds after the engine is started, which should appear after 1000 km of travel or 10 days.
The following messages may be displayed:
- OEL - oil change service;
- l - main service;
- lI - additional service.
If there is an error, the indicator field will show dEF.
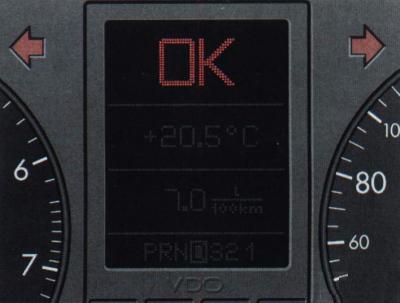
Fig. 1–40. Location of the OK indicator on the display, indicating that there are no faults in the Check system
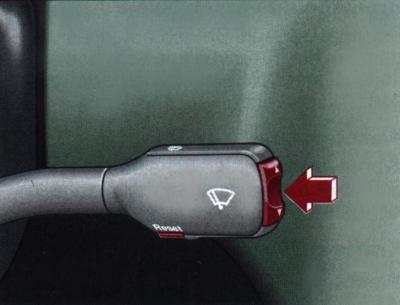
Fig. 1–41. Location of the function selection switch in the windshield wiper lever handle
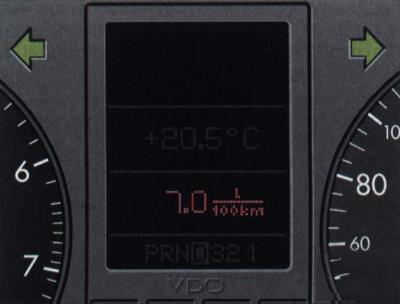
Fig. 1–42. Location of the on-board computer parameter indication display on the display
4 – fuel reserve indicator.
 The indicator works when the ignition is on.
The capacity of the car's fuel tank is approximately 80-90 liters.
If the indicator has reached the red reserve fuel zone and the warning lamp is on, it means there are still about 12 liters of fuel left.
5 – "Check" button. If you briefly press the "Check" button several times with the ignition on, the corresponding symbols appear. The check can be carried out with the engine running or at a speed of up to 5 km/h.
In the presence of serious violations (red symbol) it is not recommended to carry out further testing.
6 – button for setting the digital clock. Designed to set the time on the watch.
When setting the clock, press the left button h. If the button is held down for more than 5 seconds, the numbers change at an increased speed.
When setting the minutes, press the right button min. If the button is held down for more than 5 seconds, the numbers change at an increased speed.
After 15 seconds of releasing the buttons, the watch operates in normal mode.
7 – control lamps
8 – digital display. Indication of outside temperature. The outside temperature value appears on the display when the ignition is on, and on vehicles with an automatic transmission – after moving the selector lever.
If the display shows °F, which means that the outside air temperature is +5…–5°C, icing is possible.
9 – buttons for adjusting the intensity of the instrument panel backlight
 . By pressing the "+" and "–" buttons, you can adjust the intensity of the instrument panel illumination when the outside lighting is on.
The intensity of the instrument cluster lighting is adjusted automatically depending on the overall illumination.
If necessary, the display can be turned off by pressing the button Reset on-board computer and turn it on again by pressing the button again.
10 – odometer reset key (daily mileage counter). When you press the button 000,0 the daily odometer readings are set to 0.
Control lamps
The location of the indicator lights in the instrument cluster depends on the vehicle model and engine version.
 Direction indicator. The indicator lamp lights up with a flashing light when the left or right turn signal is turned on, synchronously with it. If one of the turn signal lamps burns out, the indicator lamp flashes at a double frequency (except when driving with a trailer).
 Battery discharge. The control lamp lights up when the ignition is turned on, and goes out after the engine starts. The generator is driven by a durable V-belt.
If the indicator light comes on while driving, you must stop, turn off the engine and check the condition of the V-belt.
If the belt is loose or broken, you cannot continue driving - the engine cooling system pump is not activated. Replace the belt if necessary.
If the indicator lamp lights up and the coolant pump drive belt is in good condition, you can continue driving to the nearest Volkswagen service centre.
To reduce battery drain, turn off all non-essential power consumers.
 Door open alarm. If the door is not closed, the indicator lamp flashes and goes out after the door is closed.
 Parking brake. When the parking brake is applied and the ignition is on, the indicator lamp lights up. It should go out when the parking brake is released.
 Anti-lock braking system (abs). The control lamp warns of a malfunction in the anti-lock braking system and the anti-skid system with braking of the slipping wheel.
The indicator lamp lights up for a few seconds after the ignition is turned on or when the engine is started and goes out after the automatic system operability check is completed.
If the indicator lamp does not light up within a few seconds after the ignition is turned on, does not go out, or lights up while driving, then the ABS is faulty.
If there is a malfunction in the system, the following is possible:
- if the anti-lock brake system indicator light comes on while driving, the vehicle's service brake system is functioning without the anti-lock brake system. You should contact a Volkswagen service center as soon as possible;
- if the anti-lock brake system warning light comes on together with the brake system warning light, it means that both systems are faulty.
Warning: If there are faults in the anti-lock braking system and the brake system, which are indicated by both warning lights, the rear wheels may lock prematurely when braking. In this case, contact a service center immediately.
The electronically controlled differential lock system (EDS) works together with ABS. A malfunction in the EDS is indicated by the ABS warning light coming on. Try to contact a service center as soon as possible.
 Direction indicator when driving with a trailer. The indicator lamp flashes together with the direction indicators on the vehicle and trailer. If one of the direction indicator lamps on the vehicle or trailer fails, the indicator lamp does not flash.
 External lighting. The indicator lamp lights up when the external lighting and ignition are turned on.
CAT – catalytic converter (only for cars with V8 engines). The indicator lamp flashes during functional testing after the ignition is turned on and goes out after the engine warms up.
If the indicator light comes on while driving, there is a risk of overheating of the catalytic converter due to engine malfunctions. It is necessary to stop the car and cool the engine.
AIRBAG – airbag system. After the ignition is switched on, the indicator lamp lights for approximately 3 seconds. On vehicles with the front passenger airbag deactivated, the indicator lamp flashes for approximately 12 seconds.
If the lamp does not go out or lights up while driving, the airbag system is faulty. Such a system should be checked immediately at a service center.
 High beam headlights. The indicator lamp lights up when the high beam headlights are on and when the light signal is on.
 Electronic anti-theft system. When the ignition is switched on, the ignition key code is automatically requested. The comparison of the data is confirmed by a short-term illumination of the control lamp. If an uncoded key is used, the control lamp starts to flash with short breaks – the car cannot be used.
ASR – anti-skid system with engine torque reduction. The indicator lamp comes on when the ignition is switched on and should go out after approximately 2 seconds. The lamp flashes when driving while the traction control system is activated. When the traction control system is switched off or if there is a malfunction in it, the indicator lamp lights constantly. Since the traction control system works together with the anti-lock brake system and the traction control system with braking of the slipping wheel, if there is a malfunction in the anti-lock braking system (ABS), the traction control system (ASR) indicator lamp also comes on.
AUTO–Check. The automatic control system, with the ignition on and while driving, constantly monitors the performance of certain functions and the condition of individual components of the vehicle.
A sound signal and a red or yellow light pictogram in the instrument cluster, depending on the severity of the malfunction or repair, indicate a malfunction or the need for repair or maintenance.
A minor fault is indicated only when the major fault has been corrected.
In addition, a message text appears on the display to confirm the red or yellow light icons.
The text of the message and the corresponding instructions for the driver are provided in one of five foreign languages: English, French, Italian, Spanish or Portuguese (depending on the country for which the car is produced).
Malfunctions of primary importance (red pictograms)
 Brake system malfunctions.
 Insufficient level or overheating of coolant in the cooling system.
 Emergency reduction of oil pressure in the lubrication system.
If a malfunction occurs in certain systems and devices, a pictogram appears after the ignition is turned on. At the same time, a corresponding triple sound signal is triggered.
Pictograms of primary importance warn of a danger, therefore you should stop, turn off the engine, correct the malfunction, and, if necessary, seek qualified technical assistance.
If several faults of primary importance occur at the same time, the icons appear one after another for approximately 2 seconds each. The icons flash until the fault is corrected.
Minor faults (yellow pictograms)
 Malfunction of brake light bulbs.
 The low beam or tail light bulb has burned out.
 The brake linings are worn to an unacceptable degree.
 Insufficient fluid level in the windshield washer reservoir.
 Minimum fuel level in the fuel tank.
 Battery voltage is too low or too high.
 Speeding warning.
When a yellow pictogram appears, one sound signal sounds. The appearance of pictograms means a warning. You should respond to them as quickly as possible. If there are several warnings, the pictograms appear one after another for about 2 seconds each.
Instructions for the driver. When the priority symbol flashes, the driver can display the text of the message on the display. For example: "SOFQRT MOTOR ADSTELLEN, OLSTAND PRUFEN" ("Turn off the engine, check the oil level").
To do this, you need to click on the button Check. The text message will switch 5 seconds after the button is released.
Odometer and digital clock. With the ignition on, you must press the button Check, while the odometer and digital clock will turn on for 15 s.
Operation of vehicles with manual transmission
After turning on the ignition, you must press the brake pedal.
If there are no faults, the symbol appears first "BREMSLICHT" ("brake light"), which should go out after pressing the brake pedal.
If verified by the system Check functions are normal, then the inscription appears for a few seconds OK.
If there are any faults, they are displayed after the ignition is turned on and a corresponding sound signal is given.
When priority 2 error occurs, symbols appear alternately "BREMSLICHT" ("brake light") and errors. After pressing the brake pedal, only the error symbol appears on the display.
If no message appears on the display OK, no error notification, no need to check the system Check.
Operation of cars with automatic transmission
After turning on the ignition in the selector lever position R and N an indication appears "BEIM EINLEGEN EINER FAHRSTUFE IM STAND FUSSBREMSE BETATIGEN" ("While moving the selector lever, press the brake pedal").
When moving the selector lever (positions R, D etc.) the instruction to the driver is cancelled.
Indicator
If verified by the system Check functions are normal, then the inscription appears for a few seconds OK.
If there is one or more faults, the driver's message disappears approximately 15 seconds after the engine is started and the fault symbols appear on the display.
Speeding warning
The speed that the car must not exceed is stored in the memory. If the speed exceeds the stored speed by 10 km/h, a signal sounds and a warning symbol appears on the display km/h.
The warning symbol goes out if the driving speed decreases to the set value and if the driving speed increases by 40 km/h for no more than 30 s.
Memorizing speed
Indicator Malfunctions of secondary importance blinking.
Press the button briefly Check at the moment when the speedometer shows the required speed. The speed recorded in the memory is saved until the next recording.
Malfunctions during vehicle operation
The automatic control system constantly monitors the performance of certain functions and the condition of individual components of the vehicle. Malfunctions in operation and the need for repairs are indicated by an audible signal and, depending on the severity of the malfunction, a symbol in the instrument cluster.
 Brake system. The symbol appears when the brake fluid level is insufficient. It is necessary to stop the car and check the brake fluid level.
If the level in the tank has dropped below the MIN mark, you should proceed to the nearest service center with extreme caution.
If the ABS malfunctions, the regulation of the braking force of the rear brake mechanisms is stopped, which causes the brake mechanisms to lock the rear wheels earlier.
Warnings: If the brake fluid level in the reservoir is too low, immediately find the nearest service center to check the service brake system. When driving to the service center, press the brake pedal harder when braking and take into account the possibility of an increase in the braking distance and pedal free travel.
If the brake fluid level is normal, the normal operation of the ABS may be disrupted. In this case, there is a risk of early locking of the rear wheels during braking. Under certain circumstances, this may lead to failure of the rear brake mechanisms.
It is necessary to immediately proceed with extreme caution to the nearest service center to eliminate the malfunction.
 Coolant temperature/coolant level. If the symbol lights up or flashes while driving, the coolant temperature may be too high or the coolant level may be too low.
You should stop, turn off the engine and check the coolant level, topping it up to normal if necessary.
If the coolant level is normal, the cooling system malfunction may be caused by a faulty fan. Check the fan fuse and replace it if necessary.
If the indicator light does not go out, and the coolant level is normal and the fan fuse is working, you should stop driving - qualified assistance is required.
If the cause is a faulty fan, provided that the coolant level is normal and the symbol on the display has disappeared, you can continue driving to the nearest Audi service center. In order to use the oncoming air flow to cool the coolant, if possible, do not allow the engine to idle and drive at low speed.
 Engine oil pressure. If the symbol appears while driving, you must stop, turn off the engine, check the engine oil level and, if necessary, bring it to normal.
If the symbol flashes despite the engine oil level being normal, you must not continue driving. Do not allow the engine to run even at idle speed – seek qualified assistance.
 Malfunction of brake system lamps (brake lights do not light). Brake lights that do not light or only flash may be the result of the following defects:
- the brake light bulbs burned out;
- unreliable contact of the lamp in the socket;
- the electrical circuit of the lamps is broken;
- the brake light switch is faulty.
 Malfunction of low beam and rear light bulbs. The violation may be caused by the following defects:
- the incandescent bulbs burned out;
- the contact of the lamp in the socket is unreliable;
- the electrical circuit of the lamps is broken.
 Excessive wear of brake linings. You should contact an Audi service center to check the condition of the brake linings.
Since the brake pad wear indicator only indicates wear on the front brake pads, it is recommended that you check the condition of the rear brake pads at the same time as replacing the front brake pads.
 Windscreen washer fluid. The symbol appears when the windshield washer fluid level in the reservoir is insufficient.
You should add windshield and headlight washer fluid.
 Minimum fuel supply. The car needs to be refueled.
 The battery voltage is too low or too high. You should contact an Audi service center to check the condition (and tension) poly V-belt, voltage regulator and battery.
 Speeding warning. If the set speed is exceeded, it is necessary to reduce the speed.