
Table of contents: Reading ↓ Installation ↓ Lift and slide roof hatch panel ↓ Remote control for closing the hatch ↓ Procedure in case of panel drive… ↓ Interior lighting and individual… ↓ Interior Lighting Control ↓ Front individual lights ↓ Rear individual light ↓ Lighting for storage box ↓
1 2 3 program number notification – clock button
Setting the time
Reading
Press the watch button briefly. The notification turns off after 10 seconds.
Installation
Press the clock button.
Set the exact time. Long press the clock button to change the clock display in fast mode.
Constant ventilation
Normal installation for summer
With the button pressed the device operates only with the help of a fresh air fan, the electric heating device does not turn on.
Switching on and off or pre-selecting ventilation occurs in the same way as for autonomous heating, as follows.
Autonomous heating
Normal installation for winter
Turning the heating on and off
To turn on press the instant heating button. A notification appears and the display lights up.
To turn off press the instant heating button. The notification and display go out.
After 60 minutes, the autonomous heating automatically switches off.
Programming and activating the on time
Three time values can be programmed, one of which is activated.
The time is set as follows.
Press the program selection button.
The following appears on the illuminated display for 10 s:
- program number;
- already programmed switch-on time or an empty field (–:– –) to set the time.
Set the switch-on time within 10 seconds by pressing the "forward/backward" button.
The switching time of the following program numbers can be programmed after pressing the program selection button. The number must be changed within 10 seconds.
Notes: After programming, the activated on time is displayed.
The selected time switches off after 10 seconds. The display remains lit and shows the number of the activated program.
Output of activated turn-on time
Press the program selection button.
The activated program number and display lighting are switched off. The programmed switch-on time is saved for the next activation.
Setting the program activation time
Press the program selection button for 10 seconds until the required program number with the corresponding start time appears.
The selected time switches off 10 seconds after activation. The display remains illuminated and shows the number of the activated program.
Lift and slide roof hatch panel
The panel opens and closes when the ignition is on using a switch.
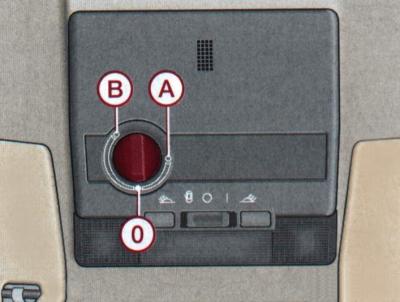
Fig. 1–56. Location of the sunroof sliding and lifting panel switch: A – opening; B - lifting; 0 – closing
To open (position A) (fig. 1–56). Turn the knob to select the desired position of the panel.
For lifting (position B). Turn the knob to select the desired position of the panel.
To close set the handle to position 0.
Remote control for closing the hatch
The sliding panel can be closed not only using the switch, but also by locking one of the front doors of the car: hold the key in the lock position or press the remote control until the panel closes.
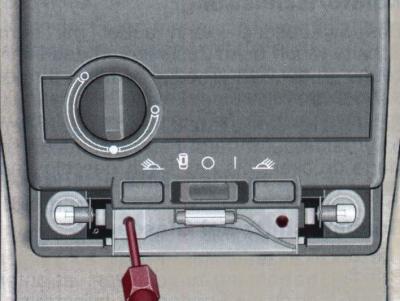
Fig. 1–57. Unscrewing the lamp reflector mounting screw
Note: On vehicles with a glass roof panel, the sliding sunshade opens automatically when the roof panel is slid open. When the roof panel is closed, it can be slid back by hand.
Procedure in case of panel drive mechanism failure
If the drive mechanism fails, the roof panel can be closed manually.
Remove the interior light by manually moving the front part downwards.
Remove the two screws securing the lamp reflector and remove the casing.
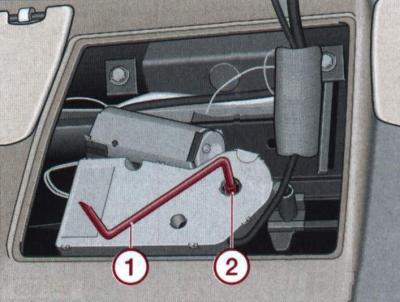
Fig. 1–58. Installing the handle (1) into the hole (2) when closing the sliding panel
Remove the crank handle 1 (Fig. 1–58) from the back of the casing, insert it into the opening 2 and, by turning the handle, close the sliding panel.
Insert the handle into the casing and the casing into place.
Install and secure the interior light reflector with screws.
Install the interior light by first inserting the plastic clips into the back of the light and then snapping the front of the light into place.
Interior lighting and individual lamps
The front lights are located on the roof above the windshield.
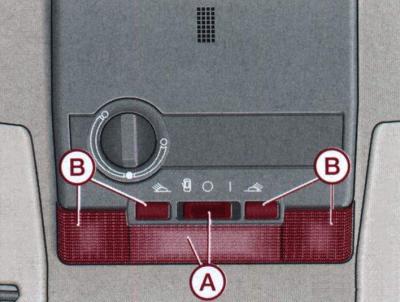
Fig. 1–59. Location of lamps and switches for internal (A) and individual (B) lighting fixtures
Switch positions A (Fig. 1–59) Interior lighting lamps:
 - control by means of contact switches on the door pillars;
- ABOUT - the lamp is off;
- I - long-term switching on of the lampshade.
Interior Lighting Control
The interior lights come on for approximately 30 seconds when the vehicle doors are unlocked, one of the doors is opened, or the key is removed from the ignition. In these cases, the light switch must be in the door contact switch control position.
The lamps go out immediately when the car doors are locked or the ignition is turned on.
The interior lighting remains on for no more than 4 minutes when the door is open. This prevents unwanted battery discharge.
Front individual lights
They are turned on or off by pressing the corresponding switch IN (see Fig. 1–59).
Rear individual light
Rear individual light switch positions:
 - control using contact switches on the door pillars.
- The lights turn on and off together with the front interior light;
- ABOUT - the light is off;
- I - long-term switching on of the lamp.
Lighting for storage box
The light in the storage box in the front passenger seat only lights up when the ignition is on and the storage box lid is open.
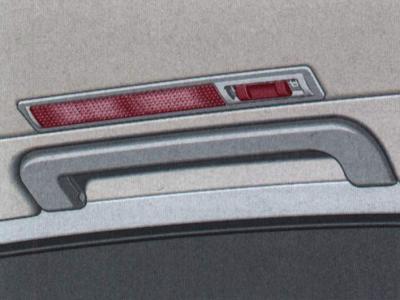
Fig. 1–60. Rear individual light location
(The original article is located on the online resource: AUDImanual)