
Table of contents: Tone control ↓ Adjusting the volume depending on… ↓ Tone control (Bass – low frequencies) ↓ Balance regulator ↓ Fixed Station Preset Buttons ↓ Selecting a compact disc (CD) ↓ RDS ↓ Regional radio stations ↓ EON (information Concerning Other… ↓ Display notifications ↓ Entering the code ↓
Technical specifications
|
Anti-theft protection
|
Encoding device with four-digit code
|
|
Output power, W
|
4 x 20 6 x 20 (Audi A8)
|
|
Speaker power, W:
front doors
rear doors
rear shelf
|
2 x 50
2 x 25
1 x 50
|
|
Additional equipment
|
automatic electric antenna CD player
|
|
Frequency range, Hz/ dB
Noise level, dB
Nonlinear distortion coefficient, %
|
5-20 000/ 0,3
94
0,009
|
Keys for searching radio stations (fig. 1–63).
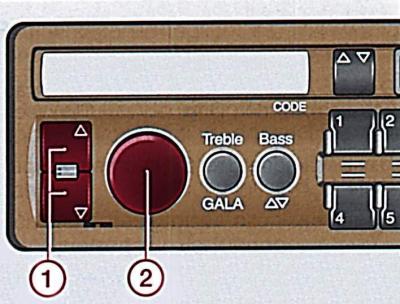
Fig. 1–63. Location of radio station search keys (1), power and volume control knobs (2)
By pressing one of the radio station search keys, an automatic search for radio stations in the desired direction is performed.
For manual search of radio stations press both keys for more than 2 sec. The symbol appears on the display MAN. Now, when you press the upper or lower key, a step-by-step search for radio stations in the desired direction is performed.
Pressing and holding the key increases the speed of step-by-step radio station search.
After 10 seconds of searching for radio stations, the receiver automatically switches to the normal radio station search mode.
Power and volume control knob (fig. 1–63). The radio is turned on and off using the volume control knob.
If the car is equipped with an automatic antenna, it extends when the radio is turned on.
If the key is removed from the ignition switch, radio automatically turns off, and turns on again when the ignition is turned on.
With the ignition off, turn it on radio can be done by turning the volume knob 2. Its operating time is 1 hour. After this time, radio automatically turns off. After turning on again radio works again for 1 hour.
The volume can be changed smoothly by turning the volume control knob.
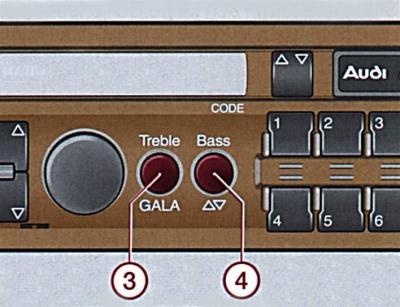
Fig. 1–64. The arrangement of the high (3) and low (4) tone control knobs and the volume control depending on the vehicle speed
Tone control (Fig. 1–64) (Treble – high frequencies) and volume control depending on the vehicle speed (GALA).
Tone control
Press the handle and it will come free.
Turn the knob to set the desired sound timbre.
Press the handle and it will lock into place.
Adjusting the volume depending on the speed of the car
As the speed of movement increases, the noise level in the car increases. The volume of the sound, depending on the speed of the car, is adjusted with the handle (GALA).
Press the handle - it will be released, pull the handle towards you.
Turn on: turn the handle to the right.
Shutdown: turn the handle to the left.
If you need to change the sound volume, just rotate the volume control knob, and the volume will change automatically depending on the speed of the car.
Tone control (fig. 1–64) (Bass – low frequencies) and adjustment of the balance between the front and rear speakers.
Tone control (Bass – low frequencies)
Press the handle and it will release.
Turn the knob to set the desired sound timbre.
Press the handle and it will lock into place.
Balance regulator
Press the handle - it will be released, pull the handle towards you.
Turn the knob to set the desired sound balance between the front and rear speakers.
Press the handle and it will lock into place.
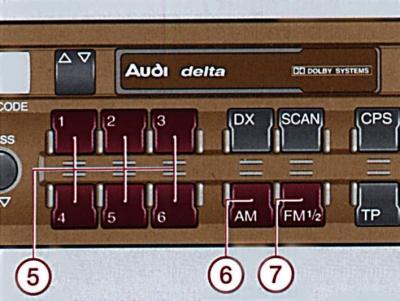
Fig. 1–65. Location of the radio station preset buttons and CD selection (5), AM (6) or FM (7) band switching
Radio station preset buttons (fig. 1–65) and selecting a compact disc (CD).
Fixed Station Preset Buttons
Short press: Activates preset tuning to a pre-selected radio station.
Long press until there is a pause in the received transmission: memorize the current setting in manual mode.
The display shows the frequency of the operating radio station and the number under which the radio station is entered into memory.
You can store 12 FM radio stations in the memory (6 in two ranges) and 6 radio stations in the AM range.
Selecting a compact disc (CD)
Pressing the button briefly starts playback of the corresponding CD.
The number of the selected CD is displayed on the display, for example CD 01. If the CD is not inserted, the display shows NO CD.
AM range on/off button (Fig. 1–65). When you press the button, the radio receiver switches to receive radio stations in the medium wave range. Information about the selected range is displayed on the display.
FM 1/2 band power button (Fig. 1–65) When the button is pressed, the radio receiver switches to receiving radio stations in the ultra-short wave range (FM I or FM II).
Switching from the FM I range to the FM II range is done by pressing the button again. Information about the selected range is displayed on the screen.
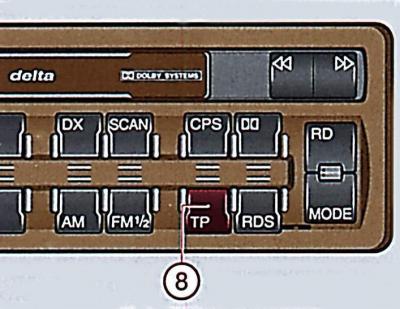
Fig. 1–66. Location of button (8) TP (transport radio) with integrated EON function
TR button (transport radio) with integrated EON function (fig. 1–66). The radio station transmits information about the traffic situation.
After pressing the key TP tP and EON functions are activated.
If you press the button TP more than 2 s radio switches to the AM range, the TP function is turned off.
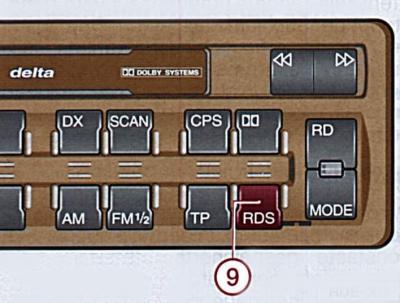
Fig. 1–67. Location of the RDS button (9)
RDS button (Radio Data System) (Fig. 1–67).
Radio can receive radio data system signals RDS. If the signal of the selected radio station in the FM range complies with the RDS standard, the receiver automatically tunes to the frequency that provides the best reception quality.
Button RDS has 2 functions.
Pressing the button turns on RDS.
By pressing the button, regional radio stations REG ON and REG OFF are switched on.
RDS
When you turn on the receiver or search for radio stations, it automatically searches for RDS radio stations. The RDS symbol appears on the display.
When receiving a radio station operating in RDS mode, the station name appears on the display, for example BAYERN 3.
When traveling long distances and in unfavorable reception conditions, it was necessary to rebuild radio. RDSautomatically from the list of alternative frequencies will find the best one and turn it on. This process happens silently.
When RDS is turned on, radio stations that are not currently broadcasting an RDS program can also be received.It is therefore recommended that this radio station be kept on at all times if possible.
Regional radio stations
Function REG is switched on by pressing the RDS button for at least 2 seconds. As confirmation, the message appears on the display at this time REG OFF.
If you press the RDS button again for at least 2 seconds, the display will show the message REG ON.
Example: Bavarian Radio programme 2 broadcasts the announcement BR 2 MUN, or BR 2 SH, or BR 2 OBV at a certain time with regional programmes of varying content.
When these regional programs are received, the display shows REG.
If possible, function REG must be turned on at all times.
When driving in an area where the coverage of several regional radio stations overlaps and radio radio reception is getting worse REG, the function of receiving regional radio stations must be turned off.
When recording radio stations into memory RDS you must press the corresponding station button only when the name of the radio station appears on the display.
EON (information Concerning Other Networks)
EON is an RDS function that enables the car radio to receive all messages from a radio station in TP mode.
Regardless of the currently installed program, all TP messages from other radio stations should be audible.
Disaster reporting takes precedence over all other functions.
Display notifications
The display shows all the information: RDS frequency, radio station name, number of stations in FM I and FM II; in CD playback mode – CD 01…CD 06, and if they are not available – CD NO.
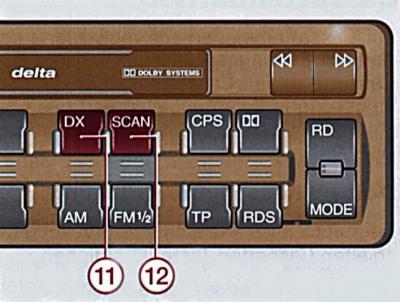
Fig. 1–68. DX button locations (Distance reception) (11) and SCAN (12)
DX button (fig. 1–68). When you press the DX button ("Distance reception" – long-distance reception) the red LED turns on, the sensitivity of the radio station search increases.
Pressing the button again turns the DX function off and radio switches to short-range reception mode.
SCAN button (fig. 1–68). When you press the SCAN button, the red LED on it turns on and all radio stations and titles on the CD and audio cassette are displayed for 8 seconds.
Pressing the button again turns off the SCAN function.
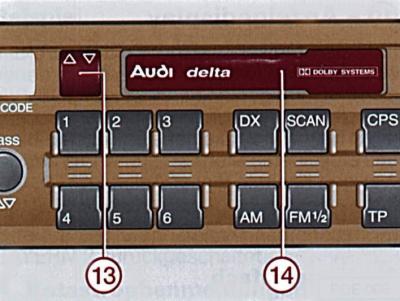
Fig. 1–69. Location of the cassette receiver (14) and cassette track selector (13)
Cassette player (fig. 1–69). Turn on the radio and load the cassette into the cassette player.
When playing a cassette, the display shows TAPE.
When playing tapes recorded with Dolby noise reduction, you need to turn on the noise reduction system, which will improve the sound quality.
Cassette receiver. Slide the cassette end-on into the cassette slot. When loading a cassette into the cassette slot, radio automatically switches to cassette playback mode.
If radio works in TP mode, playback of cassettes is interrupted by radio station messages.
Cassette track selector (fig. 1–69). When you press the key, the player reverses and switches the cassette tracks.
An arrow on the display shows which side of the tape is being played.
When the cassette has finished playing, the cassette player automatically reverses and switches the cassette tracks.
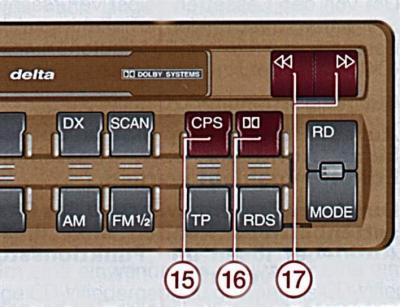
Fig. 1–70. Location of the CPS (15), Dolby B (16) buttons and the tape rewind and eject keys (17), and selection of CD tracks to be played
CPS button (fig. 1–70). The CPS system provides search by pauses in musical pieces.
When you press the button CPS a red LED lights up on it. Then, when you press key 17 "Rewind Forward" or "Rewind Backward", the tape starts rewinding in the selected direction until the pause between musical pieces, followed by switching to playback mode.
Dolby B button (see fig. 1–70). When playing tapes recorded with Dolby noise reduction, you must press the buttonDolby B, at the same time, the noise reduction system is turned on, which improves the sound quality.
Rewind and eject keys for the cassette, selection of CD tracks to be played (see Fig. 1–70).
To rewind the cassette, press the corresponding button until it locks into place.
To stop rewinding, press the second key.
Press both rewind buttons simultaneously – the cassette will eject from the cassette slot.
By pressing one of the keys you can select the beginning of the current and next track on the CD.
By pressing one of the keys repeatedly, the numbers of the names are selected up and down.
The selected number appears on the display: TR 01… TR 02… TR 03… etc.
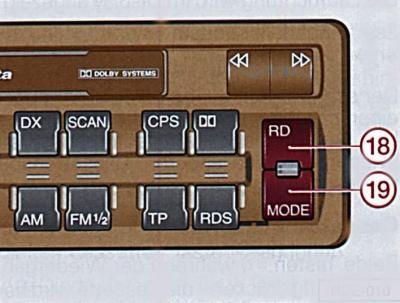
Fig. 1–71. Location of the RD (18) and MODE (19) buttons
Button: Random Play for CD (Fig. 1–71). After pressing the button RD the CD's tracks are played in random order.
MODE button – selects the operating mode (Fig. 1–71). By pressing the button in succession MODE the operating mode of the radio, cassette player or CD player is selected. In this case, the cassette must be inserted into the cassette player.
Anti-theft coded device. The device is based on a microprocessor. After disconnecting the radio from the car's electrical network (removing the battery, dismantling the radio or installing it for the first time) you must enter the security code. Radio can only be enabled after entering the correct code.
After turning on the radio, the display shows the message SAVE – you can enter an anti-theft code.
Entering the code
The code number is pasted on the radio receiver operating manual.
To enter the correct code, you must perform the following steps.
- Turn on radio - the display shows the inscription SAVE.
- Press and hold the FM and DX buttons simultaneously until "1000" appears. Release the buttons. Do not press the FM and DX buttons again under any circumstances, because otherwise the number 1000 will be taken as a code.
- Using buttons 1–4 (fixed settings) enter the code number: the first digit of the code is entered with button 1, the second digit with button 2, etc. Buttons 5 and 6 are not used.
- Press and hold the FM and DX buttons simultaneously until SAVE appears.
- Release the buttons.
Now radio ready to work.
If an error was made when entering the code, the display will show the SAVE indicator in a flashing mode, which then remains on continuously.
Try setting the code again. The number of attempts is shown on the display.
If the wrong code is entered again, the receiver will be blocked for 1 hour.
After 1 hour, you can repeat two attempts to set the code. If they are unsuccessful, the receiver will be blocked for 1 hour.