



Table of contents: Car jack lifting and support points ↓ Anchor points for lift and garage… ↓ Towing ↓ Models with automatic transmission ↓ Installing a tow rope/bar ↓ Version 2: The towing eye is welded… ↓
Many maintenance and repair operations require raising the vehicle and placing it on two or four sturdy stands. At the service station, the vehicle is usually raised on a lift.
If any work is to be carried out under the vehicle, the vehicle must be securely secured. The use of a jack is only permitted when changing wheels. Carrying out repairs or other work under the vehicle in this case is prohibited. Life-threatening!
Raise only unloaded vehicle. Place stands under the vehicle.
Car jack lifting and support points
On the lower side member of the body there are characteristic places indicating the location of the front and rear sockets for installing the jack (arrows in the illustration). Each wheel has only one socket. Jacking in other places is not allowed. The distance from the socket for installing the jack to the corresponding front wheel arch is about 15 cm, and to the rear one about 25 cm.
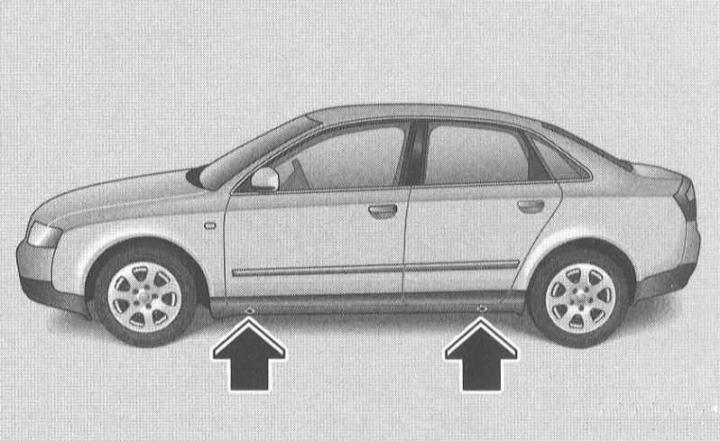
Lifting and support points for a car jack.
Place the jack under the lower beam and, by turning the handle, raise its lifting paw to such a height that the paw is located directly under the vertically located rib of the side member.
Align the jack so that the cam of the lifting paw (A) covers the edge of the side member, and the movable heel (B) rests with its entire surface on the base.
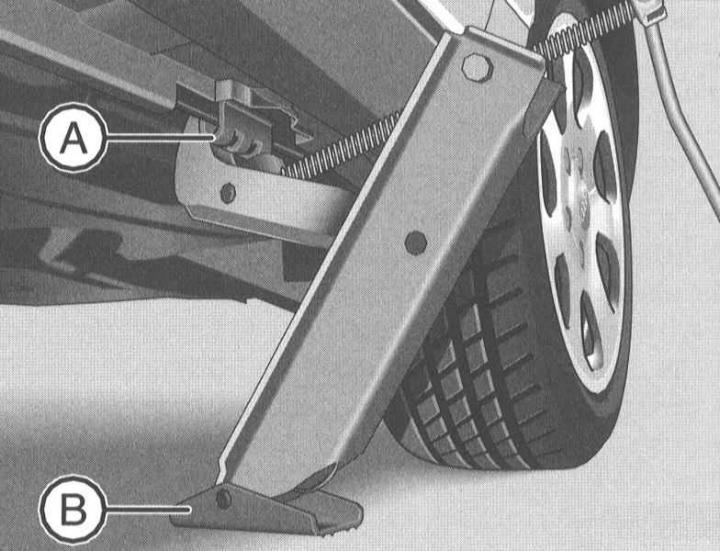
Jack.
Turn the jack handle to raise the vehicle until the faulty wheel is off the ground.
Place chocks under the wheels that remain on the ground to prevent the vehicle from moving. Do not rely on the parking brake. Some repairs require the parking brake to be released.
Anchor points for lift and garage lift
Warning: To avoid damage to the underside of the vehicle, place rubber or wooden pads. Never lift the vehicle by resting on the powertrain, oil pan, front or rear suspension, as this may cause serious damage.
Support points in front. They are located on the vertical reinforcement of the lower beam at the height of the mark for the side jack. The reinforcement of the lower beam should be in the center of the support plate of the lift.
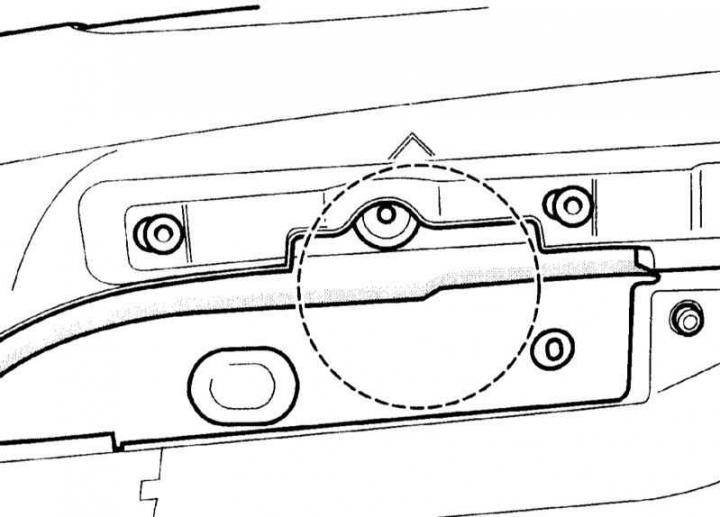
Support points in front.
Support points at the back. They are located on the vertical reinforcement of the lower beam in the area of the stamped mark (arrow on the illustration) for the side jack. The reinforcement of the lower beam should be in the center of the support plate of the lift.
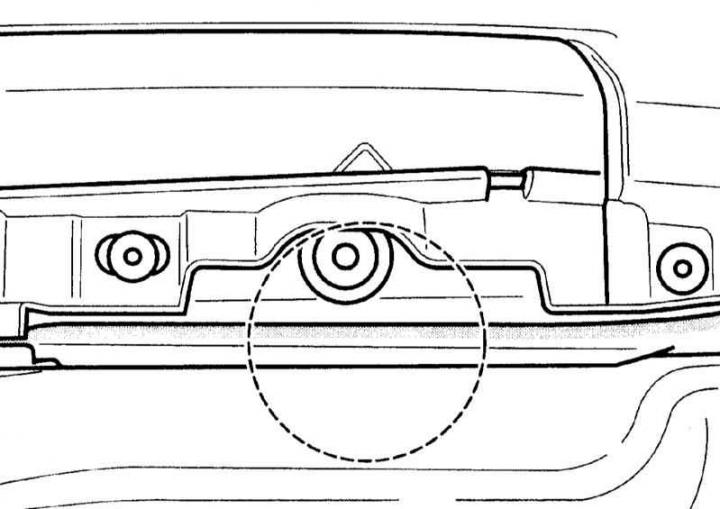
Support points at the back.
Towing
The vehicle must only be towed using the towing eyes specifically provided for this purpose.
The requirements of the "Road Traffic Regulations" regarding towing must be observed.
The towing rope must be elastic to avoid damaging both vehicles. Only ropes made of synthetic fibers or similar elastic materials should be used. However, it is safer to use a towing rod!
Care must be taken to ensure that there is no unacceptably high tension and, at the same time, that there is no significant rolling resistance to the vehicle.
When towing a vehicle along the edge of a dirt road, there is always a risk of skidding to the side of the road.
Before attempting to tow start the engine, you should, if possible, use another vehicle's battery to jump start the engine - refer to the relevant section.
Both drivers must be familiar with the towing handling precautions outlined below and have sufficient experience. Inexperienced drivers should not be driving either vehicle.
When using a towing rope, the driver of the towing vehicle must, when starting off and changing gears, release the clutch pedal especially smoothly.
The driver of the towed vehicle must ensure that the towing rope is kept taut at all times.
Both vehicles must have external lights are on in accordance with the "Traffic Rules".
The ignition must be on so that the steering wheel does not lock and it is possible to turn on the direction indicator, horn, windshield wipers and washers if necessary.
The service brake system's power amplifier only performs its function when the engine is running, so when the engine is off it is necessary to press the brake pedal much harder when braking.
Since the power steering does not function when the engine is not running, it is necessary to use it when turning apply more force to the steering wheel.
If there is no oil in the automatic transmission, the vehicle must be towed only with the drive wheels raised.
Models with AT and all-wheel drive: Towing a vehicle with raised front or rear wheels is not permitted.
Models with manual transmission and all-wheel drive: If the vehicle is towed with the front or rear wheels raised, the towing speed must not exceed 50 km/h and the towing distance must not exceed 50 km.
Models with automatic transmission
Turn the key in the ignition switch to position 2.
Move the AT selector lever to the "N" position.
Maximum towing speed: 50 km/h.
Maximum towing range: 50 km.
Failure to comply with maximum towing speed or distance may result in transmission damage.
For long distances or in case of damage to the gearbox, towing is only permitted with the drive wheels raised.
When towing with the front axle raised or checking the parking brake on a brake test stand, the engine must be switched off. Otherwise, damage to the rear axle brakes will occur due to the activation of the brakes by the Electronic Skid Control System (ESP).
Installing a tow rope/bar
Front towing eye
Take the towing eye from the on-board tool kit, on the left side of the spare wheel opening.
Remove the cover (1). To do this, press your thumb down in the area of the tab (2) and press a little with your fingers at the top, releasing the cover (spring clamps).
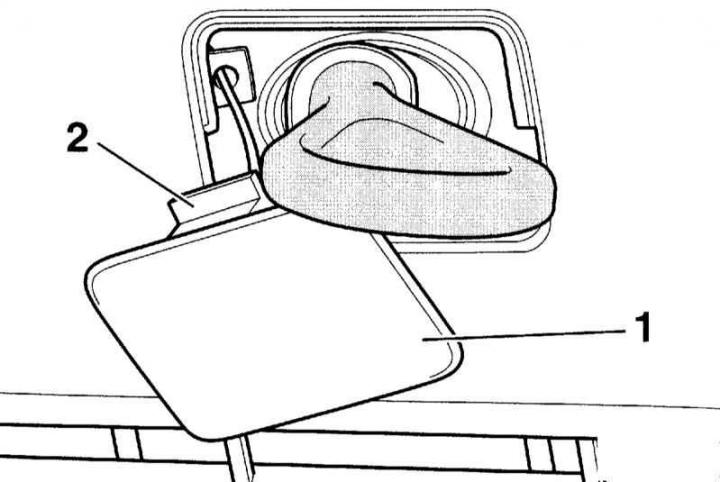
Screw the lug into the threaded hole until it stops by hand, then insert a screwdriver or wheel wrench into the lug from the side and tighten the lug.
Warning: After towing is complete, place the towing eye in the on-board tool kit.
Connect the cover with the tab (2) at the bottom, press it from above and thus fix it. Rear towing eye
Execution 1: Screw in the rear towing eye in the same way as the front one.
Version 2: The towing eye is welded underneath the bumper. Emergency starting of the car by towing
On models with AT - not possible.
To avoid damage to the catalytic converter, do not start the vehicle with a warm engine by towing or pushing.
First try to start the engine using another car's battery.
Warning: Models with AT cannot be tow started.
Models with gasoline engine can be towed for the purpose of starting the engine at a distance no more than 50 m, because otherwise there is a risk of damage to the catalytic converter.
First try to start the engine using another car's battery.
Warning: Models with AT cannot be tow started.
Models with gasoline engine can be towed for the purpose of starting the engine at a distance no more than 50 m, because otherwise there is a risk of damage to the catalytic converter.
Before towing, engage 2nd or 3rd gear, press and hold the clutch pedal.
Turn on the ignition.
Slowly engage the clutch if both vehicles start moving.
Once the engine starts, press the clutch pedal and shift out of gear to avoid running into the towing vehicle.