



Automatic transmission 0B5 with double clutch Audi Q5 (8R)

Marking of the KP
The following data can be found on the body of the gearbox "arrows" LHF = Letter designations of the control gear D04 = Decoding 0026 = Serial number K100808 =...
The following data can be found on the body of the gearbox "arrows" LHF = Letter designations of the control gear D04 = Decoding 0026 = Serial number K100808 =...

Flywheel and dual clutch
Flywheel and dual clutch 1. Flywheel: different designs depending on the model, take into account the compliance; 2. Coupling cover: depending on the design,...
Flywheel and dual clutch 1. Flywheel: different designs depending on the model, take into account the compliance; 2. Coupling cover: depending on the design,...

Removal the flywheel
The gearbox is secured to the engine and gearbox retainer "VAS 6095". Remove the left shaft with the flange. Secure the puller "T40176" to the flywheel "A"...
The gearbox is secured to the engine and gearbox retainer "VAS 6095". Remove the left shaft with the flange. Secure the puller "T40176" to the flywheel "A"...

Removal the double clutch
The gearbox is secured to the engine and gearbox retainer "VAS 6095". Remove the flywheel. Drain the ATF. Remove the drive shaft seal using the hook...
The gearbox is secured to the engine and gearbox retainer "VAS 6095". Remove the flywheel. Drain the ATF. Remove the drive shaft seal using the hook...

Replacing the drive shaft ball bearing
Remove the double clutch "1". On the removed clutch housing cover, remove the retaining ring "arrow". Press out the dual clutch ball bearing. Depending on the...
Remove the double clutch "1". On the removed clutch housing cover, remove the retaining ring "arrow". Press out the dual clutch ball bearing. Depending on the...

Electrical, electronic components and their location
Diagnostic connector Installation location: The diagnostic connector for the diagnostic complex is located in the footwell on the driver's side. Before...
Diagnostic connector Installation location: The diagnostic connector for the diagnostic complex is located in the footwell on the driver's side. Before...

Mechatronic plug connectors and sensor modules
Electrical connectors Mechatronics 1. Used CP to printed circuit board 1; 2. Used CP to printed circuit board 2; 3. Printed circuit board 2; 4. Sensor module...
Electrical connectors Mechatronics 1. Used CP to printed circuit board 1; 2. Used CP to printed circuit board 2; 3. Printed circuit board 2; 4. Sensor module...

Guided functions on the control panel
Operating procedure The tester is connected. On the diagnostic tester in the Guided functions mode, in the folder "02 - gearbox electronics, functions", select...
Operating procedure The tester is connected. On the diagnostic tester in the Guided functions mode, in the folder "02 - gearbox electronics, functions", select...
Gear shift mechanism
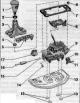
Before disassembling the gear shift mechanism, it is necessary to perform a check. Gear shift mechanism I 1. Selector handle; 2. Decorative rosette; 3....
Before disassembling the gear shift mechanism, it is necessary to perform a check. Gear shift mechanism I 1. Selector handle; 2. Decorative rosette; 3....

Checking the gear shift mechanism
1. Checking the operation of the gear shift mechanism drive In the "S", "O", "R" positions of the automatic transmission selector and in the "Tiptronic slot",...
1. Checking the operation of the gear shift mechanism drive In the "S", "O", "R" positions of the automatic transmission selector and in the "Tiptronic slot",...

Emergency release of the gearshift mechanism
If the battery is disconnected or discharged, the automatic transmission selector cannot be moved from the "P" position. The car cannot be moved or towed. When...
If the battery is disconnected or discharged, the automatic transmission selector cannot be moved from the "P" position. The car cannot be moved or towed. When...

Removal the selector lock solenoid «N110»
Move the selector lever to position "P". Remove the front ashtray. Unscrew nuts "1,3,5,6" a few turns, do not unscrew completely. This will lower the...
Move the selector lever to position "P". Remove the front ashtray. Unscrew nuts "1,3,5,6" a few turns, do not unscrew completely. This will lower the...

Removal the gear selector sensor control unit «J587»
Remove the automatic transmission lever handle. Remove the front ashtray. Disconnect the plug connector "1". Unlock the 4 "arrow" tabs and remove the automatic...
Remove the automatic transmission lever handle. Remove the front ashtray. Disconnect the plug connector "1". Unlock the 4 "arrow" tabs and remove the automatic...

Removal the selector position switch P «F305»
Installation location: consisting of 2 reed switches "1" and "2", the selector position switch P "F305" is installed on the board "B" of the automatic...
Installation location: consisting of 2 reed switches "1" and "2", the selector position switch P "F305" is installed on the board "B" of the automatic...

Removal the gear shift module functional unit
Remove the front ashtray. Disconnect electrical connectors "2" and "4". The damping mat is not shown in the figure. When removing the gearshift mechanism under...
Remove the front ashtray. Disconnect electrical connectors "2" and "4". The damping mat is not shown in the figure. When removing the gearshift mechanism under...
Automatic transmission selector handle, automatic transmission selector position indicator panel «Y26»
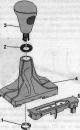
Automatic transmission selector handle, automatic transmission selector position indicator panel "Y26" 1. Clamp: for fastening the handle to the automatic...
Automatic transmission selector handle, automatic transmission selector position indicator panel "Y26" 1. Clamp: for fastening the handle to the automatic...

Selector lever cable
Selector lever cable 1. Selector cable retaining clip on the shift actuator functional unit; 2. Sealing ring: replace; 3. Bolt: for adjusting the selector...
Selector lever cable 1. Selector cable retaining clip on the shift actuator functional unit; 2. Sealing ring: replace; 3. Bolt: for adjusting the selector...

Removal the gearbox — vehicles with a 2.0 l TFSI engine
Prepare the mount for the gearbox "T40173": It is necessary to remove the mounting block installed on "pos. 1". Turn the mounting block installed on "pos. 2"...
Prepare the mount for the gearbox "T40173": It is necessary to remove the mounting block installed on "pos. 1". Turn the mounting block installed on "pos. 2"...

Removal the gearbox — vehicles with a 3.2 l FSI engine
Prepare the T40173 gearbox mount: Remove the mounting block installed at pos. 1. Move the mounting block 2 with the long side facing up, as shown in the...
Prepare the T40173 gearbox mount: Remove the mounting block installed at pos. 1. Move the mounting block 2 with the long side facing up, as shown in the...

Removal the gearbox — vehicles with a 2.0 l TDI engine
Prepare the T40173 gearbox mount: Remove the mounting block installed at "pos. 1". Turn the mounting block installed at "pos. 2" with the long side up, as...
Prepare the T40173 gearbox mount: Remove the mounting block installed at "pos. 1". Turn the mounting block installed at "pos. 2" with the long side up, as...

Gearbox removal — from a vehicle with a 3.0 l TDI engine
Prepare the T40173 gearbox mount: Remove the mounting block installed at "pos. 1". Turn the mounting block installed at "pos. 2" with the long side up, as...
Prepare the T40173 gearbox mount: Remove the mounting block installed at "pos. 1". Turn the mounting block installed at "pos. 2" with the long side up, as...
Installation of the control unit
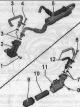
Note: Replace bolts that have been tightened to the limit. Replace self-locking nuts and bolts, as well as sealing rings, gaskets and sealing cuffs. Hose...
Note: Replace bolts that have been tightened to the limit. Replace self-locking nuts and bolts, as well as sealing rings, gaskets and sealing cuffs. Hose...

Drain, filler and inspection plugs
Drain, filler and inspection plugs I 1. ATF drain plug thread; 2. Sealing sleeve: ATF drain plug thread; replace; 3. Filler and inspection plug for...
Drain, filler and inspection plugs I 1. ATF drain plug thread; 2. Sealing sleeve: ATF drain plug thread; replace; 3. Filler and inspection plug for...

Draining and filling ATF
The engine is turned off. Place the car on a lift or in a pit so that it stands horizontally. The selector lever is in position "P". Pull the parking brake...
The engine is turned off. Place the car on a lift or in a pit so that it stands horizontally. The selector lever is in position "P". Pull the parking brake...

ATF radiator, ATF lines, ATF line filter
The figure shows the ATF lines of the 3.0L TDI engine. ATF radiator, ATF lines, ATF line filter 1. ATF radiator: built into the coolant radiator; 2. Sealing...
The figure shows the ATF lines of the 3.0L TDI engine. ATF radiator, ATF lines, ATF line filter 1. ATF radiator: built into the coolant radiator; 2. Sealing...

ATF lines, ATF radiator and ATF replacement filter
ATF lines, ATF radiator and ATF replacement filter I 1. Oil pipes: replace after removal; before inserting, lubricate the sealing rings with ATF oil; 2....
ATF lines, ATF radiator and ATF replacement filter I 1. Oil pipes: replace after removal; before inserting, lubricate the sealing rings with ATF oil; 2....

Mechatronic gearbox with twin-disc clutch «J743»
Mechatronic gearbox with twin-disc clutch "J743" II 1. ATF drain plug thread; 2. Sealing cuff: replace; 3/6/10/38. Bolt; 4. Expansion rivet: in original...
Mechatronic gearbox with twin-disc clutch "J743" II 1. ATF drain plug thread; 2. Sealing cuff: replace; 3/6/10/38. Bolt; 4. Expansion rivet: in original...

Removal the ATF pan
Remove the subframe cross braces. Risk of damage to chassis components. If the unit support, steering gear or subframe cross brace is not properly mounted, the...
Remove the subframe cross braces. Risk of damage to chassis components. If the unit support, steering gear or subframe cross brace is not properly mounted, the...

Drain transmission fluid (MTF)
Transmission oil temperature approx. 20°C (room temperature). Gearbox installed: Place the car on a lift and in a pit so that it stands absolutely...
Transmission oil temperature approx. 20°C (room temperature). Gearbox installed: Place the car on a lift and in a pit so that it stands absolutely...

Front final drive, shaft seals
Front final drive, shaft seals 1. Flywheel; 2. Sealing ring: for left shaft with flange; between the main gear and the gearbox housing; 3. Adjusting washer:...
Front final drive, shaft seals 1. Flywheel; 2. Sealing ring: for left shaft with flange; between the main gear and the gearbox housing; 3. Adjusting washer:...

The center differential housing is a threaded cardan shaft
The central differential housing can also be removed and installed with the gearbox installed. Central differential housing - threaded cardan shaft 1. Bolt:...
The central differential housing can also be removed and installed with the gearbox installed. Central differential housing - threaded cardan shaft 1. Bolt:...

The central differential housing is a cardan shaft with a plug-in connection
The central differential housing can also be removed and installed with the gearbox installed. Central differential housing - cardan shaft with plug-in...
The central differential housing can also be removed and installed with the gearbox installed. Central differential housing - cardan shaft with plug-in...
This section is available on russian, bulgarian, belarusian, ukrainian, serbian, croatian, romanian, polish, slovak, hungarian
Similar sections of other Audi car models:
Transmission: Automatic transmission 0B5 Audi A4 B8 (2007-2015)
Transmission: Automatic transmission 0B5 Audi A4 B8 (2007-2015)
Share information:
- General information
- Operating instructions
- Maintenance
- Power unit
- Diesels 3.0 l (BUG, BUN, CAS)
- Diesels 3.0 l (CATA, CCMA)
- Diesels 3.0 l (CJGA/CJGC)
- Diesels 4.2 l (BTR, CCFA/CCFC)
- Cooling system
- Fuel and exhaust system
- Engine management system
- Starting and charging
- Transmission
- Automatic gearbox
- Drive shafts
- Chassis
- Brake system
- Front suspension
- Rear suspension
- Steering system
- Body
- Air conditioner
- Exterior
- Interior
- Electrical equipment
- Equipment and devices
- Electrical circuits
- General information
- User manual
- Power unit
- Petrol engine 2.0 l
- Petrol engine 3.2 l
- Fuel system (petrol)
- Diesel 2.0 liter (CA)
- Diesel 2.0 liter (CG/CJ/CM)
- Diesel engine 3.0 l
- Fuel system (diesel)
- Transmission
- Manual gearbox 0B1
- Manual gearbox 0B2
- Automatic gearbox 0B5
- Automatic gearbox 0B6
- Chassis
- Front suspension
- Rear suspension
- Brake system
- Steering
- Body
- Exterior
- Interior
- Doors, locks and windows
- Safety system
- Ventilation and heating
- Electrical equipment
- Power devices
- Equipment and devices
- Lighting and alarm
- Audio system
- Electrical circuits