



Car brake system Audi Q5 (8R)

Brake system — general information
The tables below contain the decoding of the kit codes. The information provided in them is important for the combination of brake caliper/brake disc and brake...
The tables below contain the decoding of the kit codes. The information provided in them is important for the combination of brake caliper/brake disc and brake...

ABS/ESP systems
The anti-lock braking system does not require maintenance in principle. Inspection, installation and repair work may only be performed by trained specialists....
The anti-lock braking system does not require maintenance in principle. Inspection, installation and repair work may only be performed by trained specialists....

Removal the brake light sensor
After removing the brake light sensor, it can be reused. The brake light sensor adapts itself. No calibration is required after installing the switch. Remove...
After removing the brake light sensor, it can be reused. The brake light sensor adapts itself. No calibration is required after installing the switch. Remove...

Roof Rack Recognition Sensor «G625»
The sensor cannot be replaced separately. It is supplied with the left roof rails. The roof rack recognition sensor "G625" is installed in the left roof rail...
The sensor cannot be replaced separately. It is supplied with the left roof rails. The roof rack recognition sensor "G625" is installed in the left roof rail...

Removal the ESP sensor unit «G419»
Warning! The ESP sensor unit is sensitive to strong vibration and impact. Strong vibration and impact may damage the ESP sensor unit. If the ESP sensor unit...
Warning! The ESP sensor unit is sensitive to strong vibration and impact. Strong vibration and impact may damage the ESP sensor unit. If the ESP sensor unit...

Removal the steering wheel angle sensor «G85»
The steering wheel angle sensor "G85" is installed between the steering wheel and the switch on the steering column. Set the wheels to the "straight ahead"...
The steering wheel angle sensor "G85" is installed between the steering wheel and the switch on the steering column. Set the wheels to the "straight ahead"...

Hydraulic block N55 with used L 04
Hydraulic block N55 with used L 04 1. Hydraulic unit ABS "N55" used ABS "L 04". Hydraulic unit N55 and control unit L 04 cannot be separated. Installation...
Hydraulic block N55 with used L 04 1. Hydraulic unit ABS "N55" used ABS "L 04". Hydraulic unit N55 and control unit L 04 cannot be separated. Installation...

ABS/ESP Speed Sensors
The figure shows the front view from the right. 1. Speed sensors G45/G47 2. Hexagon socket head cap screw. 9 Nm Removal the front wheel speed sensors G45/G47...
The figure shows the front view from the right. 1. Speed sensors G45/G47 2. Hexagon socket head cap screw. 9 Nm Removal the front wheel speed sensors G45/G47...
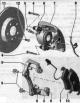
Front Wheel Brake Installation Diagram FBC-60
Note: Install the entire repair kit. After installing the brake pads, press the brake pedal hard several times while the vehicle is stationary so that the...
Note: Install the entire repair kit. After installing the brake pads, press the brake pedal hard several times while the vehicle is stationary so that the...

Removal the brake caliper and front brake bracket
Use new bolts. Do not loosen the bolts (4 pcs.) securing the brake pads to the brake bracket. Raise the car. Remove the wheels. Release the brake hose on...
Use new bolts. Do not loosen the bolts (4 pcs.) securing the brake pads to the brake bracket. Raise the car. Remove the wheels. Release the brake hose on...

Front brake caliper FBC-60. Replace brakes
Use new bolts. Do not loosen the bolts (4 pcs.) securing the brake pads to the brake bracket. Install the spacer "V.A.G 1869/2" between the brake pedal and the...
Use new bolts. Do not loosen the bolts (4 pcs.) securing the brake pads to the brake bracket. Install the spacer "V.A.G 1869/2" between the brake pedal and the...

Front brake pads FBC-60. Removal
Always replace the axles on both wheels. Do not loosen the bolts (4 pcs.) securing the brake pads to the brake bracket. Raise the vehicle. Remove the wheels....
Always replace the axles on both wheels. Do not loosen the bolts (4 pcs.) securing the brake pads to the brake bracket. Raise the vehicle. Remove the wheels....
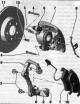
Front brake disc FBC-60. Replace brakes
I Use new bolts. Always replace axles on both wheels. Do not loosen bolts (4 pcs.) securing brake shoes to brake bracket. Raise vehicle. Remove wheels. Remove...
I Use new bolts. Always replace axles on both wheels. Do not loosen bolts (4 pcs.) securing brake shoes to brake bracket. Raise vehicle. Remove wheels. Remove...
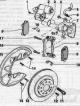
Rear brakes with automatic adjustment
Install only a complete repair kit. II 1. Self-locking bolt. 12 Nm; 2. Executive motor of the electric parking and hand brake of the control unit of the...
Install only a complete repair kit. II 1. Self-locking bolt. 12 Nm; 2. Executive motor of the electric parking and hand brake of the control unit of the...

Removal the brake caliper and rear brake bracket
With the ignition off, connect the diagnostic complex "VAS 5051B" or "VAS 5052" to the 16-pin diagnostic connector of the vehicle. Turn on the ignition....
With the ignition off, connect the diagnostic complex "VAS 5051B" or "VAS 5052" to the 16-pin diagnostic connector of the vehicle. Turn on the ignition....
Replacing the rear brake caliper
Use new bolts. When replacing the rear brake caliper, it is not necessary to remove the actuator motor. A new actuator motor is included in the brake caliper...
Use new bolts. When replacing the rear brake caliper, it is not necessary to remove the actuator motor. A new actuator motor is included in the brake caliper...

Removal the rear brake pads
Mark brake linings if they are to be reused. Reinstall in the same position, otherwise uneven braking performance! After a long journey, it is recommended to...
Mark brake linings if they are to be reused. Reinstall in the same position, otherwise uneven braking performance! After a long journey, it is recommended to...
Removal the rear brake disc
Raise the vehicle. Remove the wheels. Disconnect the brake hose and electrical wiring from the combined bracket on the wheel support. Remove the brake caliper...
Raise the vehicle. Remove the wheels. Disconnect the brake hose and electrical wiring from the combined bracket on the wheel support. Remove the brake caliper...

Replacing the rear brake disc
Raise the car. Remove the wheels. Disconnect the brake hose and electrical wiring from the combined bracket on the wheel support. Remove the rear brake pads....
Raise the car. Remove the wheels. Disconnect the brake hose and electrical wiring from the combined bracket on the wheel support. Remove the rear brake pads....
Removal the rear brake shield
Raise the car. Remove the wheels. Remove the rear brake disc. Unscrew the bolts on the brake shield. Remove the brake shield. Install Install the brake shield....
Raise the car. Remove the wheels. Remove the rear brake disc. Unscrew the bolts on the brake shield. Remove the brake shield. Install Install the brake shield....

Brake pedal and support bracket
Lubricate all bearing and contact surfaces with ET-No. grease "G 000 450 02". II 1. Pedal assembly support bracket (the picture shows a car with an automatic...
Lubricate all bearing and contact surfaces with ET-No. grease "G 000 450 02". II 1. Pedal assembly support bracket (the picture shows a car with an automatic...
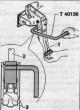
Disconnecting and connecting the brake pedal and brake booster
Disconnect the brake pedal from the brake booster. Remove the storage compartment on the driver's side "1...3". Disconnect the electrical connector "C" of the...
Disconnect the brake pedal from the brake booster. Remove the storage compartment on the driver's side "1...3". Disconnect the electrical connector "C" of the...

Connecting the brake pedal to the brake booster
If possible, leave the brake pedal stop "17" in place; abrupt release of the brake pedal may result in damage to the brake light sensor bracket "10". Hold the...
If possible, leave the brake pedal stop "17" in place; abrupt release of the brake pedal may result in damage to the brake light sensor bracket "10". Hold the...
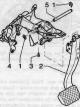
Removal the brake pedal. Cars with manual transmission
To remove the brake pedal of a car with a manual transmission, it is necessary to remove the support bracket. Remove the support bracket. Remove the brake...
To remove the brake pedal of a car with a manual transmission, it is necessary to remove the support bracket. Remove the support bracket. Remove the brake...

Installing the brake pedal with the support bracket removed
I If possible, leave the brake pedal stop in place; abrupt release of the brake pedal may cause breakage of the brake light sensor bracket. If possible, leave...
I If possible, leave the brake pedal stop in place; abrupt release of the brake pedal may cause breakage of the brake light sensor bracket. If possible, leave...
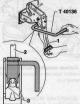
Removal the support bracket. Cars with manual transmission
Removing the instrument panel cover on the driver's side "1...3" Disconnect the electrical connection of the air duct for the footrest "C". Remove the air duct...
Removing the instrument panel cover on the driver's side "1...3" Disconnect the electrical connection of the air duct for the footrest "C". Remove the air duct...

Electronic Parking Brake (EPB)
Email parking brake (ERB) 1. Parking brake switch "F321". The switch lights up for a long time to make it easier to find in the dark. Pressing it - closes...
Email parking brake (ERB) 1. Parking brake switch "F321". The switch lights up for a long time to make it easier to find in the dark. Pressing it - closes...

Removal the electronic parking and handbrake control unit J540
Bend back the side trim in the trunk at the rear right. Depending on the car model, a trailer detection system control unit is installed. Before removing the...
Bend back the side trim in the trunk at the rear right. Depending on the car model, a trailer detection system control unit is installed. Before removing the...

Removal the actuator motor of the electronic parking and hand brake
Ignition off. Ignition must be off at least 30 sec. before disconnecting the actuator motor connector! Release the parking brake. Fault memory interrogated,...
Ignition off. Ignition must be off at least 30 sec. before disconnecting the actuator motor connector! Release the parking brake. Fault memory interrogated,...
Checking for leaks by pressing the brake pedal
Turn off the engine. Until then, press the brake pedal until there is brake force support, "brake booster works idle", the brake pedal becomes hard. Press the...
Turn off the engine. Until then, press the brake pedal until there is brake force support, "brake booster works idle", the brake pedal becomes hard. Press the...
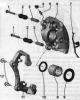
FBC Brake Caliper Repair
Note: Install the entire repair kit when performing repair work. Apply a thin layer of mounting paste "G 052 150 A2" to the brake cylinder, piston and seals I...
Note: Install the entire repair kit when performing repair work. Apply a thin layer of mounting paste "G 052 150 A2" to the brake cylinder, piston and seals I...

Removal the FBC Front Brake Caliper Piston
Press the piston out of the brake caliper housing with compressed air. Place a wooden panel underneath to avoid damaging the piston. Remove the lip seal. Use...
Press the piston out of the brake caliper housing with compressed air. Place a wooden panel underneath to avoid damaging the piston. Remove the lip seal. Use...

Replacing FBC guide pins and protective caps
If the protective caps are damaged, remove the guide pins. Mark the brake linings if they are to be reused. They must be reinstalled in their places, otherwise...
If the protective caps are damaged, remove the guide pins. Mark the brake linings if they are to be reused. They must be reinstalled in their places, otherwise...

Rear brake caliper, electronic parking brake and handbrake (EPB)
Note: When repairing, it is essential to install the repair kit completely. Apply a thin layer of mounting paste "G 052 150 A2" to the brake cylinder, piston...
Note: When repairing, it is essential to install the repair kit completely. Apply a thin layer of mounting paste "G 052 150 A2" to the brake cylinder, piston...

Removal the rear brake caliper piston
Unscrew the piston from the brake caliper as far as possible. Press the piston out of the brake caliper housing with compressed air. When removing, do not...
Unscrew the piston from the brake caliper as far as possible. Press the piston out of the brake caliper housing with compressed air. When removing, do not...

Replacing guide pins and protective caps
If the protective caps or guide pins are damaged, install the repair kit. When installing the guide pins, use the supplied tube of grease. Unscrew the bolts...
If the protective caps or guide pins are damaged, install the repair kit. When installing the guide pins, use the supplied tube of grease. Unscrew the bolts...

Brake booster/master cylinder parts and assemblies
Note. The main brake cylinders are non-separable, i.e. their repair is not provided. Use only new brake fluid. Follow the instructions on the brake fluid...
Note. The main brake cylinders are non-separable, i.e. their repair is not provided. Use only new brake fluid. Follow the instructions on the brake fluid...
Removal the brake fluid reservoir cap
Not installed in all cars. On the left side of the reservoir cap there is a hole for checking the brake fluid level. To avoid further damage, brake fluid...
Not installed in all cars. On the left side of the reservoir cap there is a hole for checking the brake fluid level. To avoid further damage, brake fluid...
Removal the brake fluid reservoir
Remove the water drain box cover. Disconnect the connector of the brake fluid low level warning sensor "F34". Remove the cap from the brake fluid reservoir....
Remove the water drain box cover. Disconnect the connector of the brake fluid low level warning sensor "F34". Remove the cap from the brake fluid reservoir....

Removal the master brake cylinder
Remove the plenum chamber lining. Remove the brace. Remove the plenum chamber wall. To protect against escaping brake fluid, simply place a lint-free cloth...
Remove the plenum chamber lining. Remove the brace. Remove the plenum chamber wall. To protect against escaping brake fluid, simply place a lint-free cloth...

Removal the brake booster
Turn off the engine. Until then, press the brake pedal until there is braking force support, "the brake booster operates idle", the brake pedal becomes hard....
Turn off the engine. Until then, press the brake pedal until there is braking force support, "the brake booster operates idle", the brake pedal becomes hard....

Electronic brake vacuum pump
Electric vacuum pump for brake system "VI92" 1. Brake vacuum pump "V192"; 2. Nut. 9 Nm; 3. Check valve; 4. Buffer; 5. Vacuum hose; 6. Bushing; 7. Bolt. 9 Nm;...
Electric vacuum pump for brake system "VI92" 1. Brake vacuum pump "V192"; 2. Nut. 9 Nm; 3. Check valve; 4. Buffer; 5. Vacuum hose; 6. Bushing; 7. Bolt. 9 Nm;...

Removal the brake booster pressure sensor
Removal the brake booster pressure sensor "G294" The brake booster pressure sensor "G294" is installed in the water drainage box in front of the brake booster....
Removal the brake booster pressure sensor "G294" The brake booster pressure sensor "G294" is installed in the water drainage box in front of the brake booster....

Vacuum pumps
Depending on the engine, a corresponding vacuum pump is installed to support the operation of the brake booster. Vacuum pumps 1. Bolt 2x Torx 30.9 Nm. Unscrew...
Depending on the engine, a corresponding vacuum pump is installed to support the operation of the brake booster. Vacuum pumps 1. Bolt 2x Torx 30.9 Nm. Unscrew...

Brake lines and pipelines
Laying out lines Brake lines and pipelines, as spare parts, are supplied ready for installation. When installing the main lines and pipes of the brake drive,...
Laying out lines Brake lines and pipelines, as spare parts, are supplied ready for installation. When installing the main lines and pipes of the brake drive,...
This section is available on russian, bulgarian, belarusian, ukrainian, serbian, croatian, romanian, polish, slovak, hungarian
Similar sections of other Audi car models:
Chassis: Brake system Audi 80 B3 (1986-1991)
Chassis: Brake system Audi 100 C3 (1982-1990)
Chassis: Brake system Audi A3 Type 8L (1996-2003)
Chassis: Brake system Audi A4 B6 (2000-2006)
Chassis: Brake system Audi A6 C5 (1997-2004)
Chassis: Brake system Audi A8 D2 (1994-2002)
Chassis: Brake system Audi A2 (1999-2005)
Chassis: Brake system Audi 80 B3 (1986-1991)
Chassis: Brake system Audi 100 C3 (1982-1990)
Chassis: Brake system Audi A3 Type 8L (1996-2003)
Chassis: Brake system Audi A4 B6 (2000-2006)
Chassis: Brake system Audi A6 C5 (1997-2004)
Chassis: Brake system Audi A8 D2 (1994-2002)
Chassis: Brake system Audi A2 (1999-2005)
Share information:
- General information
- Operating instructions
- Maintenance
- Power unit
- Diesels 3.0 l (BUG, BUN, CAS)
- Diesels 3.0 l (CATA, CCMA)
- Diesels 3.0 l (CJGA/CJGC)
- Diesels 4.2 l (BTR, CCFA/CCFC)
- Cooling system
- Fuel and exhaust system
- Engine management system
- Starting and charging
- Transmission
- Automatic gearbox
- Drive shafts
- Chassis
- Brake system
- Front suspension
- Rear suspension
- Steering system
- Body
- Air conditioner
- Exterior
- Interior
- Electrical equipment
- Equipment and devices
- Electrical circuits
- General information
- User manual
- Power unit
- Petrol engine 2.0 l
- Petrol engine 3.2 l
- Fuel system (petrol)
- Diesel 2.0 liter (CA)
- Diesel 2.0 liter (CG/CJ/CM)
- Diesel engine 3.0 l
- Fuel system (diesel)
- Transmission
- Manual gearbox 0B1
- Manual gearbox 0B2
- Automatic gearbox 0B5
- Automatic gearbox 0B6
- Chassis
- Front suspension
- Rear suspension
- Brake system
- Steering
- Body
- Exterior
- Interior
- Doors, locks and windows
- Safety system
- Ventilation and heating
- Electrical equipment
- Power devices
- Equipment and devices
- Lighting and alarm
- Audio system
- Electrical circuits