
Repair Chevrolet Repair Toyota Repair Honda Repair AvtoVAZ Repair Mercedes-Benz Repair BMW Repair Opel
Home  |  Contacts  |  Sitemap  |    
English Русский
Български
Беларускі
Український
Српски
Hrvatski
Română
Polski
Slovenský
Magyar
AudiManual.ru


  • AUDI 80
  • AUDI 100
  • AUDI A3
  • AUDI A4
  • AUDI A6
  • AUDI A8
  • AUDI Q
  • OTHER
  • ARTICLES
Q7 Typ 4L (2005-2015, diesel) Q5 Type 8R (2008-2017)

Hydraulic block N55 with used L 04 (Audi Q5-8R)

  • Home
  • Audi Q
  • Q5 Type 8R (2008-2017)
  • Chassis
  • Brake system
  • Hydraulic block N55 with used L 04
            0
Table of contents: Removal ↓ Installation ↓
Hydraulic block N55 with used L 04 1. Hydraulic unit ABS «N55» used ABS «L 04». Hydraulic unit N55…
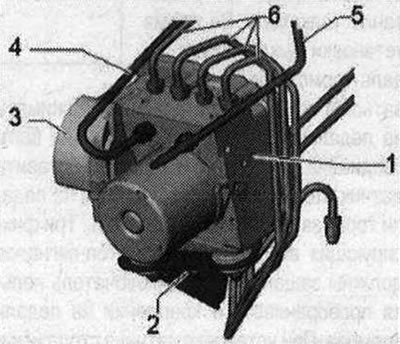
Hydraulic block N55 with used L 04 1. Hydraulic unit ABS "N55" used ABS "L 04". Hydraulic unit N55 and control unit L 04 cannot be separated. Installation location: in the engine compartment, front left. Hydraulic unit "N55" with integrated pressure sensor in the brake system G201 and control unit "L 04" form a hydraulic control unit. The components of the unit cannot be separated. Do not disconnect the plug connector until the end of the self-diagnosis. Before disconnecting the plug connector, switch off the ignition. Pressure sensor in the brake system "G201" is integrated into the hydraulic unit "N55" and cannot be replaced; 2. ESP bracket. Removing the bracket is prohibited.; 3. Plug connector of the control unit L 04; 4. Brake line to the master cylinder. 14 Nm; 5. Brake line to the master cylinder. 14 Nm; 6. Brake lines. Connects the hydraulic unit and the front right brake caliper, 14 N·m. Connects the hydraulic unit and the front left brake caliper, 14 N·m. Connects the hydraulic unit and the rear left brake caliper, 14 N·m. Connects the hydraulic unit and the rear right brake caliper, 14 N·m


Removal


Removal


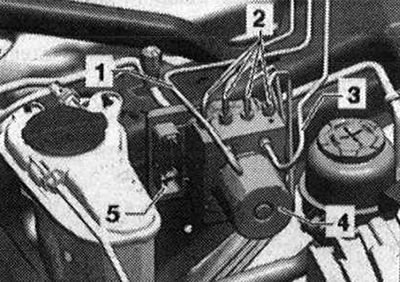
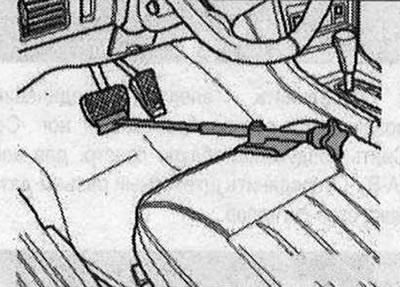
Read and record the control unit modification. Use the diagnostic complex "VAS 5051B" or "VAS 5052" for this. Disconnect the battery, taking into account the coding of the radio. Install the spacer "V.A.G 1869/2" between the brake pedal and the driver's seat, pressing the brake pedal at least 60 mm.
Read and record the control unit modification. Use the diagnostic complex «VAS 5051B» or «VAS 5052»…


This closes the master cylinder valves and the brake fluid reservoir does not remain empty. Connect the bleeder tank hose to the bleeder nipple of the front left brake caliper. Connect the bleeder tank hose to the bleeder nipple of the rear left brake caliper. Open the bleeder nipple of the front left and rear left brake caliper to relieve pressure in the hydraulic unit "N55". Close the front left and rear left bleeder nipple. Do not remove the spacer. VAG 1869/2.


This closes the master cylinder valves and the brake fluid reservoir does not remain empty. Connect…


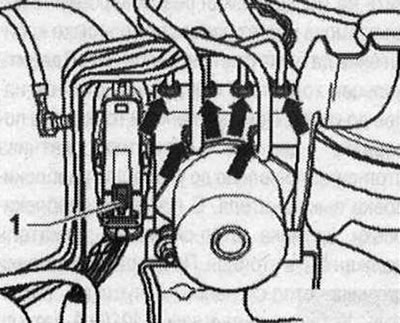
Move the lock "1" of the control unit plug connector to the lower position. Move the locking bracket "in the direction of the arrow" and disconnect the plug. Make sure that brake fluid does not get into the control unit connector housing. This may lead to corrosion of the contacts and, as a result, to failure of the system.
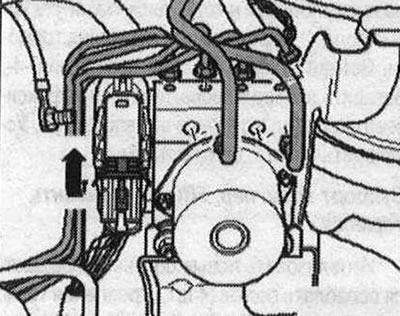
Move the lock «1» of the control unit plug connector to the lower position. Move the locking…


Clean the contaminated plug housing thoroughly with compressed air. To collect the escaping brake fluid, simply place a lint-free rag under the used "L 04" and the "N55" hydraulic unit. Mark the brake lines for subsequent installation. Loosen the bolts securing the brake lines running from the N55 hydraulic unit to the master brake cylinder. Loosen the bolts securing the remaining "arrow" brake lines from the "N55" hydraulic unit.


Close the brake lines and threaded holes with plugs from the repair kit. Carefully remove the "N55" hydraulic unit from the used "L 04" from the bracket upwards. When removing the ESP control unit from the bracket, make sure that the rubber stops do not fall into the engine compartment. Place the "N55" hydraulic unit from the used "L 04" down on a clean, level surface. After removing the "L 04" control unit and the "N55" hydraulic unit, it is necessary to close the threaded holes and brake lines with plugs.

Installation


Installation is carried out in reverse order, while taking into account the following: for servicing, the hydraulic unit "N55" must be filled with brake fluid. The plugs from the new hydraulic unit "N55" should only be removed when the corresponding brake line is installed. If the plugs are removed from the hydraulic unit "N55" before installing the corresponding brake line, brake fluid will leak out. In this case, sufficient bleeding of the brake system is not guaranteed. All rubber stops must be inserted into the bracket. Press down on the hydraulic unit "N55" with the used "J104" and insert it into the bracket. When installing
The article was checked by auto expert Timur Bazhenov
This article is available at russian, bulgarian, belarusian, ukrainian, serbian, croatian, romanian, polish, slovak, hungarian

Share information:
Previous articles
Audi Q Q5 Type 8R: Brake system
Next articles

Removal the steering wheel angle sensor «G85»
Removal the ESP sensor unit «G419»
Roof Rack Recognition Sensor «G625»
Removal the brake light sensor
ABS/ESP Speed Sensors
Front Wheel Brake Installation Diagram FBC-60
Removal the brake caliper and front brake bracket
Front brake caliper FBC-60. Replace brakes


Similar articles on other Audi car models:
Camshaft and hydraulic tappets — removal Audi 80 B3 (1986-1991, petrol)
Cylinder block/crankcase — cleaning and inspection Audi 100 C3 (1982-1990, diesel)
Bleeding air from the clutch hydraulic system Audi A3 Type 8L (1996-2003)
Hydraulic tappets Audi A4 B5 (1994-2001, petrol)
Checking hydraulic valve lifters Audi A6 C5 (1997-2004)
Checking hydraulic valve lifters Audi A8 D2 (1994-2002)
Checking hydraulic tappets Audi A2 (1999-2005)
Link to this page in different formats


Visitor comments

No comments yet


How much will 24 + 45 =


Q7 4L(2005-2015, diesel) 
  • General information
  • Operating instructions
  • Maintenance
  • Power unit
  • Diesels 3.0 l (BUG, BUN, CAS)
  • Diesels 3.0 l (CATA, CCMA)
  • Diesels 3.0 l (CJGA/CJGC)
  • Diesels 4.2 l (BTR, CCFA/CCFC)
  • Cooling system
  • Fuel and exhaust system
  • Engine management system
  • Starting and charging
  • Transmission
  • Automatic gearbox
  • Drive shafts
  • Chassis
  • Brake system
  • Front suspension
  • Rear suspension
  • Steering system
  • Body
  • Air conditioner
  • Exterior
  • Interior
  • Electrical equipment
  • Equipment and devices
  • Electrical circuits
 
Q5 8R(2008-2017) 
  • General information
  • User manual
  • Power unit
  • Petrol engine 2.0 l
  • Petrol engine 3.2 l
  • Fuel system (petrol)
  • Diesel 2.0 liter (CA)
  • Diesel 2.0 liter (CG/CJ/CM)
  • Diesel engine 3.0 l
  • Fuel system (diesel)
  • Transmission
  • Manual gearbox 0B1
  • Manual gearbox 0B2
  • Automatic gearbox 0B5
  • Automatic gearbox 0B6
  • Chassis
  • Front suspension
  • Rear suspension
  • Brake system
  • Steering
  • Body
  • Exterior
  • Interior
  • Doors, locks and windows
  • Safety system
  • Ventilation and heating
  • Electrical equipment
  • Power devices
  • Equipment and devices
  • Lighting and alarm
  • Audio system
  • Electrical circuits
 
AudiManual.ru © 2017-2026 · Mobile version · Feedback · Sitemap: EN BG BY UA RS HR RO PL SK HU · Site search · News and articles
80 B2 · 80 B3 petrol · 80 B3 · 80 B4 · 100 C3 diesel · 100 C3 petrol · 100 C3 · 100 C4 petrol · 100 C4 · A3 Type 8L · A4 B5 petrol · A4 B5 · A4 B6 petrol · A4 B6 · A4 B7 · A4 B8 · A6 C4 · A6 C5 · A6 C5 Allroad · A8 D2 · Q5 Type 8R · Q7 Typ 4L · Audi A2 ·
This site uses cookies 🍪. Click the button to accept this fact.